Do you want to customize your WooCommerce checkout page to enhance your store’s user experience?
eCommerce stores have come a long way. The checkout experience on popular sites is modern and optimized for conversions.
Most businesses aim to create an incredible checkout page that uses high-converting elements that reassure users of their purchases and drive sales.
WooCommerce comes with a default checkout page, but it isn’t optimized to make conversions.
And that’s why improving your WooCommerce checkout experience is the key - but without installing many plugins or using complex code snippets!
By replacing the default checkout with a customized design, you can get high conversion rates and generate more sales.
In this post, we’ll demonstrate the easy, step-by-step process of how to customize the WooCommerce checkout page. And that too without writing any custom codes, customizing the CSS, or editing checkout action hooks.
We’ll also give you some bonus tactics to implement for a streamlined checkout process.
Watch this mini masterclass to get 20 proven tips on WooCommerce checkout page customization:
Contents
Today's eCommerce customers are discerning; they seek good experiences and want to shop from credible websites. Forbes notes website design, checkout design, payment processing and online support are front and center for today's customers.
They value consistency in branding, payment convenience, and a smooth shopping experience.
Thanks to top stores like Amazon, Macy’s, and Zappos, you can’t afford to drop the ball at the final step, i.e., the checkout page!
You don’t want to disappoint users by leading them to a checkout page that doesn’t win confidence.
Here’s the default WooCommerce checkout page:

Note the major issues with this checkout page:
That’s not all!
There are no express payment options such as Apple Pay and Google Pay to enable faster checkout. No Google address autocomplete to minimize shipping address-related errors. Also, notice that the checkout process is single-step, which looks rather overwhelming.
Having said that, WooCommerce is a self-hosted platform and being open-source gives you full control over your website. It's also a lot cheaper to get started with WooCommerce.
Also, WooCommerce runs on WordPress, which powers more than 43.3% of all websites on the internet.
Thus, it’s important to customize the WooCommerce checkout page and increase conversions.
An optimized and well-tailored checkout page can positively impact your online business.
Do you know the average conversion rate of the default WooCommerce checkout page is 0.3%? This is exactly what could be turning your best people away.
Thus, you should customize your WooCommerce checkout page in WordPress to improve conversions in your store.
Here are some benefits associated with a custom WooCommerce checkout page:
Let’s take a look at a custom WooCommerce checkout page that really stands out from the default one:
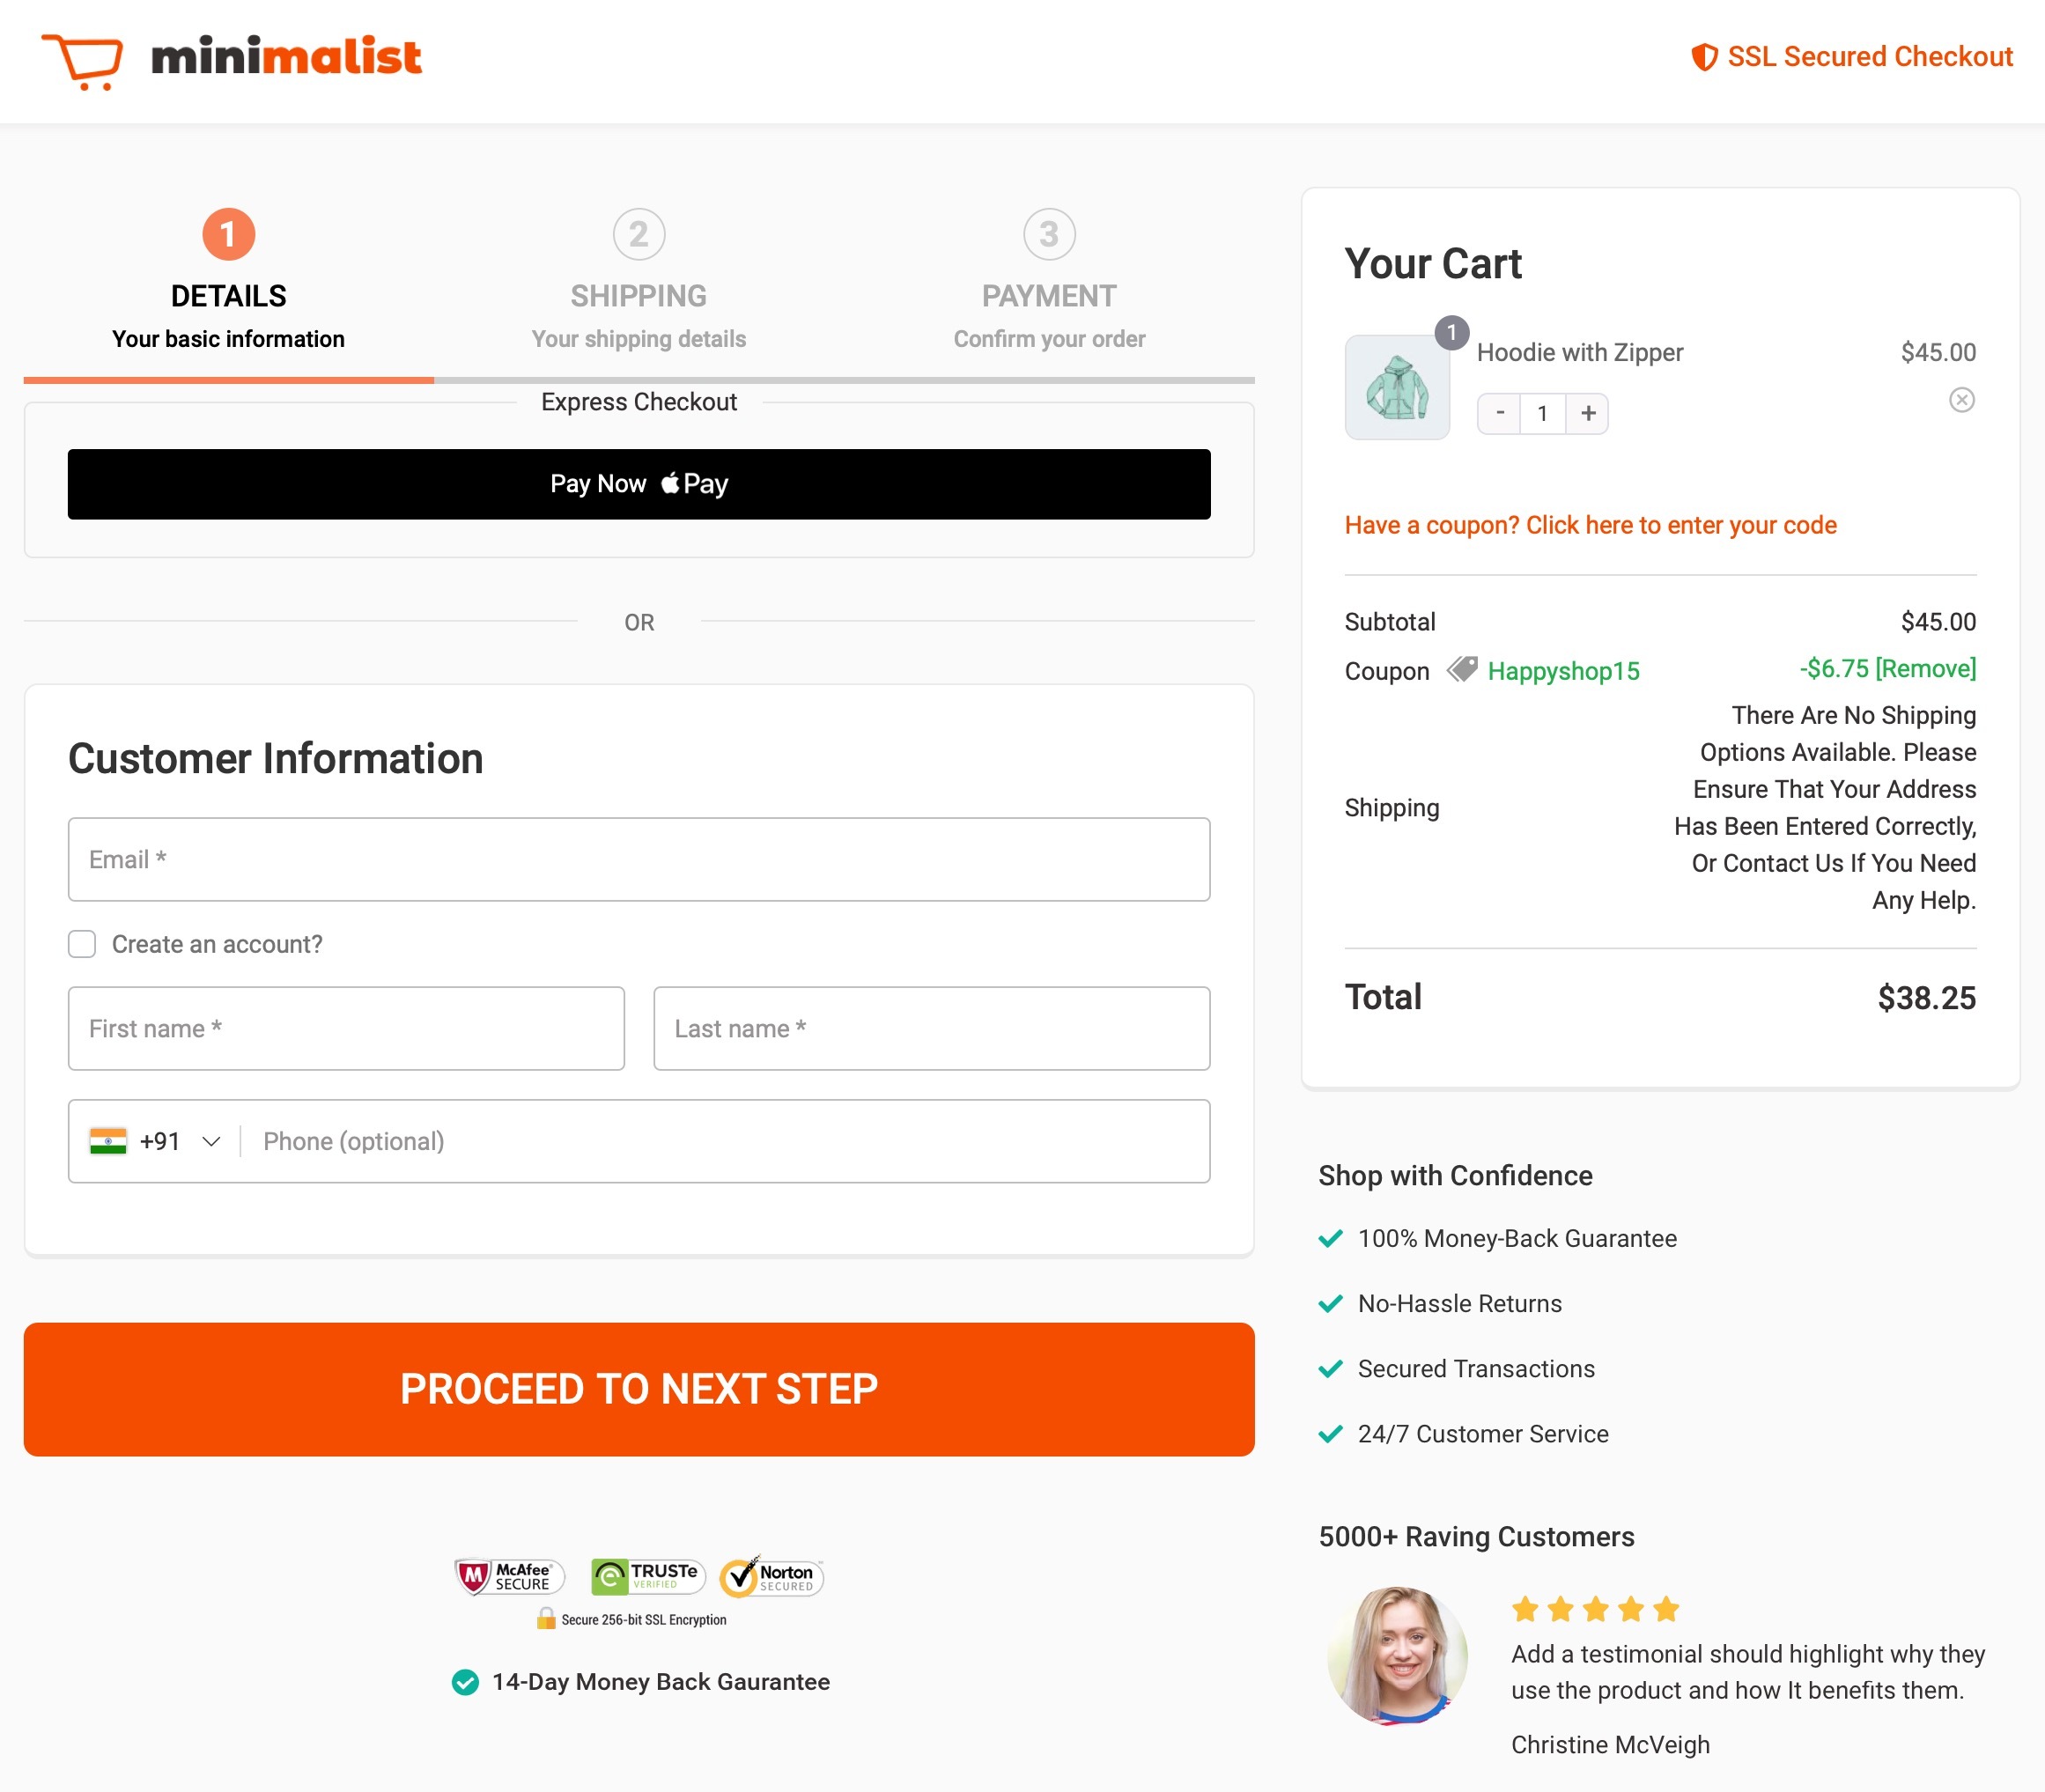
Here are some of the elements that make the custom-designed checkout page high-converting:
Such elements surely make a high-converting custom checkout page.
In this section, let's look at how to customize your WooCommerce checkout page.
To create a custom checkout page in WooCommerce, we will be using the only plugin - FunnelKit Funnel Builder.
FunnelKit is a complete WooCommerce checkout manager plugin built to create lead generation and sales funnels using custom pre-designed templates.
You can create your opt-in pages, sales pages, custom checkouts, order bumps, one-click upsells and downsells, thank you pages, and more.
It allows you to create a dedicated store checkout page in single-page or multi-step formats. Further, enabling you to activate Google address autocomplete, express pay options, and more.
The best thing is FunnelKit has both free and premium versions - which works out of the box with WooCommerce and WordPress as a whole.
Get a copy of the FunnelKit Funnel Builder from the button below:
Check out our complete guide to install and activate the Funnel Builder on WordPress.
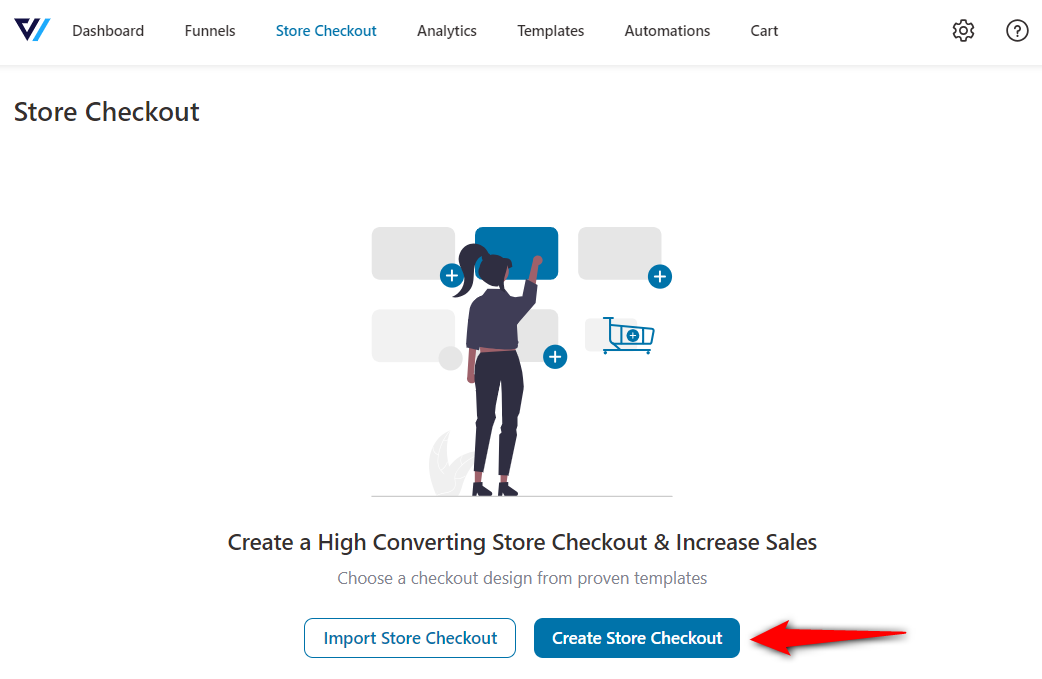
Here we will add a global or store checkout to replace the default WooCommerce checkout.
Go to FunnelKit ⇨ Store Checkout and click on the ‘Create Store Checkout’ button.
You’ll get directed to the FunnelKit templates page.
We have a bunch of pre-built checkout templates to choose from. Different templates are built to serve different niches and goals. So whatever your goal may be, we have a funnel template to help you achieve it!
FunnelKit works with all page builders, including Elementor, Divi, Oxygen, and Gutenberg. You can create your pages using shortcodes if you want to use any other builder.
Choose the page builder and hit ‘Preview’ on the template you like.
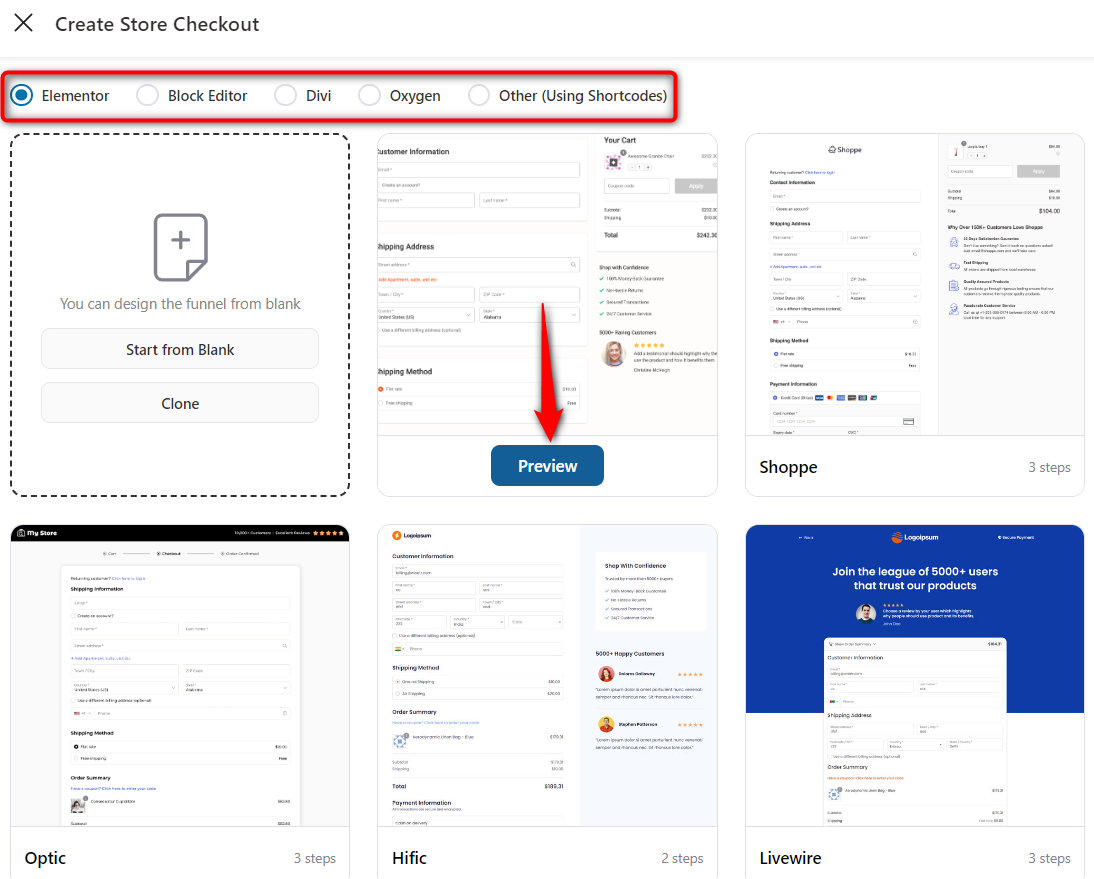
You can view every checkout template in our library in one, two, or three-step formats. We've chosen the three-step format for our article.
From the top, view the mobile-optimized version of your chosen checkout page template.
Once done, click on ‘Import This Funnel’ and name your store checkout.
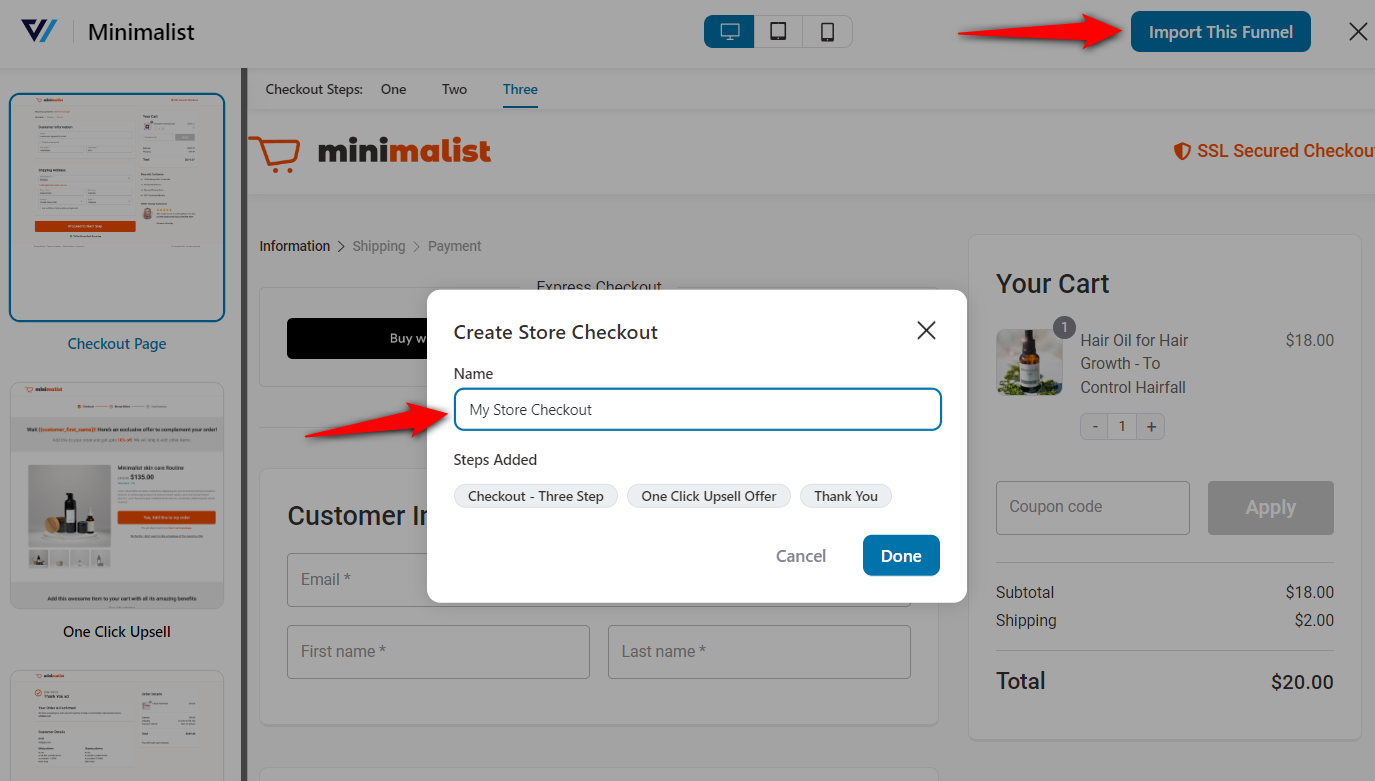
Clicking on ‘Add’ will import the funnel to your workspace.
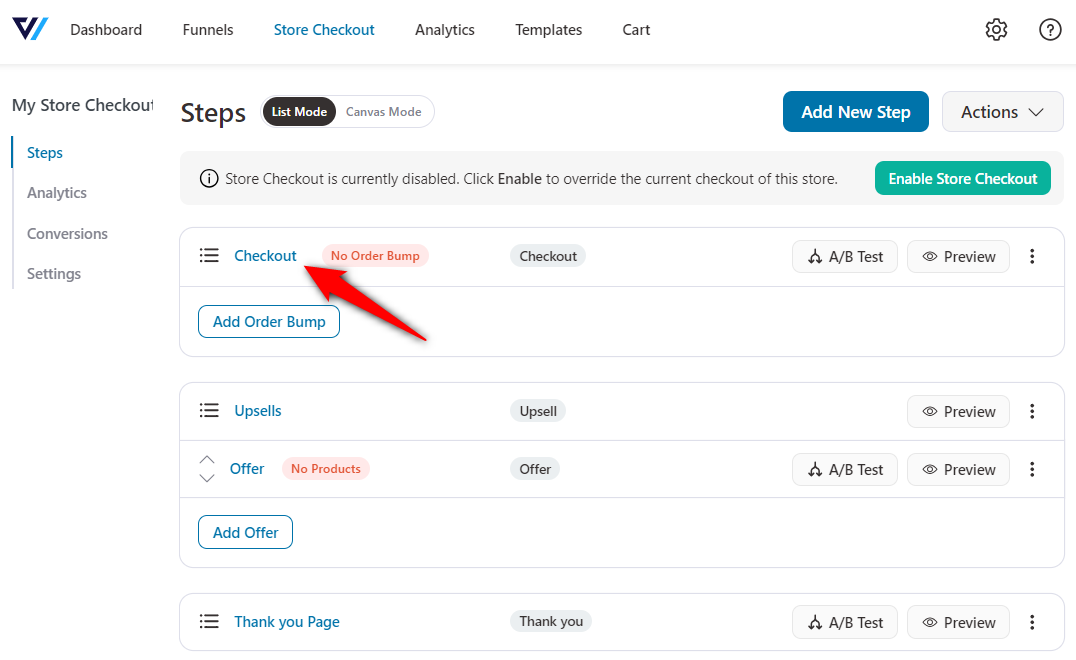
This part of the post will cover your 'How do I customize my WooCommerce checkout page?' query in detail.
Hit the name of your WooCommerce checkout page to start customizing it.
You can customize your WooCommerce checkout template from the Design tab. To do that, click on ‘Edit Elementor Template’.
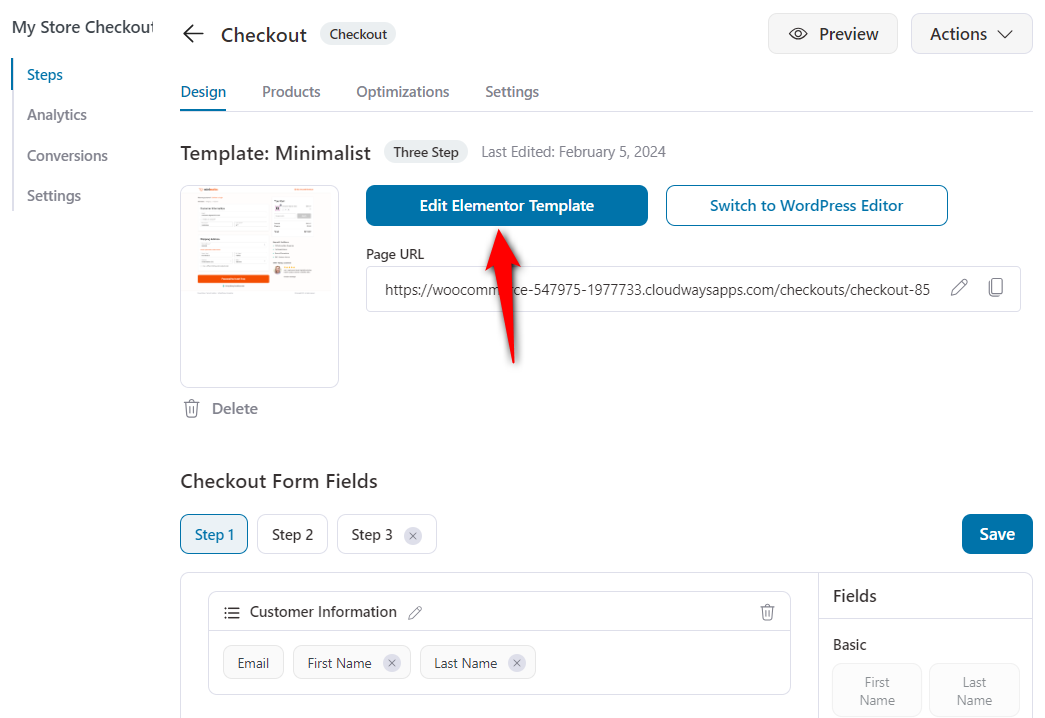
This template will open up in your preferred page builder. You’ll be able to customize your checkout page template in the same way you design pages in WordPress.
Let’s follow the WooCommerce checkout page customization:
Click on the logo and upload your brand’s logo from the left-side menu.
Just upload the logo from your system and you’re good to go!
Once you’ve added your logo, you can set its width, height, opacity, CSS filters, border radius, alignment, and more.
Click on the checkout form and you’ll see the customization options in the left-hand menu.
Enable the steps for your multi-step checkout and edit the headings of each. For example, your steps 1, 2 and 3 can be the ‘Customer Details’, ‘Shipping Details’ and ‘Payments’ respectively.
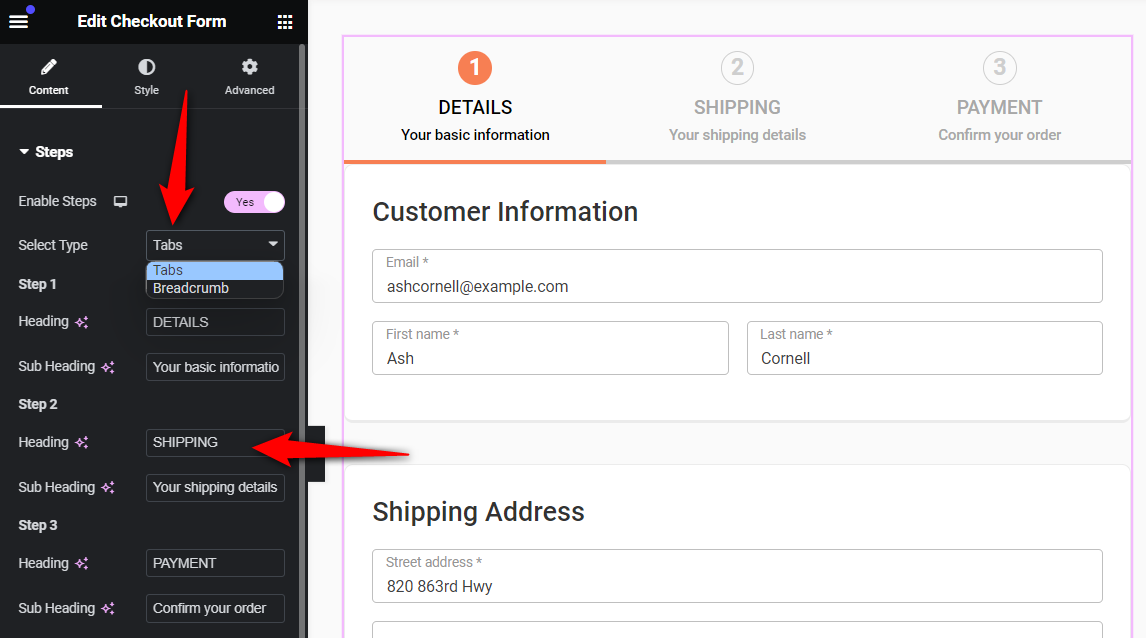
You can even customize the collapsible order summary, information and shipping/billing field widths, coupon section, order summary, and more.
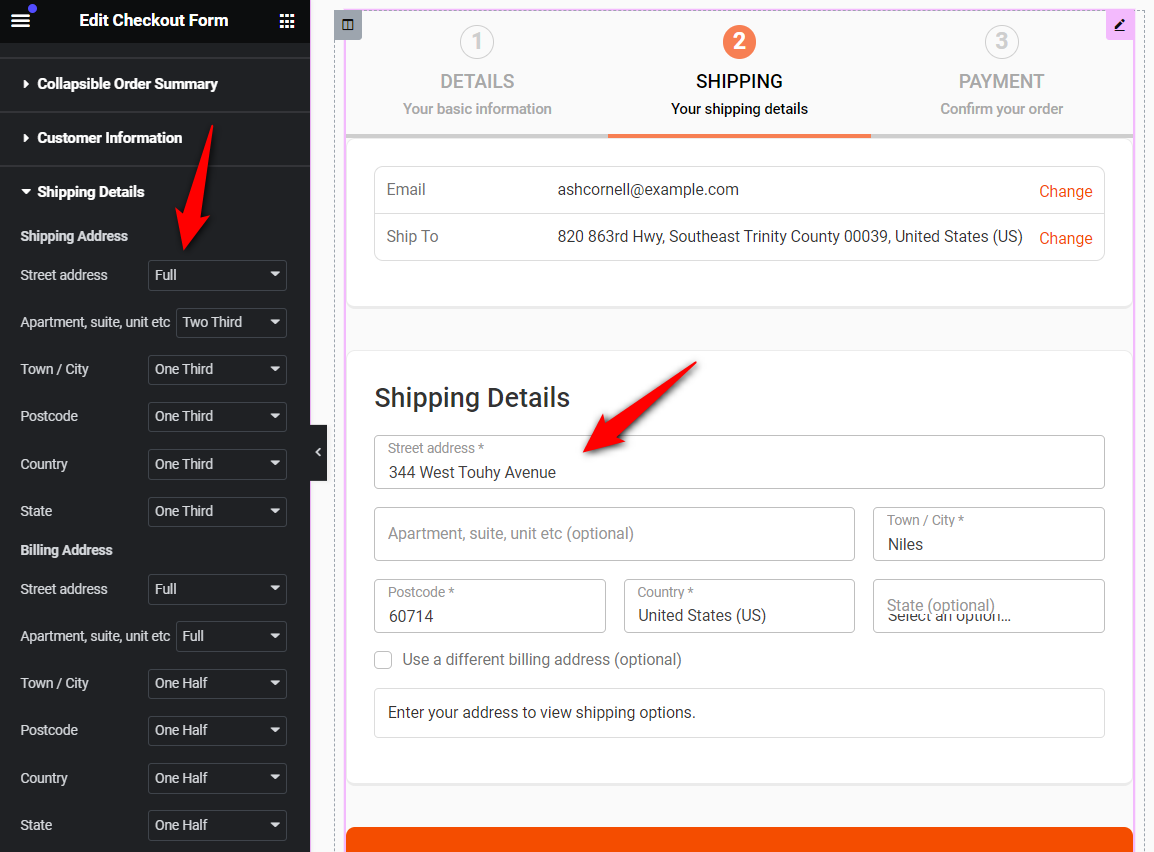
Change the widths of your shipping and billing addresses from here:
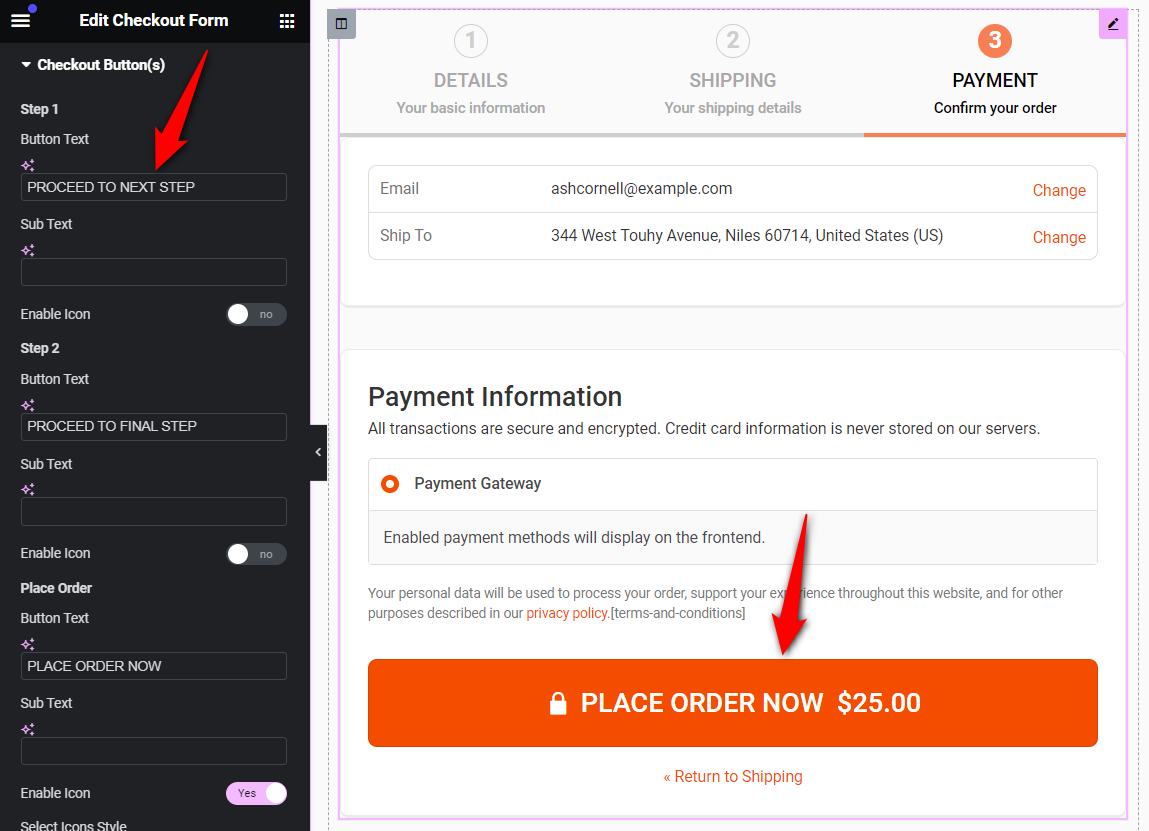
You can even modify the checkout call to action (CTA) button text, enable the icon and price on the button, and so much more.
By going into the Style tab, customize the button width, alignment, typography, icon color, font size, background color, and more.
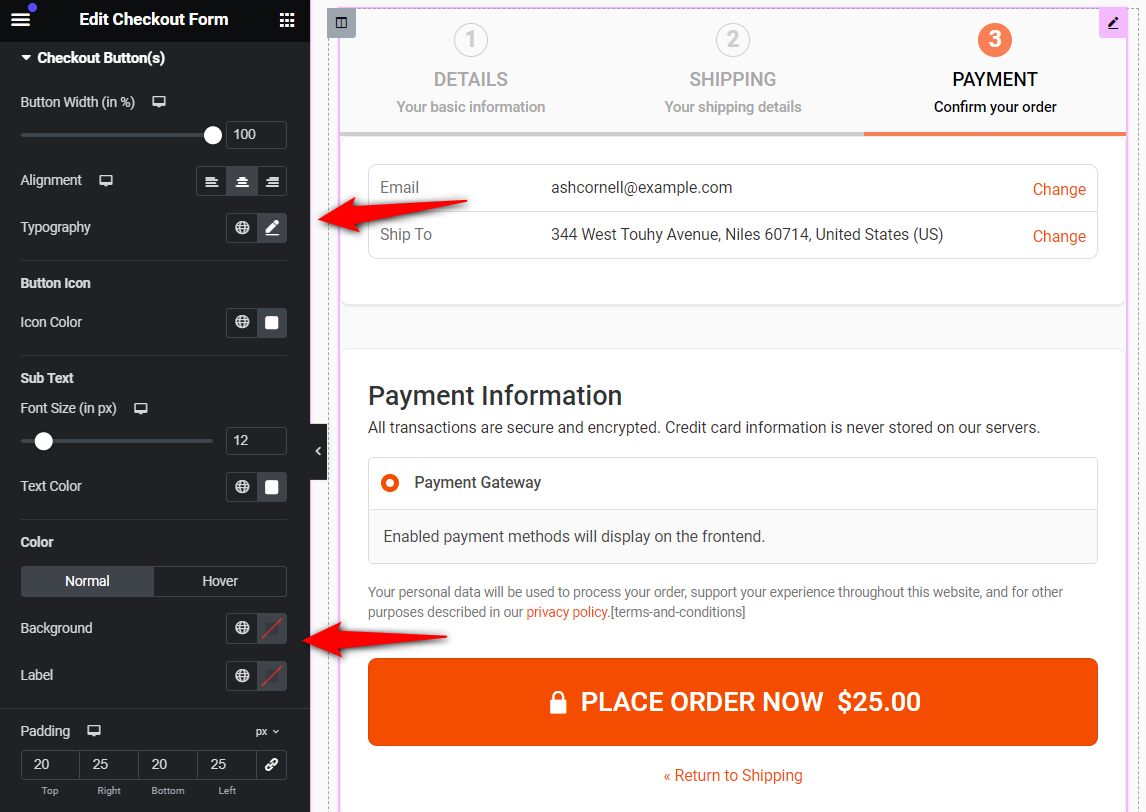
This section has successfully answered your 'How do I customize my WooCommerce checkout button?' query.
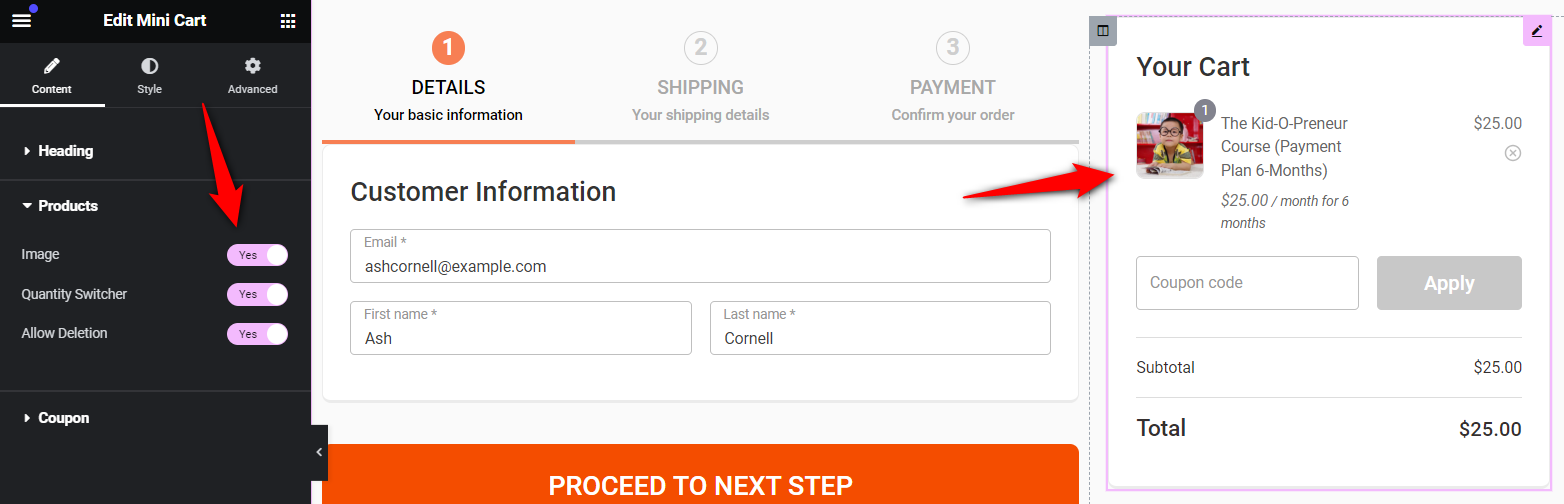
The mini cart enables your shoppers to edit the items in their shopping carts, including adjusting the quantities and deleting any items as per their needs.
From the mini cart widget, you can edit the title of your cart, enable or disable product images, quantity switcher, allow item deletion, etc.
Further, you can even enable or disable the coupon section on the checkout, turn on the collapsible format and modify the coupon button text.
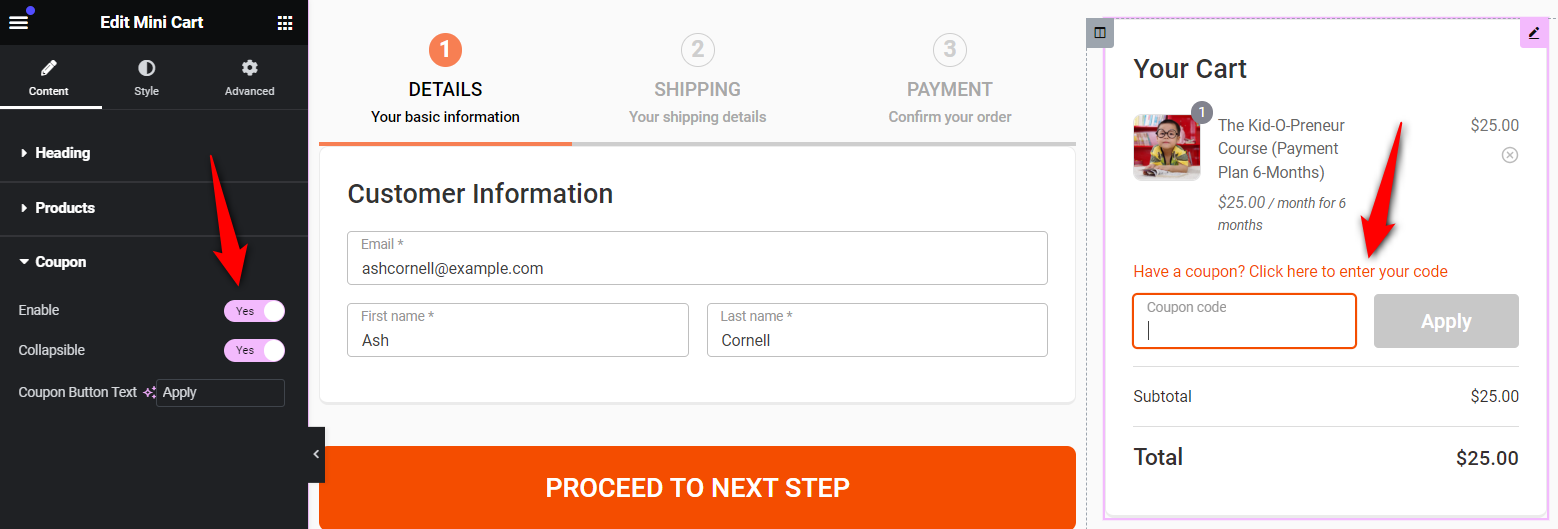
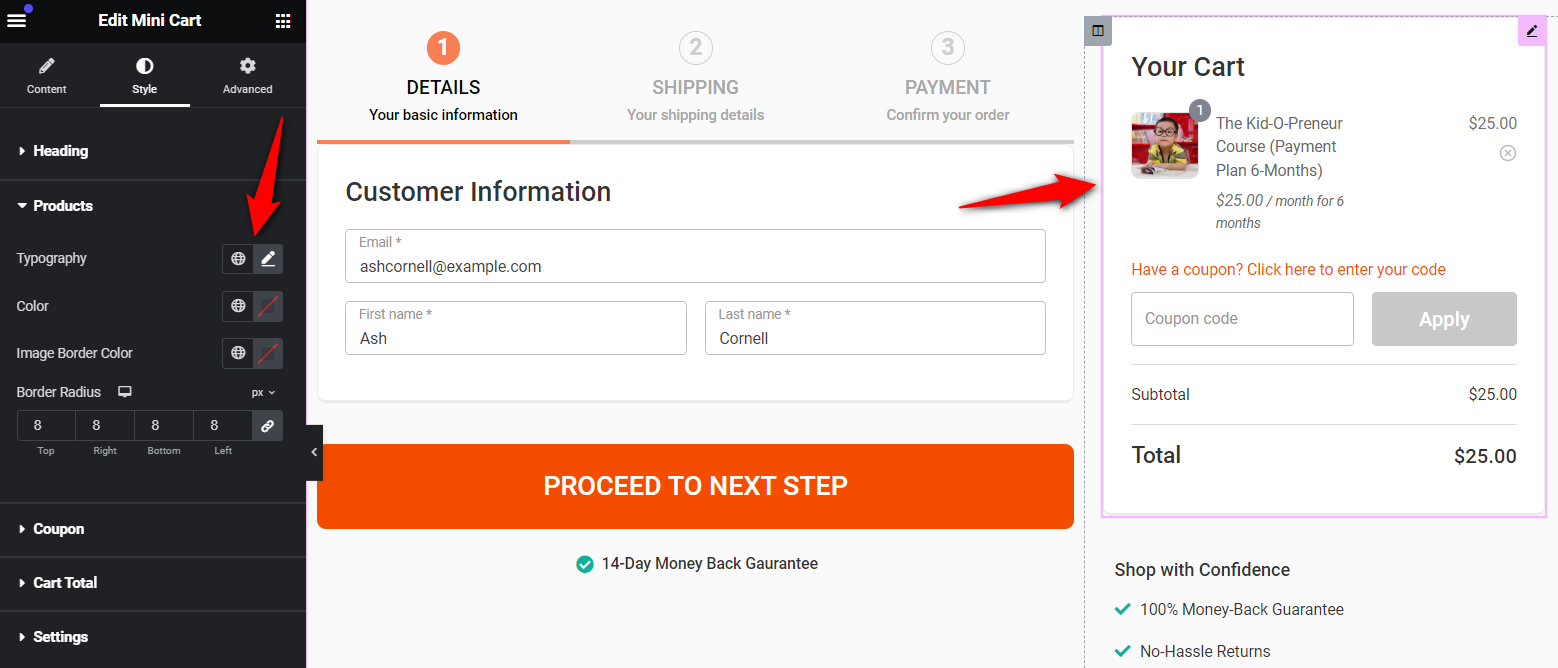
Here, the Style tab lets you customize the typography, color and alignment of your headings, products, coupon section, cart total, and more.
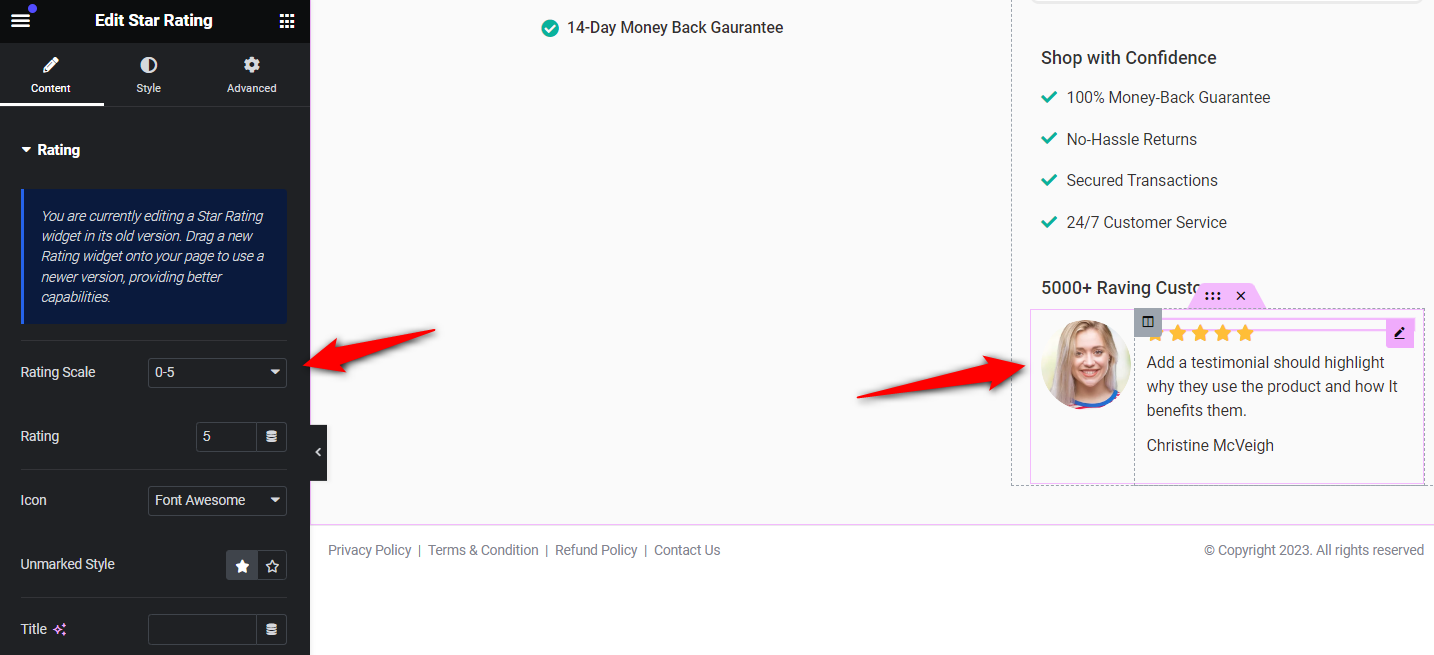
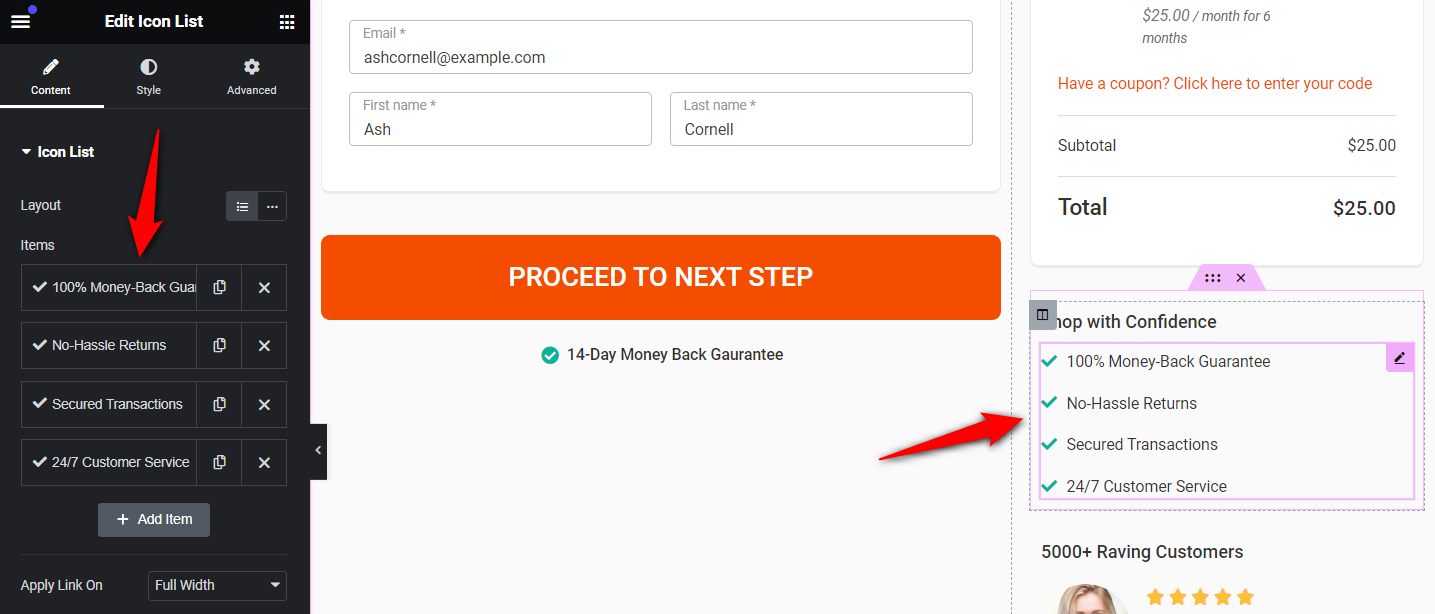
Customer reviews or social proofs are great to encourage new shoppers to trust the brand and nudge for a purchase.
Click on the reviews and customize the text from the left-hand side menu.
Modify the customer photos, ratings, names and content of the testimonial on your WooCommerce checkout page.
Your assurance section helps users to place orders without any second thoughts.
Click on the assurance text and edit it as per your need.
Once done, make sure to hit the ‘Update’ button to save all the changes made.
Go back to the ‘Design’ tab to start making changes to the WooCommerce checkout fields.
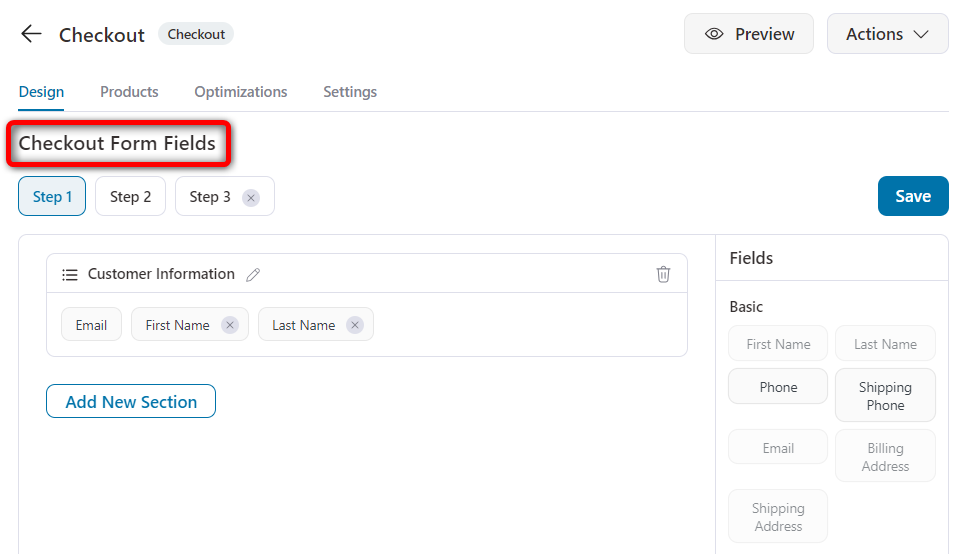
With FunnelKit’s built-in checkout field editor for WooCommerce, you can add, edit, rearrange, or delete fields and sections within the checkout form.
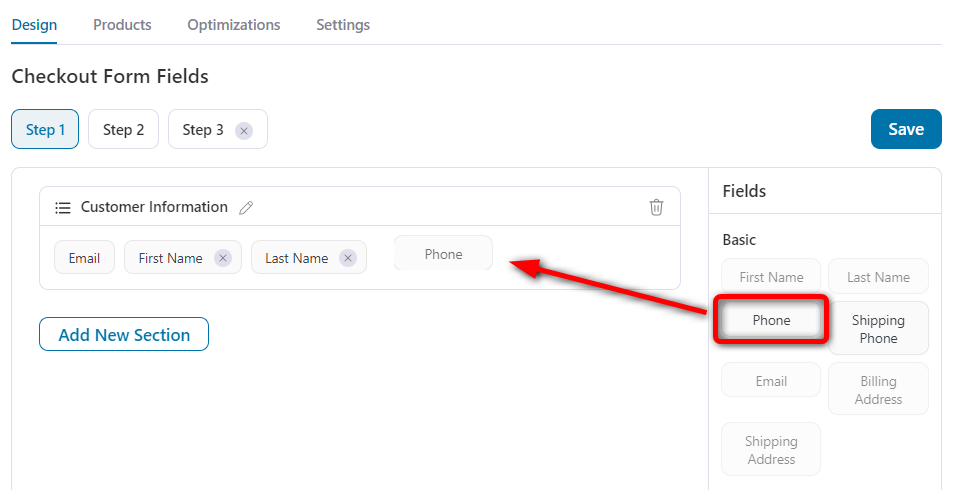
Add more fields by dragging them from the right-hand section and dropping them onto your form.
Let’s suppose you have to add a phone number to your information field, you can do it with a simple drag and drop.
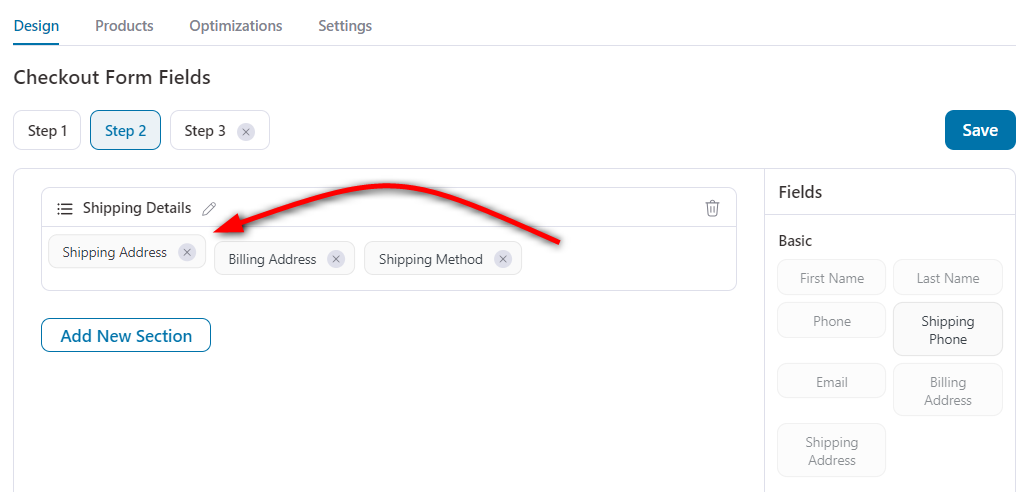
Rearrange different fields or sections on your form by dragging and dropping them onto your checkout form.
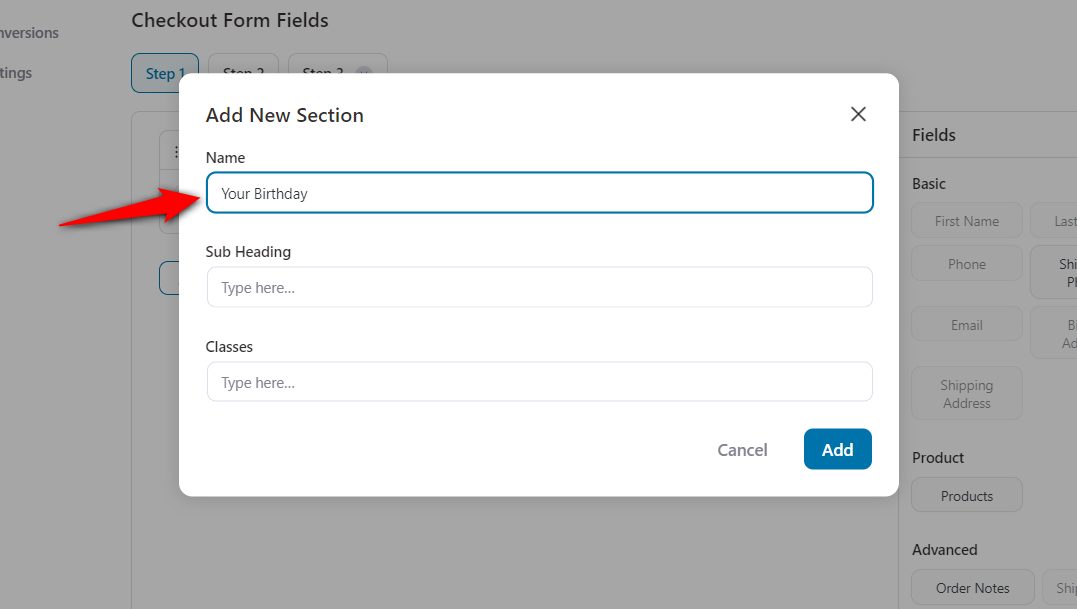
You can even add and organize different sections by clicking on the ‘Add Section’ button.
Enter the name of your new section in the popup window. Make sure to write the section name clearly because it’ll be visible to your customers.
This will add a new section to your WooCommerce checkout form.
You can add new custom fields to your WooCommerce checkout form.
To do that, click on the ‘Add New Field’ button.
You can choose from the following custom field types:
Specify the label name, field ID (order meta key), options (if required), default value, placeholder, and more.
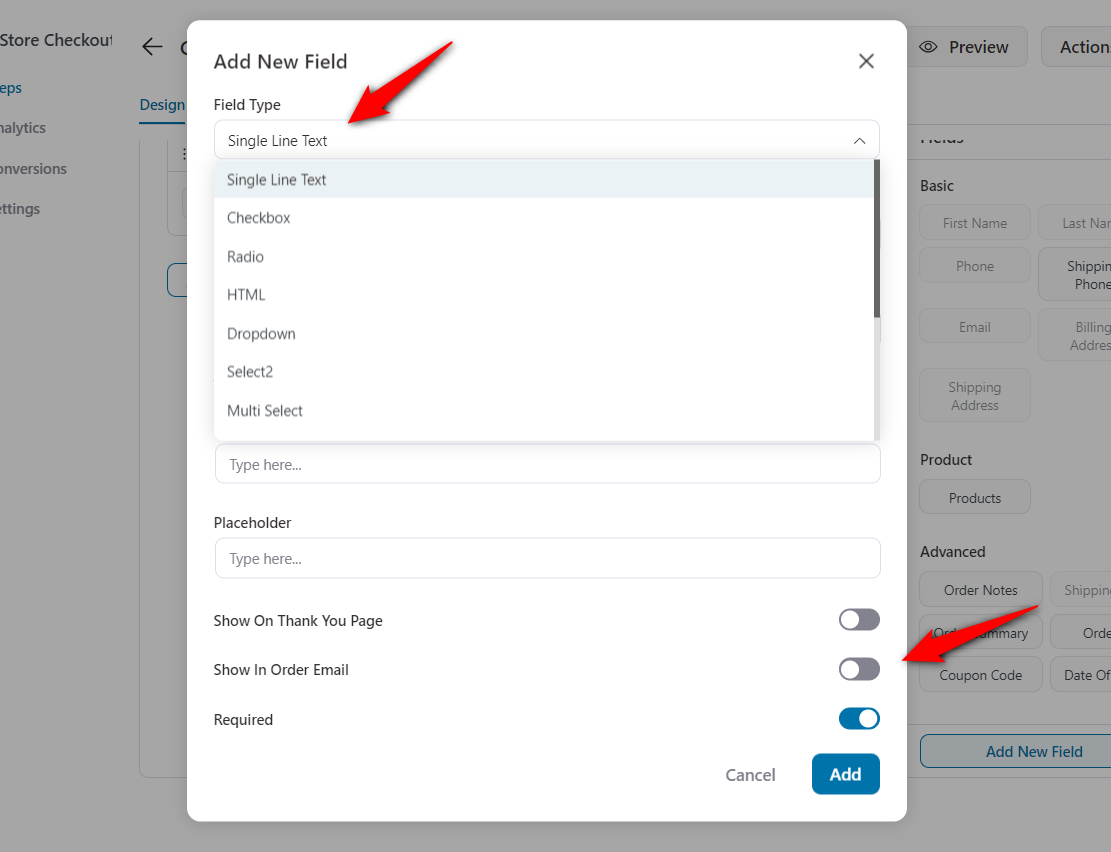
Clicking on ‘Add’ will create a new custom field.
We hope this answers your 'How to add custom field in woocommerce checkout page' query.
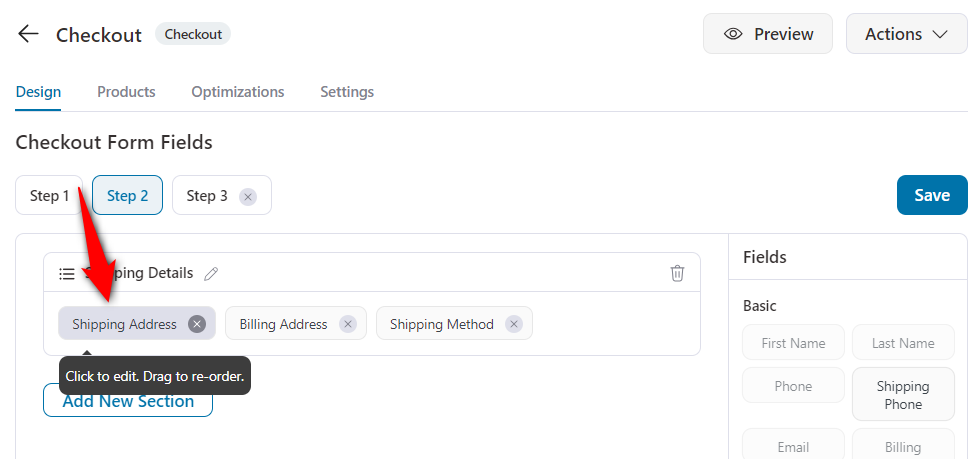
You can edit your checkout fields to customize them as per your needs.
To edit, click on a field on your checkout form. Let’s say you want to edit the ‘Shipping Address’ field.
Now, here you can choose the fields you want to show inside the Shipping Address detail on the checkout page.
You can even edit their label, placeholder and enable or disable the ‘Required field’ criterion.
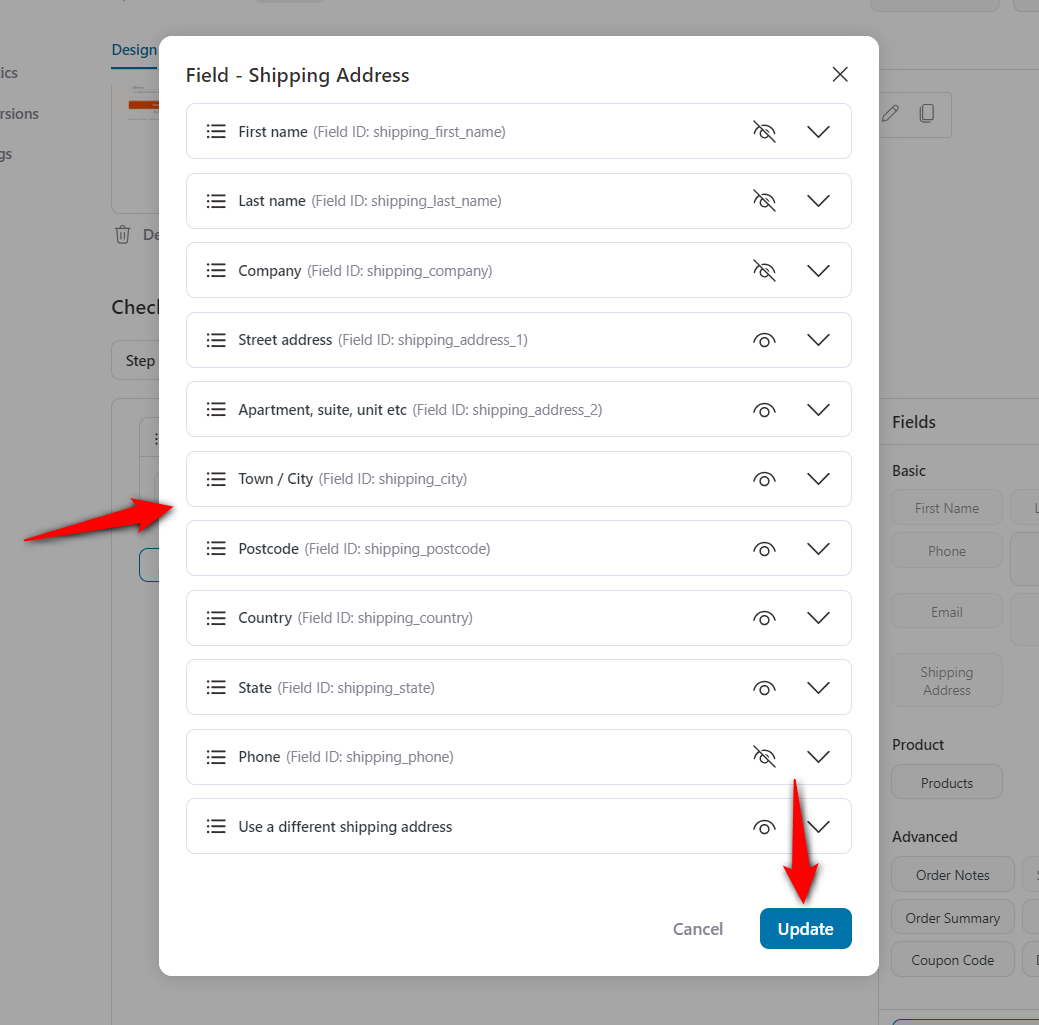
Once you’re done, scroll down and hit ‘Update’ to save the changes.
Hover over the field you want to remove and click on the red cross ❌ button. This will delete the checkout fields.
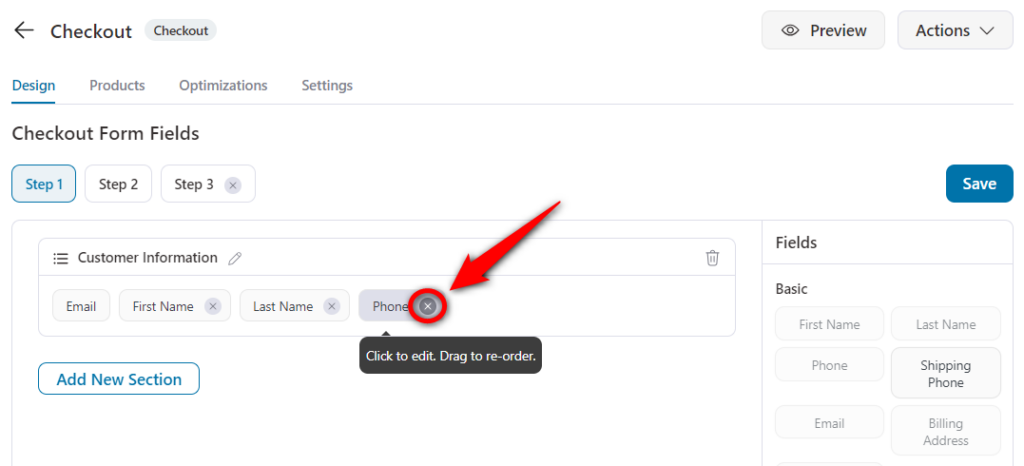
To remove a section, click on the bin icon on that particular section. Once done, hit the ‘Remove’ button when it asks for confirmation to delete that section.
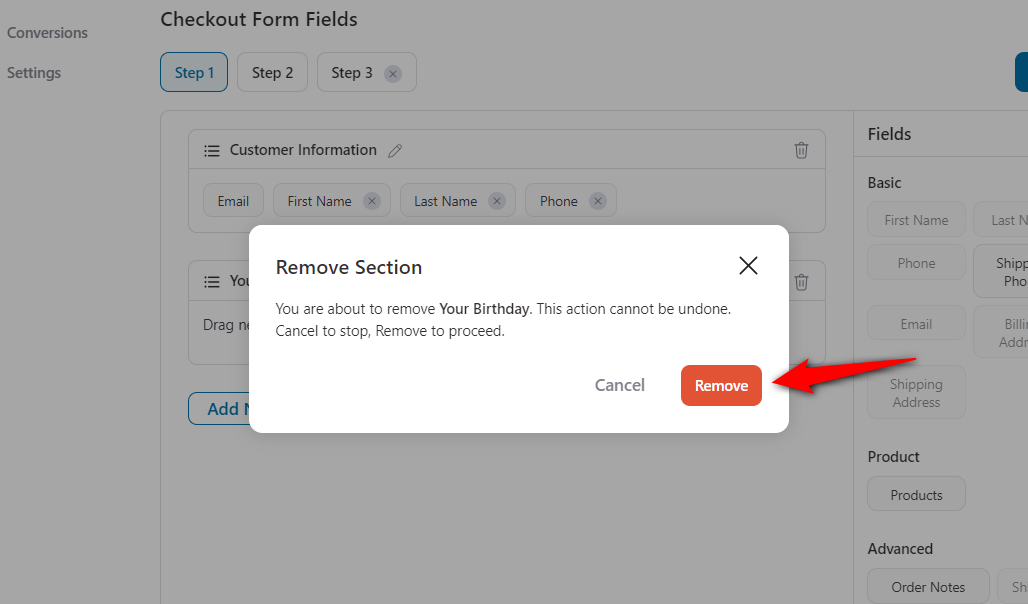
Hit ‘Update’ to lock all your changes made.
FunnelKit Funnel Builder lets you optimize your WooCommerce checkout page for a seamless buying process.
To do that, go to the Optimizations section in FunnelKit:
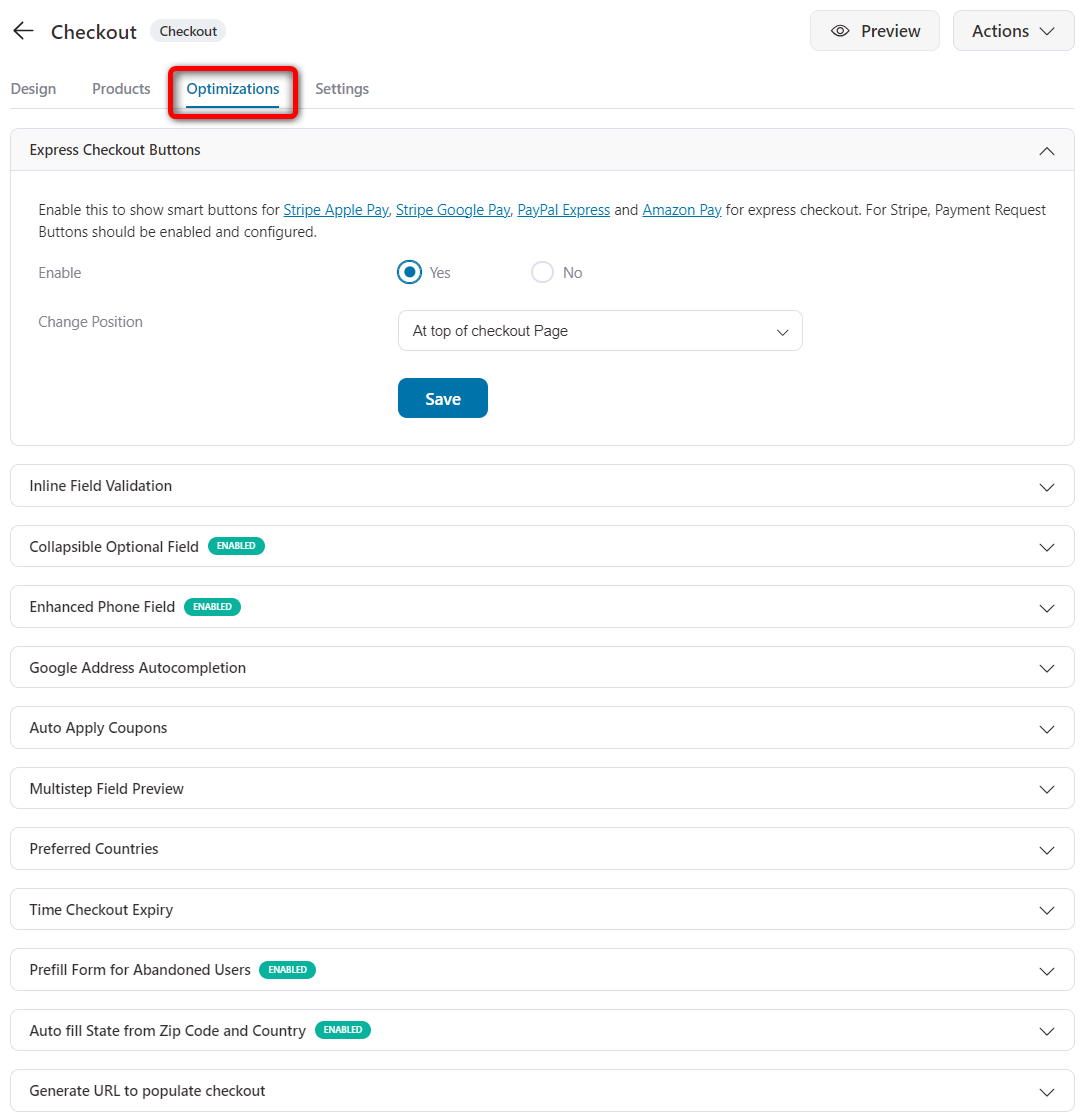
Here are some of the optimizations you can implement on your checkout page in WooCommerce:
Click on ‘Save’ once done.
👉 Learn our 23 WooCommerce checkout optimization tactics to boost your conversions here.
A thank you page is the last step of your customer’s buying process. So it becomes important to stand out and seal the deal on a higher note.
It’s important to express gratitude to your customers for their purchases.
Not just that, you also need to punch up a notch by offering exclusive discounts on your customer’s next purchase, presenting relevant product recommendations, sharing your social media accounts, and so much more.
👉 Read our complete post on creating custom WooCommerce thank you pages here.
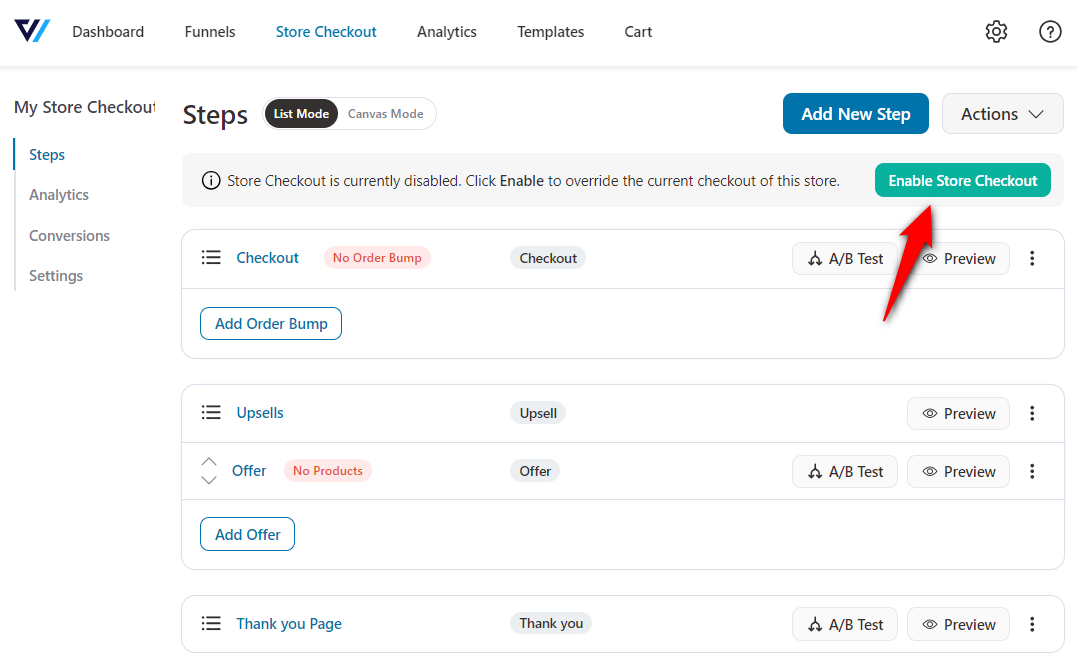
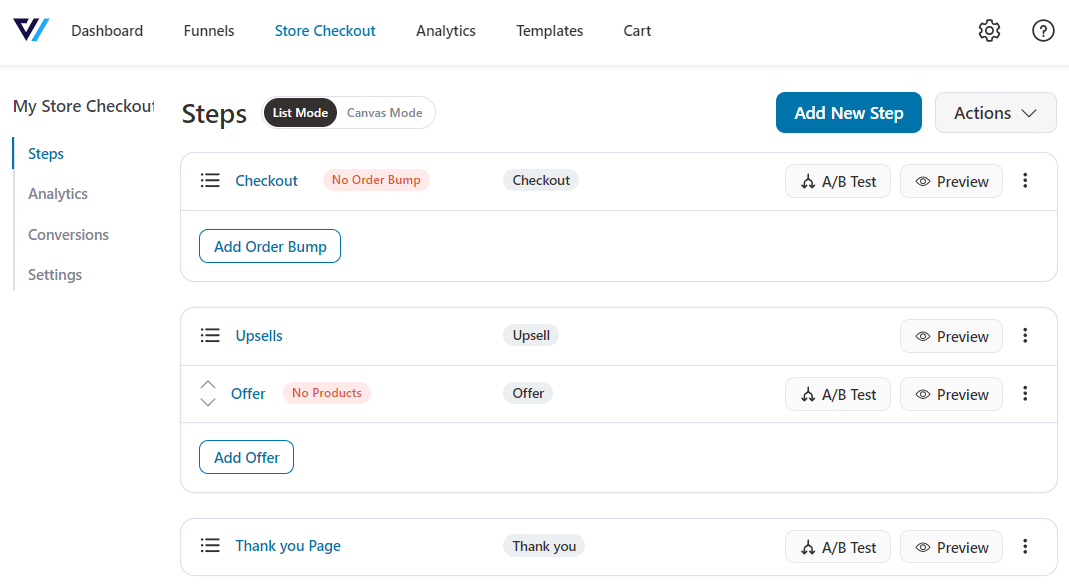
Return to your store checkout funnel.
Turn on the toggle next to Enable Store Checkout to activate your custom WooCommerce checkout page on your store.
That's it! This is how you can customize WooCommerce checkout page for a seamless buying experience.
Customizing your WooCommerce checkout page is an ever-improving process. It requires consistent testing and measuring to enhance your checkout page for better conversions overall.
It’s crucial to test your checkout pages by going through the entire checkout process and making test transactions. This ensures that everything works properly.
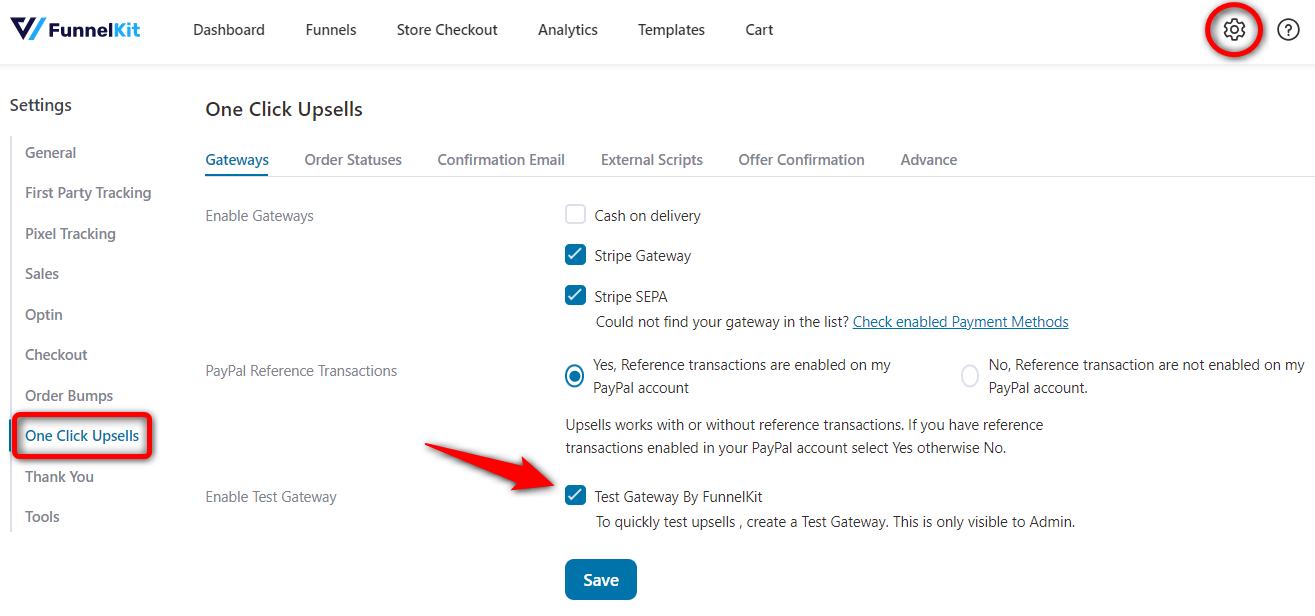
You can test your checkout page by enabling the test gateway from FunnelKit.
Go to FunnelKit Settings ⇨ One Click Upsells. Under the Payment Gateways, enable Test Gateway by FunnelKit.
Now do a real test of the store checkout flow in your store.
Go through the traditional flow by going to the products page, adding an item to your cart, moving to the cart page and then heading to the checkout.
If you want, you can directly skip your WooCommerce cart pages.
On the custom checkout page, complete the transaction using the test gateway to ensure everything works smoothly.

Once everything works, you can activate it to go live.
As your checkout page goes live and shoppers start making their purchases, you can track its performance in real-time.
Go to your store checkout funnel.
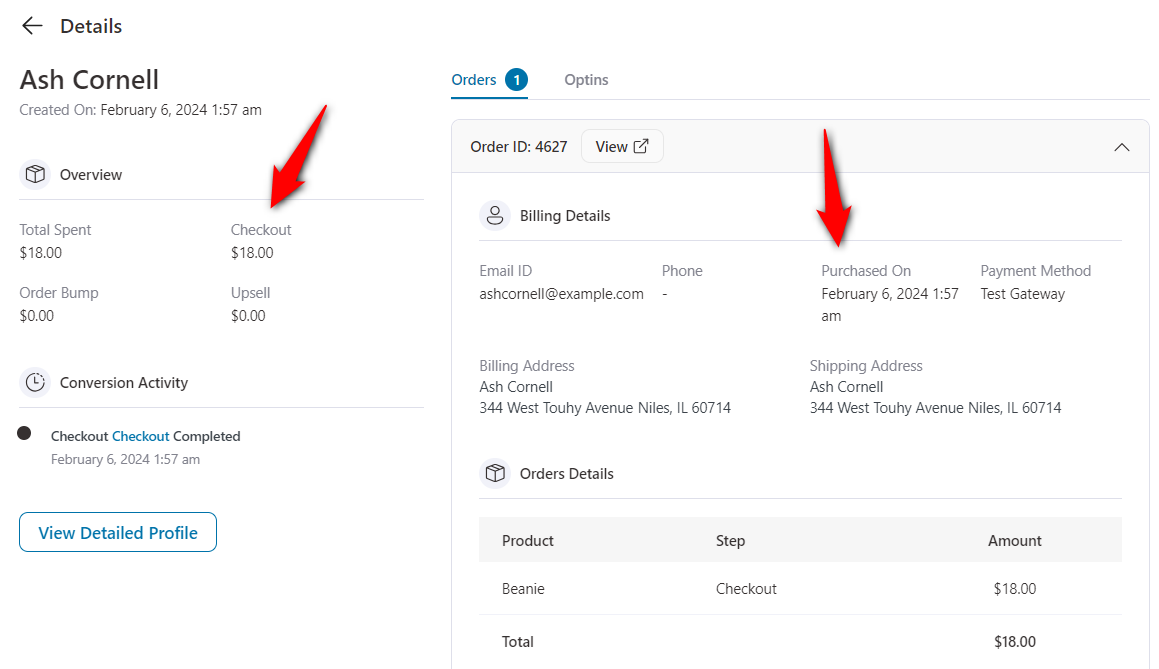
From there, visit the Conversions section. Here you can see the details of the contacts entered your funnel along with the total purchase value.
You can view their contact details in expanded view as you click on it.
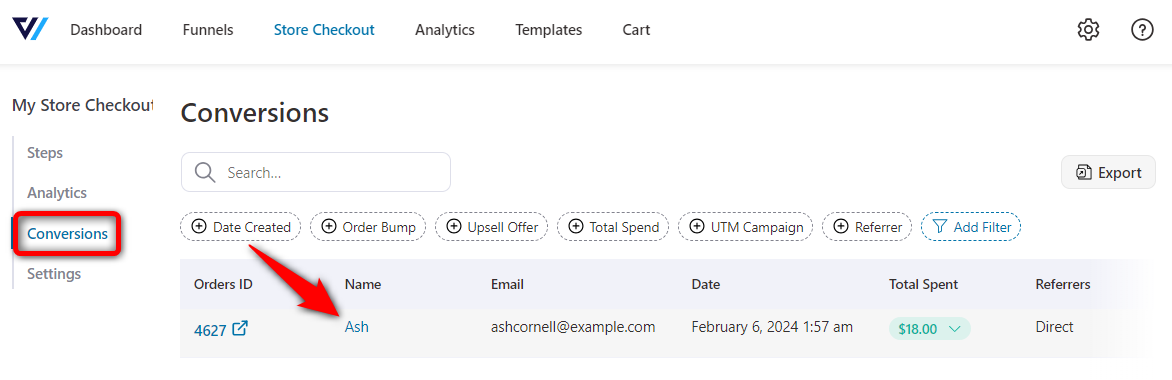
Here you can see their conversion journey and the total money they spent on each step of your funnel.
Next, return to the funnel and go to the Analytics section.
Here you can carefully analyze the performance of your WooCommerce checkout page:
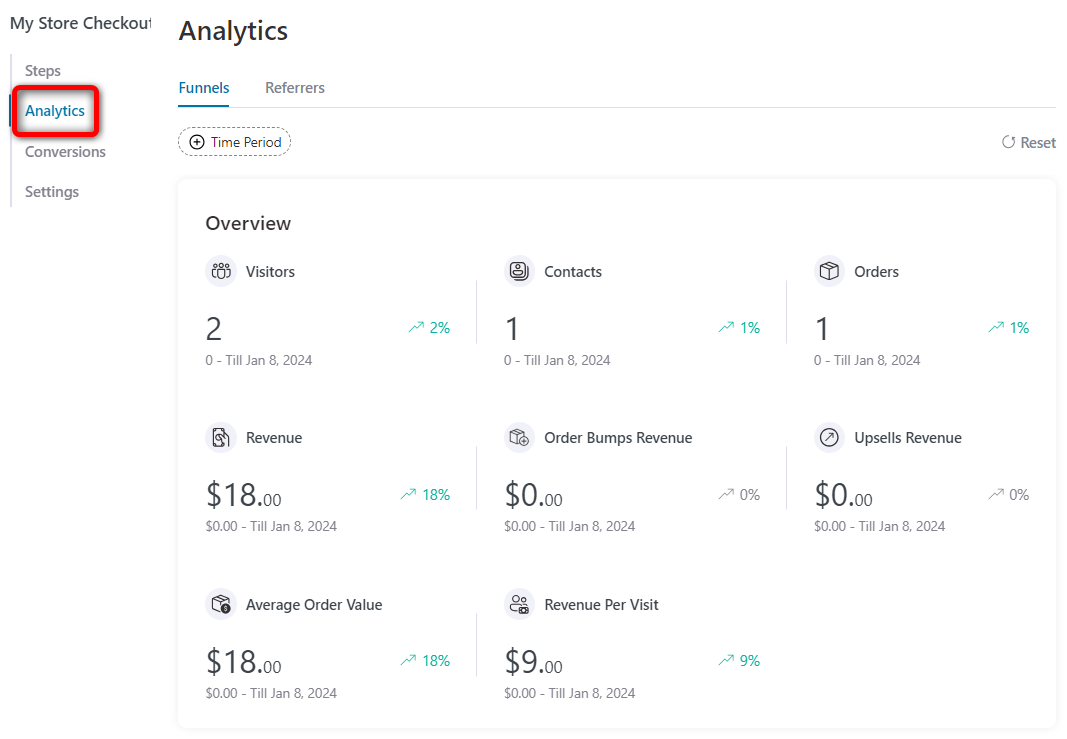
Our checkout funnel doesn't have order bumps and upsells; that's why it's not reflecting any stats here.
If you have set up order bumps and upsells, you’ll be able to see their metrics as well.
Here you can view each of these stats:
You can even set a date range and see your conversions at any given point in time.
Furthermore, FunnelKit Funnel Builder gives you the ability to view the conversion stats broken down into each step:
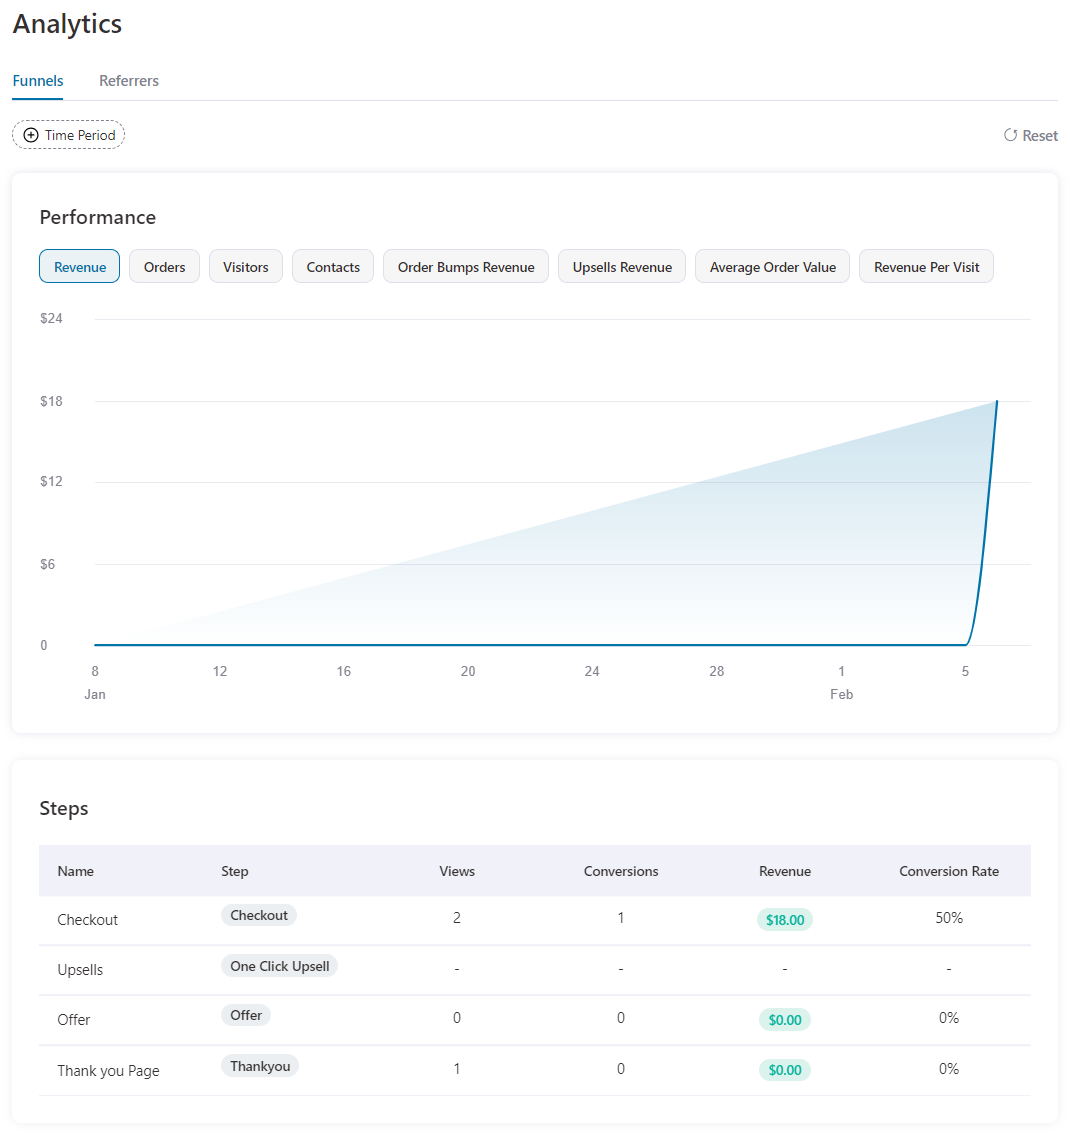
See total views, conversions, revenues and conversion rates for each step of your funnel.
A custom WooCommerce checkout page surely enhances the user experience, boosts conversions, and aligns the checkout page design with your brand.
Here are some best practices to follow when customizing the WooCommerce checkout page:
1. Simplify the checkout process
Keeping the checkout process simple and user-friendly can help you get high conversions.
It’s important to minimize the number of checkout steps and fields that helps you to reduce friction.
You can split the checkout into multiple steps to keep everything light.
2. Check your WordPress theme and page load speed
It’s important to check the WordPress theme on which your WooCommerce store pages are built.
Start by compressing the images, leveraging browser caching and optimizing your website’s code to ensure fast loading speed.
If your whole website is functioning smoothly, it’ll be easier to land on the checkout page and place orders quickly.
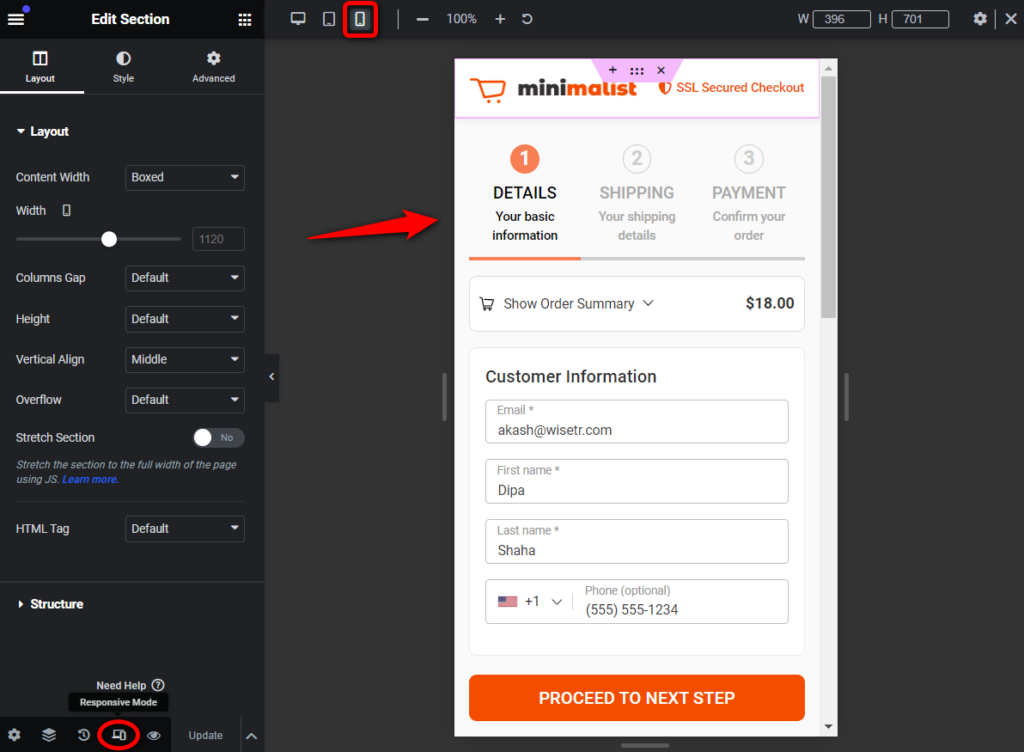
3. Optimize for mobile devices
According to Statista, smartphones accounted for around 74% of global retail traffic in the first quarter of 2023.
Therefore, it becomes crucial to ensure your checkout page is fully mobile-responsive to provide a seamless shopping experience to your users.
While customizing your WooCommerce checkout page in FunnelKit, you can test your checkout page on different devices from the responsive option.
4. Give clear call-to-action buttons
Use compelling messages when editing the text on your call-to-action (CTA) buttons.
Phrases such as “Buy Now”, “Proceed to Checkout”, and “Place Order Now” prompt shoppers to take immediate action.
Prominently position the checkout buttons on the page to avoid any kind of confusion and enhance conversions.
5. Add order bumps and one-click upsell offers
Customizing your checkout page helps you take advantage of the opportunities to boost sales through upselling and cross-selling.
Add product recommendations as order bumps on the checkout page.
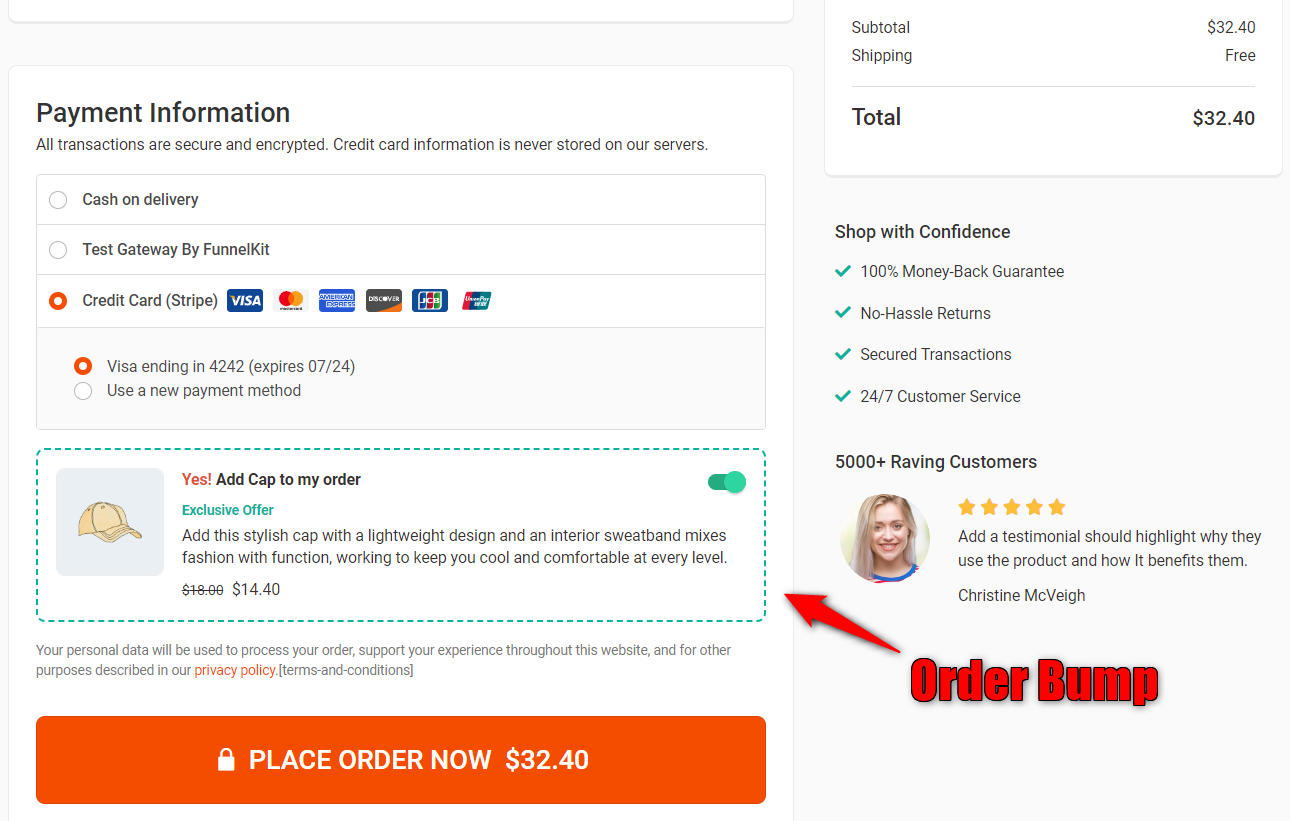
While one-click upsells are the post-purchase offers that are presented after the checkout page and before the thank you page.
These recommendations help entice your shoppers for additional purchase that assists in increasing your store's revenue.
👉 Check our post to present irresistible order bumps and upsell offers to enhance your store’s order value.
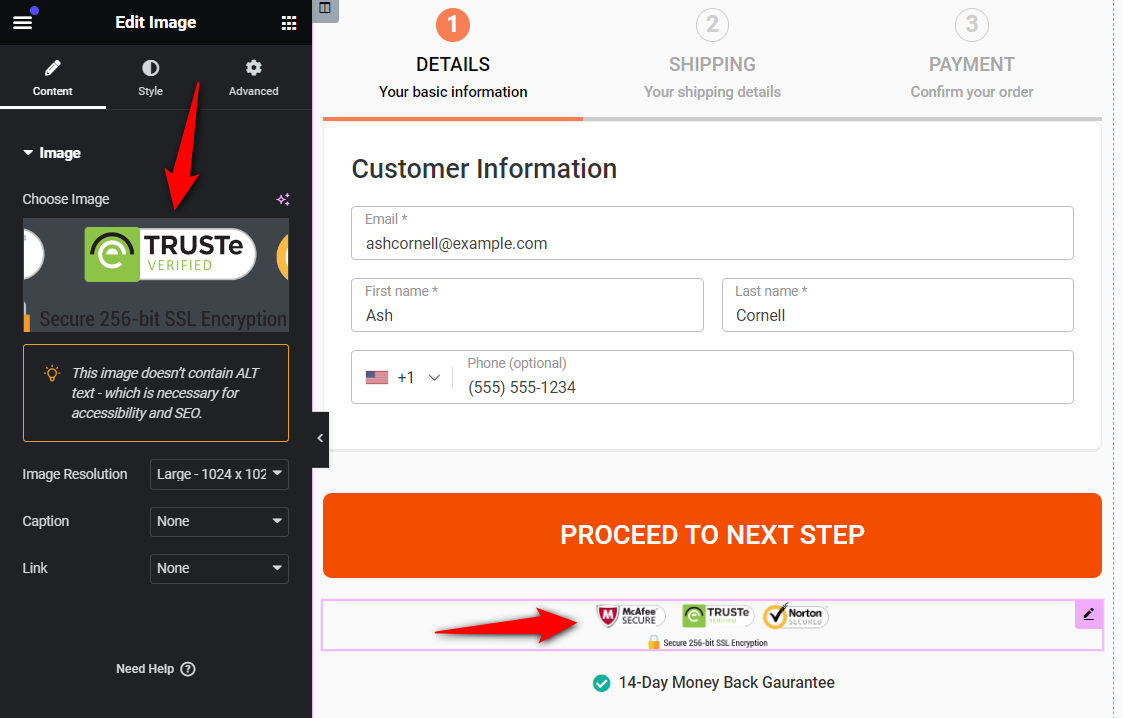
6. Add trust and security seals
You should prioritize security compliance with data protection regulations.
Even though your website can handle sensitive customer data, it’s important to showcase it on your checkout page.
You can use images and by putting the security seals below the checkout button. It’ll help you to build your customer’s trust and confidence.
7. Offer multiple payment options
Different users have a preferred mode to make payments online. That’s why you should cater to a wide audience for increased conversions.
Offer multiple payment methods like credit and debit cards, express checkout and local payments.
For that, you can use the free Stripe Payment Gateway for WooCommerce plugin to set up such payment options in your store.
8. Set up cart abandonment recovery automation
Baymard Institute collated data from 49 different studies and found that the average abandoned cart rate is 70.19%. Mobile users have an even higher abandoned cart rate of 85.65%.
Thus creating an abandoned cart recovery strategy is a very important step!
FunnelKit gives you an end-to-end solution. From building ROI-driven checkout to creating automated cart recovery sequences!
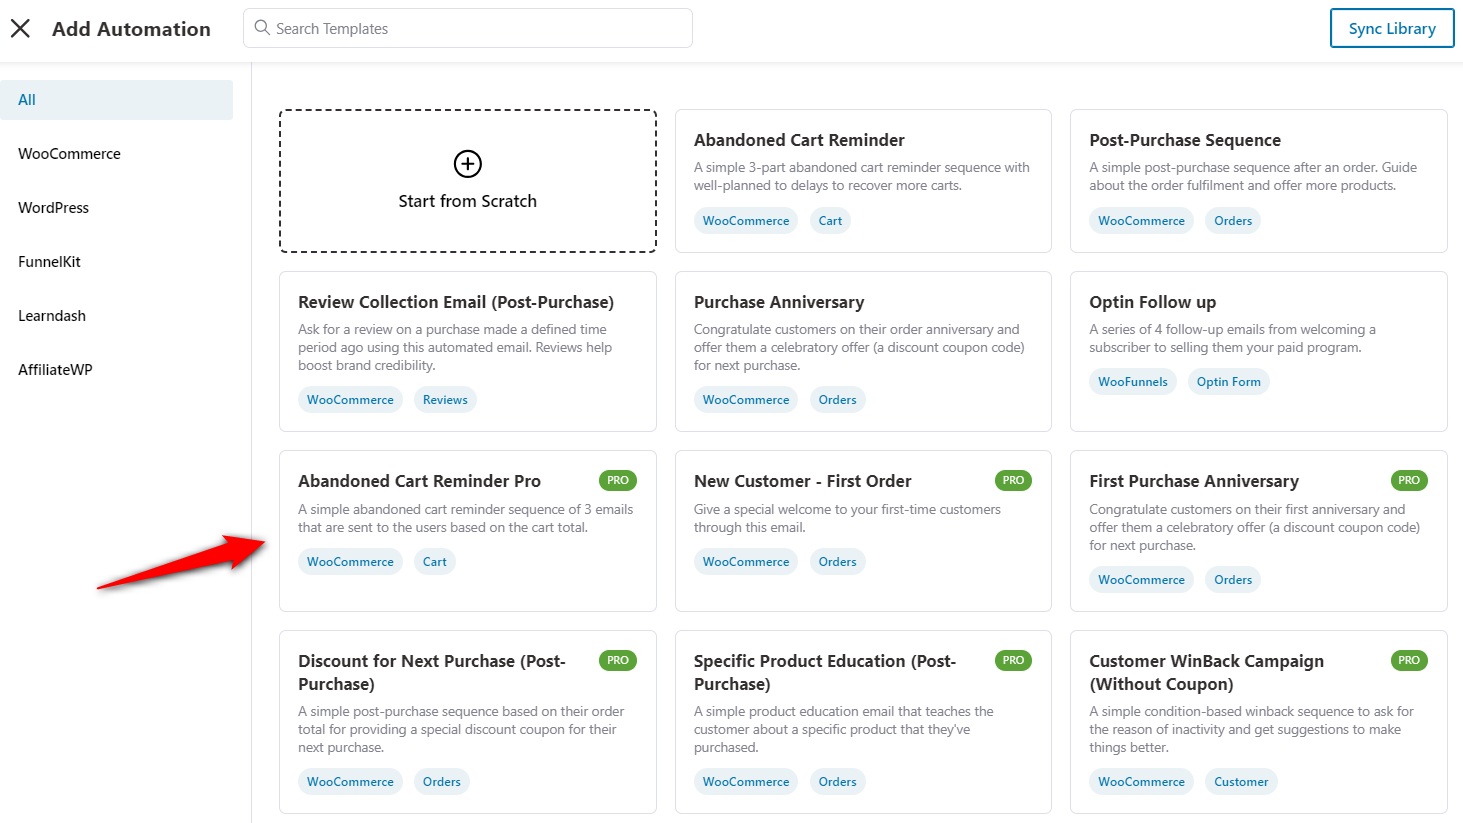
FunnelKit Automations gives you access to a library of pre-built, one-click import workflows.
You're covered for a wide range of use cases, including post-purchase follow-ups, win-back campaigns, and more.
Just go to the Automations tab and activate FunnelKit Automations for free.
Once you import the abandoned cart recovery workflow, here's how it will look:
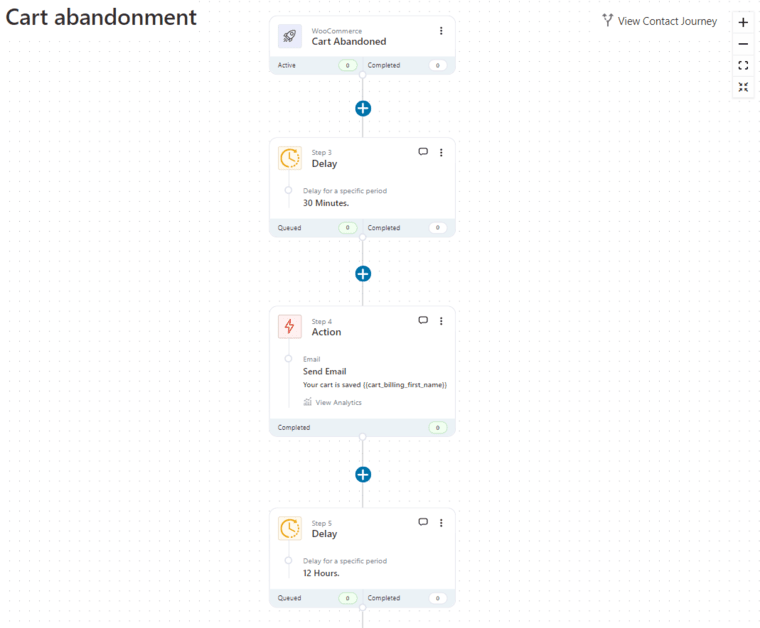
Notice the entire automation is pre-created, including time delays and email messaging:
So all you'd need to do is tweak the messages and the delays as per your requirements and go live!
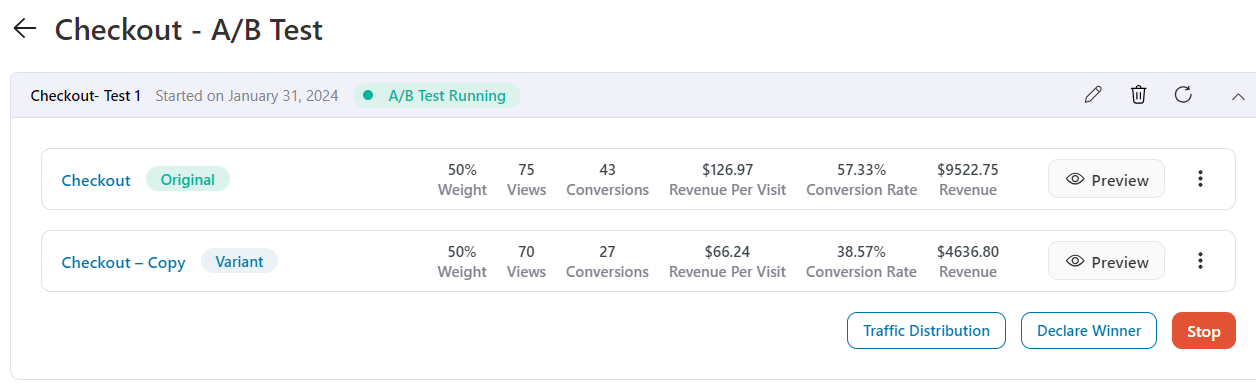
9. Perform A/B testing
It’s important to experiment and optimize your WooCommerce checkout page consistently.
FunnelKit has built-in A/B testing functionality that allows you to conduct A/B tests to compare multiple variations of your checkout pages with different elements and designs.
By measuring the A/B testing stats, you can identify which variant works best for your store.
Join our Facebook group and watch video tutorials on our YouTube channel for amazing tips to enhance your WooCommerce store.
There you go! In this post, we looked at the ways to customize the WooCommerce checkout page.
The best part? We didn't use complex code snippets or had to download different plugins!
We did all with pre-built checkout page and thank you page templates.
You saw our template library of beautiful and modern checkout pages that we've built to woo your customers.
What's more?
You saw how easy it is to add, remove, edit and re-arrange the checkout fields using drag & drop. Also, how editing the WooCommerce checkout page template was so simple in FunnelKit!
Again we used no extra plugins and added no code snippets to your theme files.
Now that you know how to make your WooCommerce checkout page look and convert higher.
So go ahead and check out the Funnel Builder by FunnelKit to customize WooCommerce checkout page using the no-code way today!