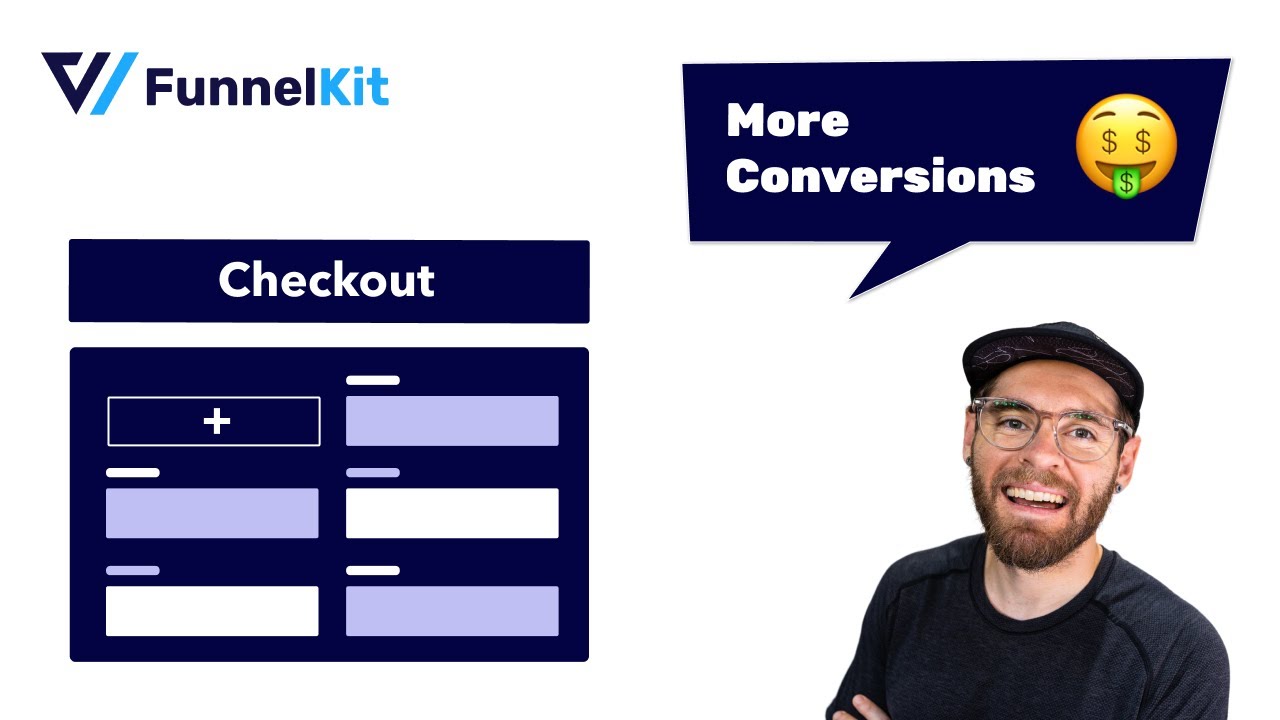
Are you looking for WooCommerce checkout optimization hacks to streamline your user’s shopping experience?
Your WooCommerce store may have an attractive layout with a user-friendly interface. You may even have a wide array of products to bring traffic to your store.
But none of it matters if a high percentage of traffic can’t make it past the checkout page.
Do you know the average cart abandonment rate is 70% for eCommerce websites? That means 7 out of every 10 shoppers leave without making a purchase. Shocking, isn’t it?
That’s why you should focus on optimizing your WooCommerce checkout page to reduce cart abandonment and improve conversions.
An optimized checkout page ensures a seamless buying experience for your shoppers that helps them convert into customers.
In this post, we’ll explore some effective strategies and hacks to optimize your WooCommerce checkout page and minimize cart abandonment.
Watch this video to learn about 20 customization tips to create a high-converting checkout page:
Contents
The checkout page is the final step in a customer’s journey, where they make the decision to either complete their purchase or abandon their cart altogether.
A poor checkout page often leads to frustration, confusion and ultimately, users abandoning the shopping process.
According to research done by Baymard Institute, here are the top 5 reasons why users abandon their carts:
To prevent this, you should provide a user-friendly and streamlined checkout flow that infuses trust, addresses potential concerns and removes unnecessary barriers.
Incorporating WooCommerce checkout optimization into your store can significantly enhance the overall shopping experience and boost your conversions.
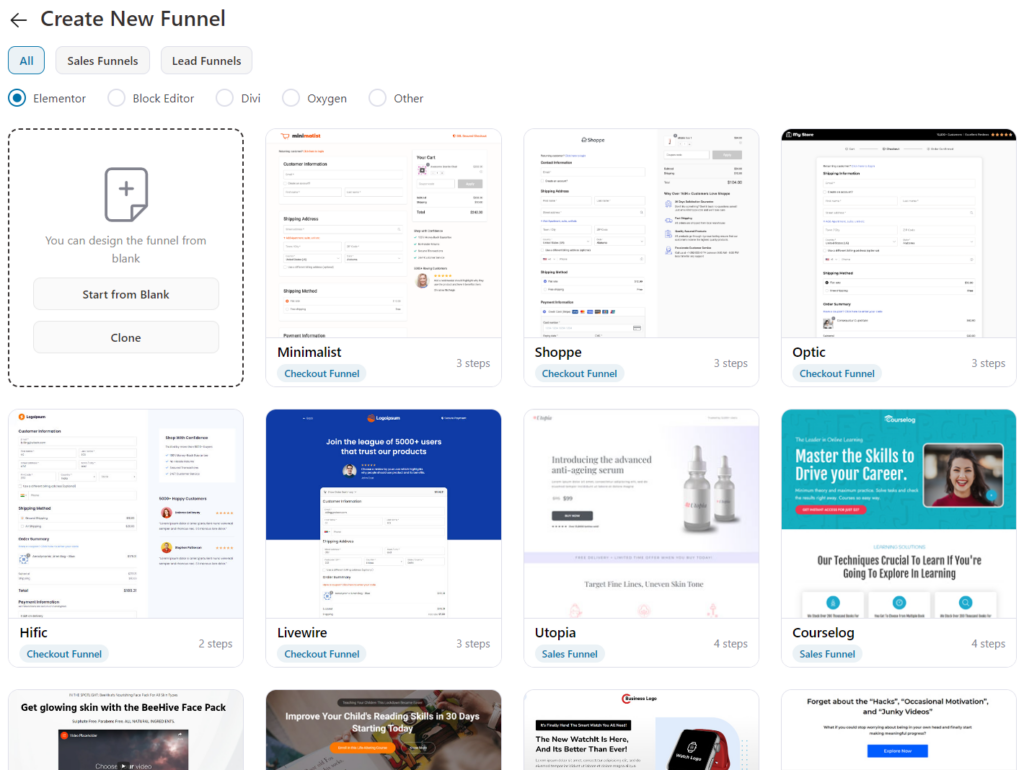
To optimize the WooCommerce checkout page, we’ll be using three plugins:
FunnelKit Funnel Builder is the most advanced sales funnel builder plugin for WordPress. It lets you create high-converting opt-in pages, landing pages, custom checkouts, one-click upsells, order bumps, thank you pages, and more.
This funnel builder offers a set of pre-built templates that can be customized how you want.
Furthermore, it has a built-in checkout field editor that allows you to add, edit, rearrange and remove the fields on your checkout form.
Plus, it also offers several WooCommerce checkout page optimizations, such as express payments, Google Address autocomplete, auto-apply coupons, etc., that make the buying process a lot faster.
FunnelKit’s Stripe Payment Gateway for WooCommerce provides an integrated solution for accepting payments on your online store.
It lets you accept debit and credit card payments through Stripe, such as Visa, MasterCard, American Express, JCB, Discover, etc. Plus, it further integrates with express checkout options like Google Pay and Apple Pay.
This plugin also provides support to accept local payments such as SEPA, P24, iDEAL, BanContact, and more.
The best thing about Stripe Payment Gateway for WooCommerce by FunnelKit is that it’s completely free to use.
FunnelKit Cart lets you add a beautiful, modern-looking sliding shopping cart to your WooCommerce website.
It allows your users to edit items, add upsells from the cart itself and directly proceed to the checkout without going to the traditional WooCommerce cart page.
Your users will be able to get all their cart-related information right in front of their eyes. Furthermore, you can set up a smart reward system to let your shoppers unlock a certain deal by encouraging them to shop more in your store.
Not just that, you get custom styling options to make your sliding cart on-brand.
Once you’ve installed and activated all of the plugins, let’s move on to our checkout page optimization section.
Let’s start with our comprehensive list of optimizing the WooCommerce checkout page:
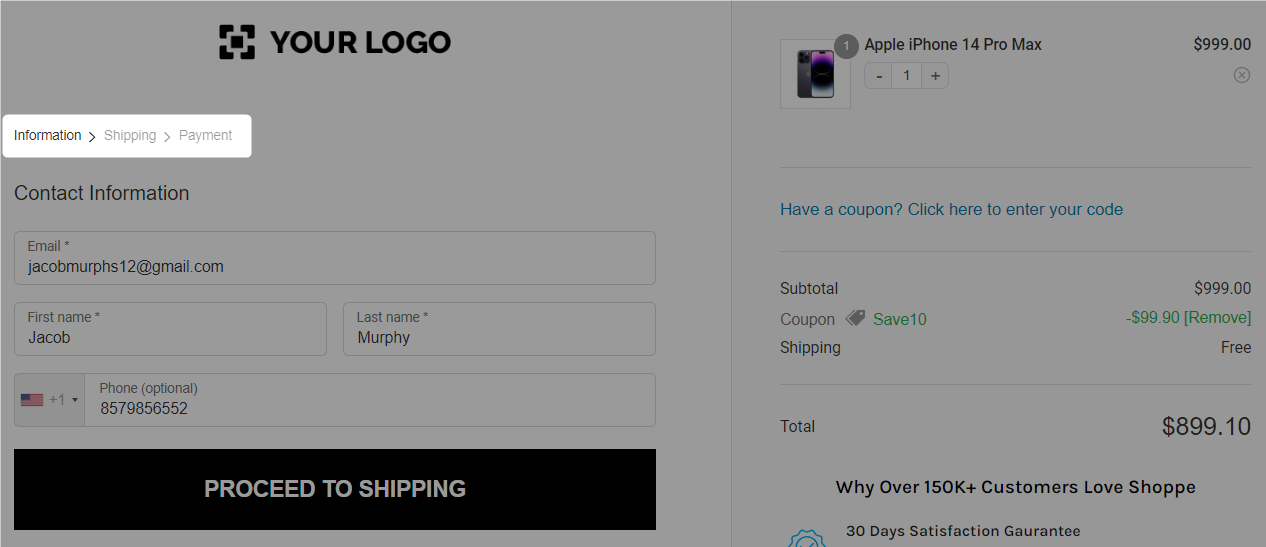
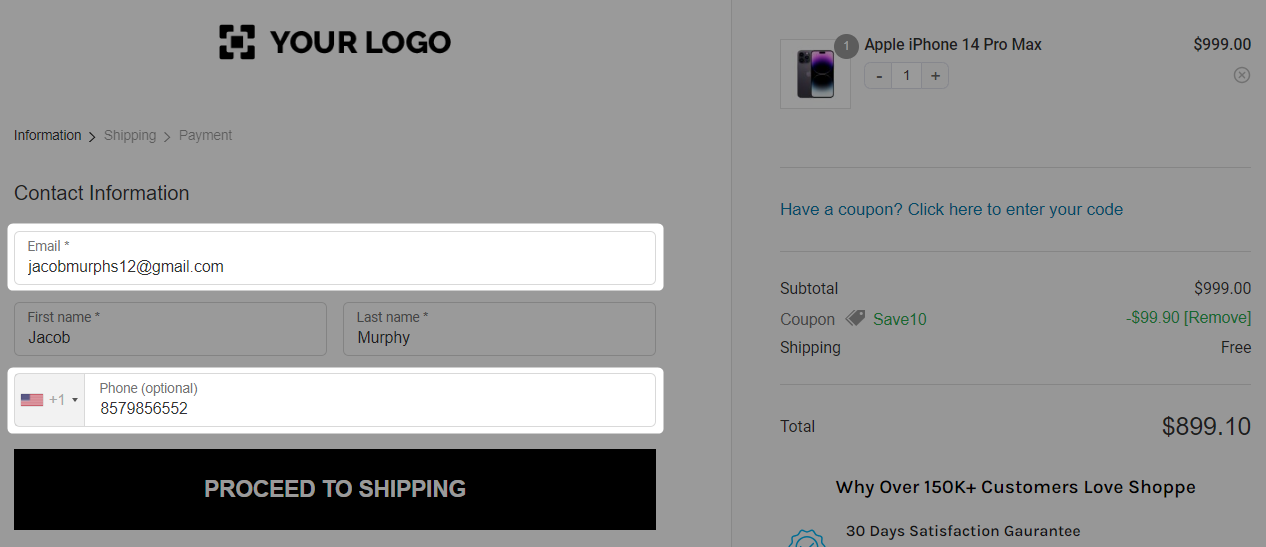
A multi-step checkout page splits the checkout fields into separate steps, making the buying process easier.
If you sell physical products requiring long details, such as billing and shipping details, a multistep checkout can help you get high conversions.
Here’s how Marcus saw a jump of 300% in their conversions when they swapped a one-page checkout with a multi-step checkout form.
Multi-step checkout looks clean and distraction-free. Take a look:
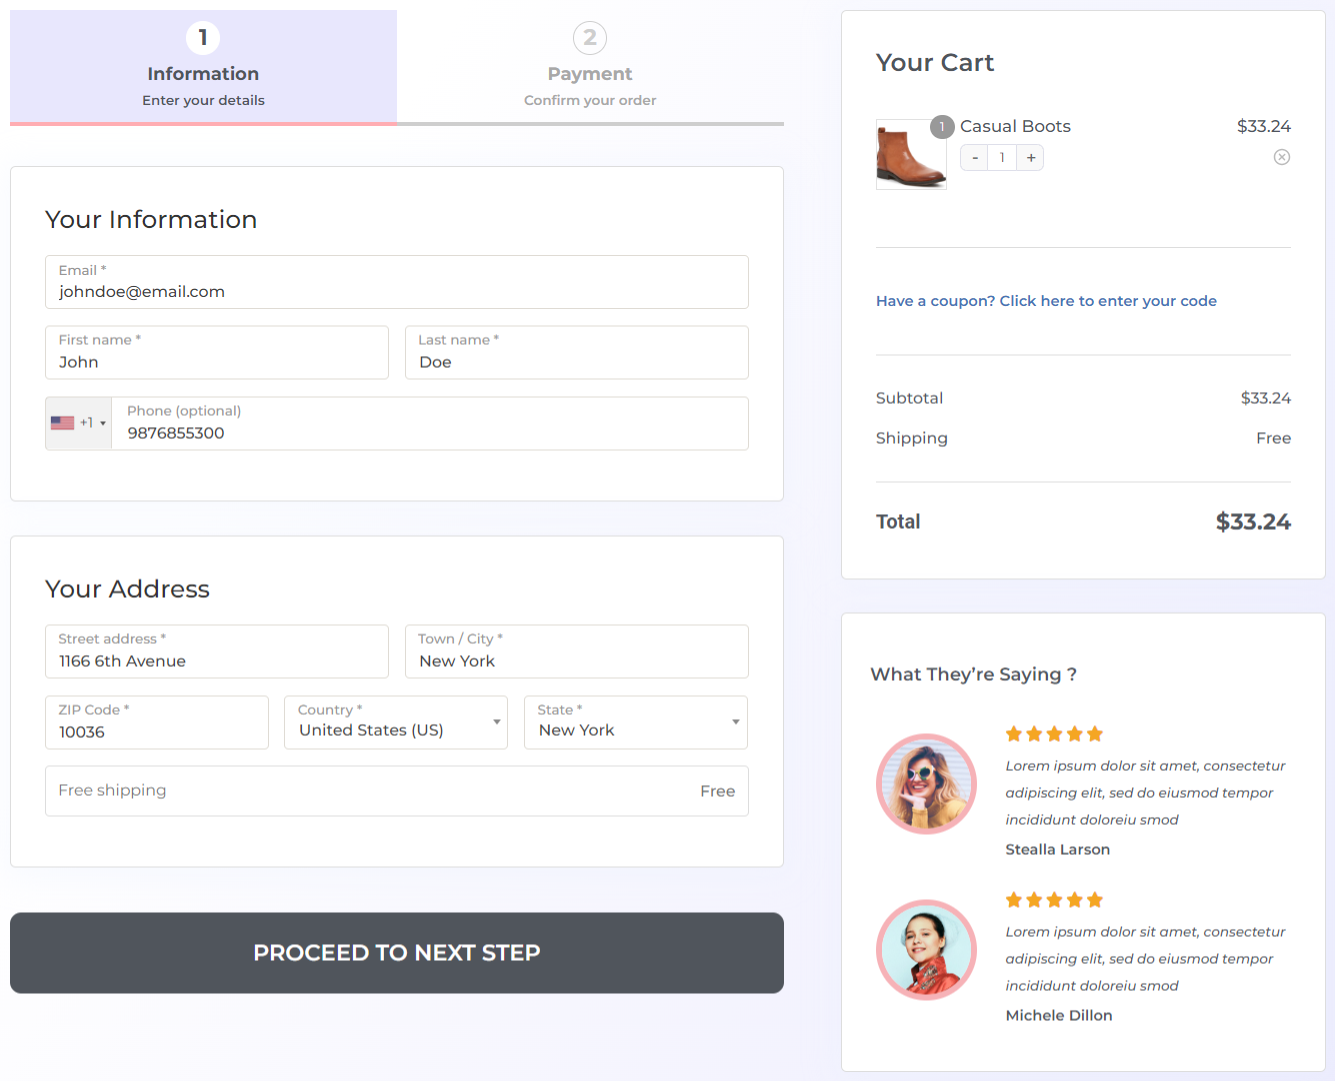
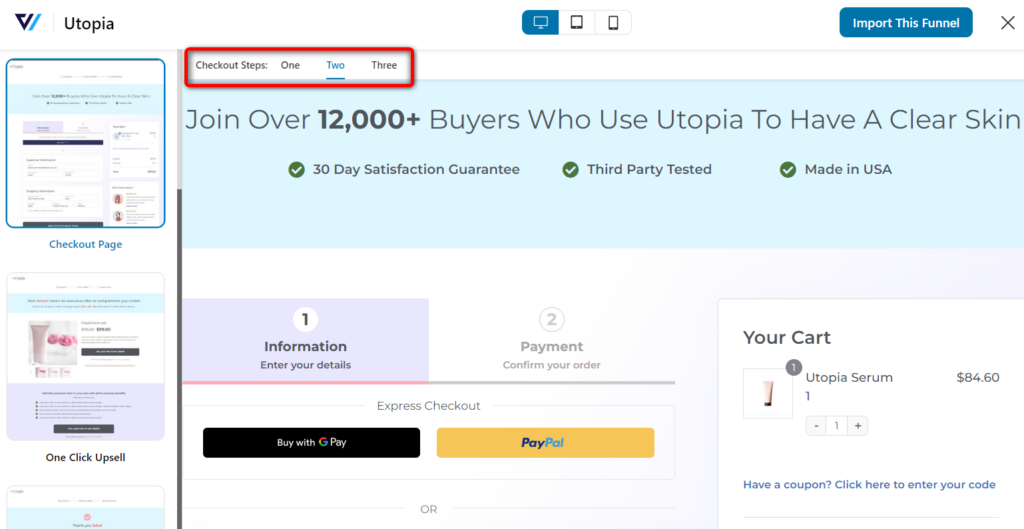
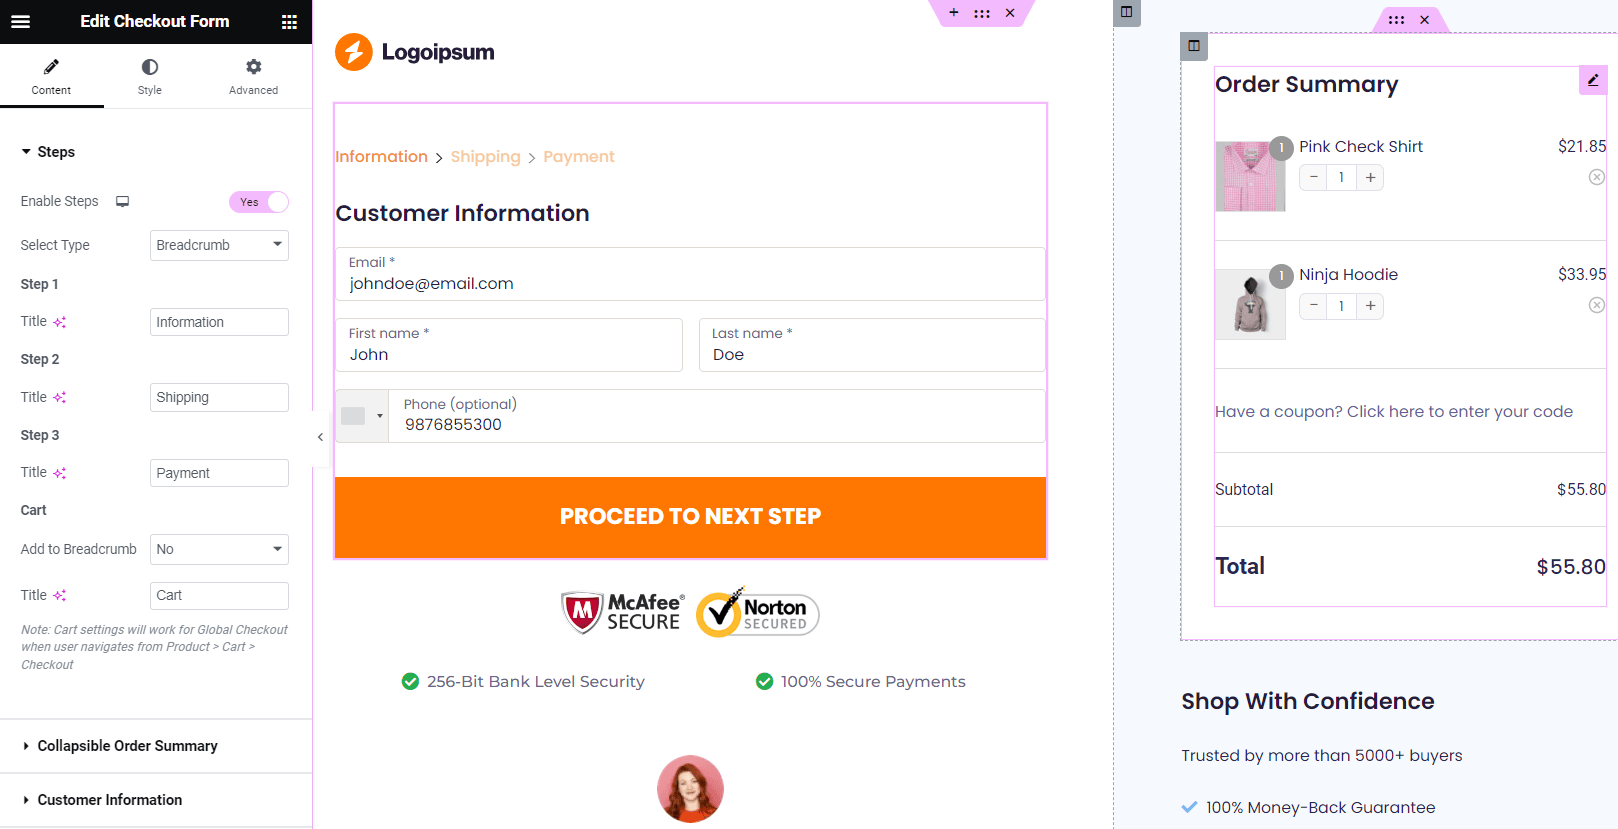
FunnelKit Checkout is the most powerful WooCommerce checkout manager plugin that lets you create a one page checkout and multi-step checkout (two-step and three-step) page.
You get the option to choose the number of steps you want on your checkout right when you import your funnel template. Plus, you also get to choose the option of page builders you want to customize your checkout page from Elementor, Divi, Oxygen, Gutenberg, or any other.
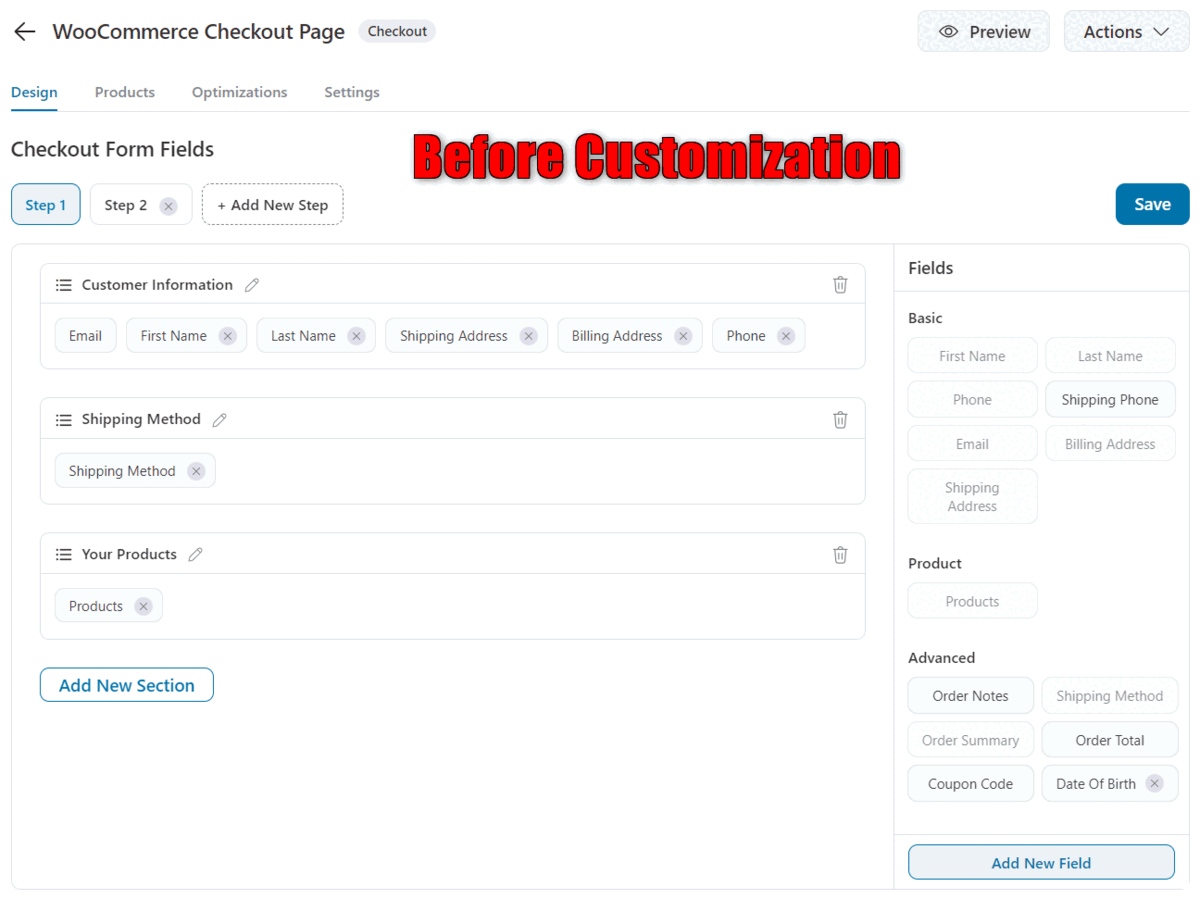
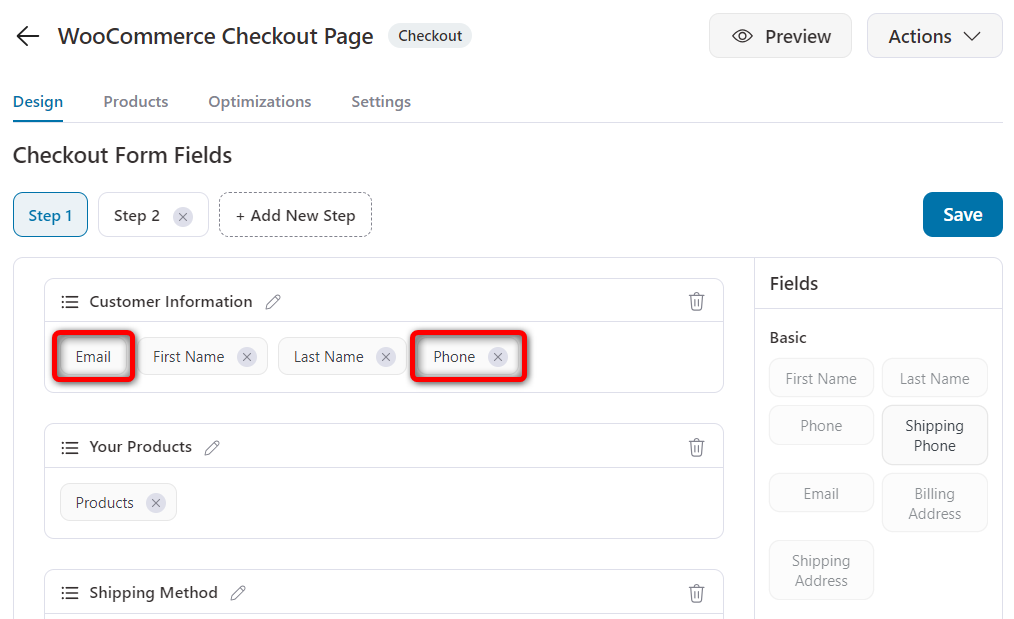
As a WooCommerce business owner, your focus should always be to keep your checkout page simple. This significantly helps improve the user experience and streamline the purchasing process in your store.
By eliminating the unnecessary form fields during checkout, you can reduce friction, enhance customer experience and increase conversions.
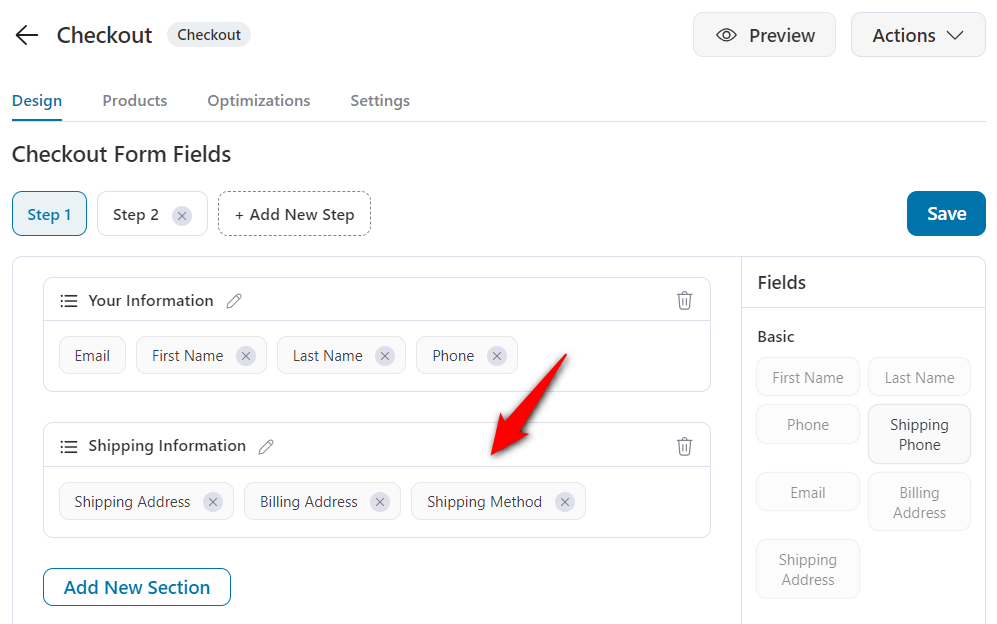
For that, FunnelKit Funnel Builder provides you with a built-in checkout field editor. It lets you add custom fields and sections, edit them, rearrange the fields, and even delete the ones you don’t want.
All you have to do is go to the Fields tab when customizing your WooCommerce checkout.
👉 Read our detailed post on customizing the WooCommerce checkout form fields here.
Guest checkout eliminates the need for shoppers to create an account before checkout, which can be time-consuming and may drive away your potential customers.
Allowing guest checkout is quite convenient for users to place their orders efficiently, leading to a positive buying experience and potentially increasing conversion rates.
To allow guest checkout, go to WooCommerce Settings ⇨ Accounts & Privacy. From here, enable Guest Checkout options to complete their purchase without an account.
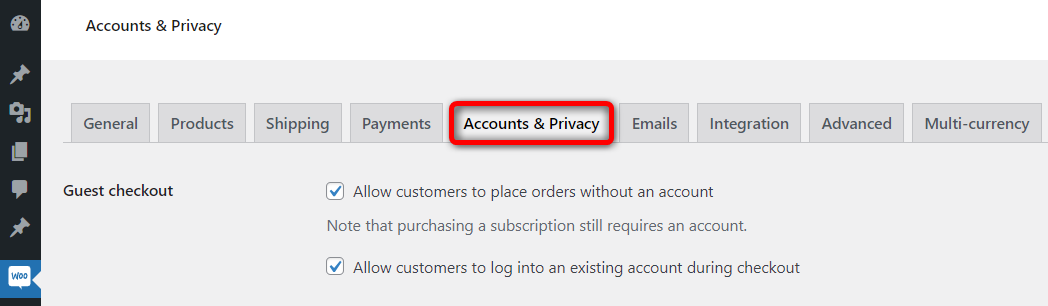
Make sure to hit ‘Save Changes’ before proceeding to the next WooCommerce checkout optimization hack.
According to FIS WorldPay Global Payments Report 2023, digital wallets have surpassed credit card payments and accounted for 49% of global eCommerce transaction value.
Digital wallets like Apple Pay and Google Pay are in demand because they make the whole checkout experience seamless. Customers are able to place their orders with a single click.
With just a tap on the express checkout payment button, shoppers see all the saved cards that they can use to make their purchases. They don’t even have to fill out the checkout form - it automatically sends the payment and address related information to the merchant.
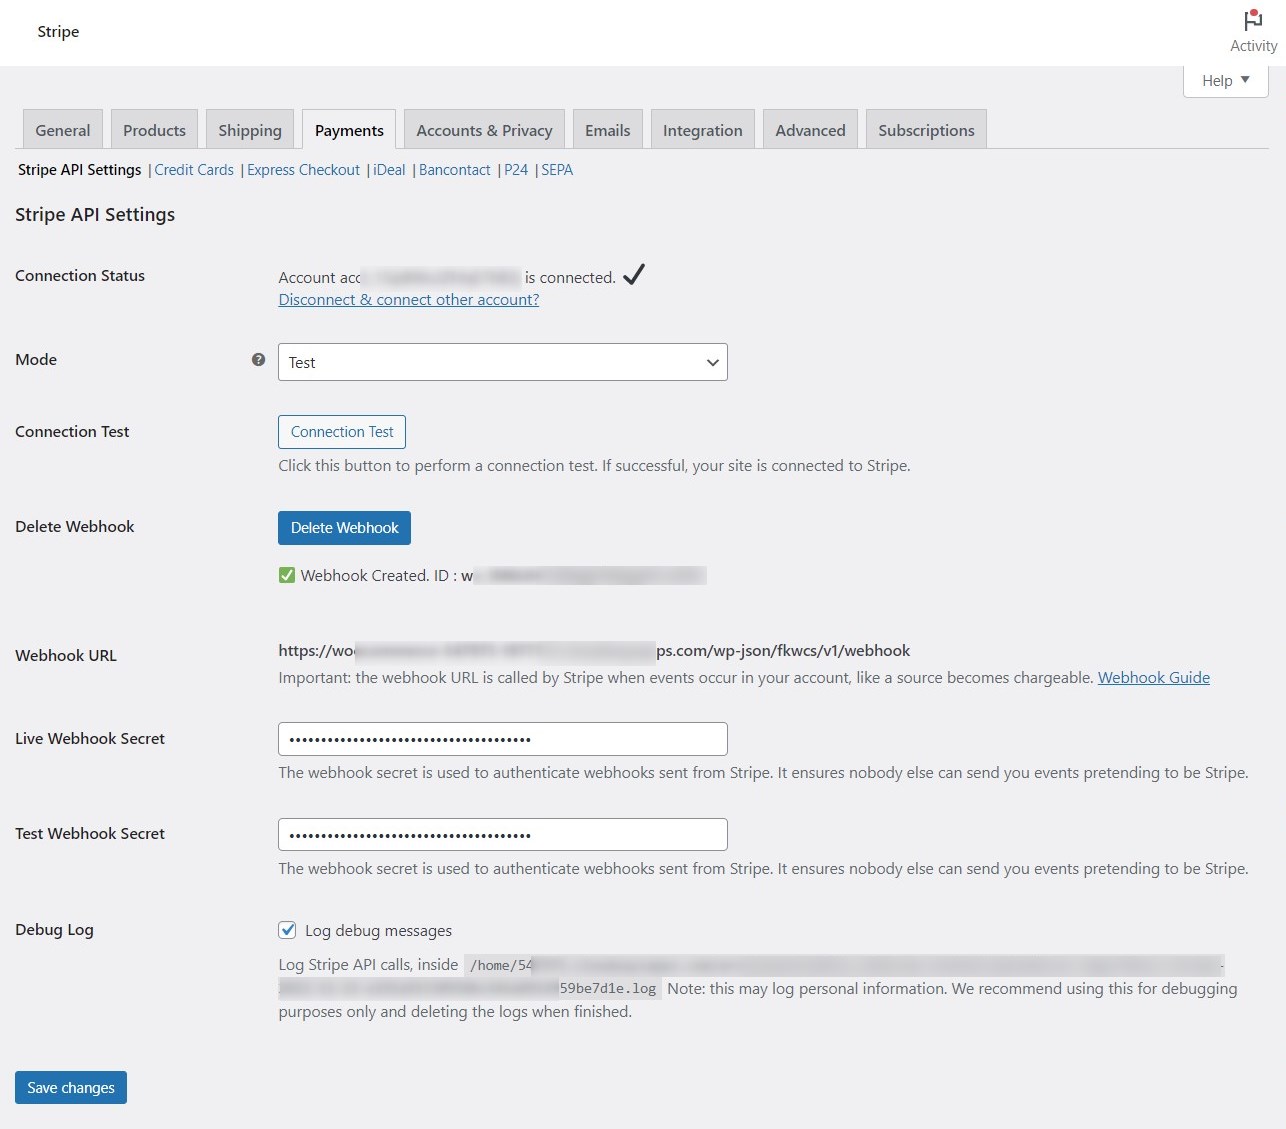
To enable express one-click checkout, make sure to install and activate the Stripe Gateway for WooCommerce from FunnelKit.
Then, click on the Start Onboarding Wizard button.

It’ll take you to the connection process and ask you to log in to your Stripe account.
With a few steps, FunnelKit automatically fetches all the details such as Webhook URL, ID, Live and test webhook secret, and more.
👉 Check out our complete guide for the setup and onboarding process here.
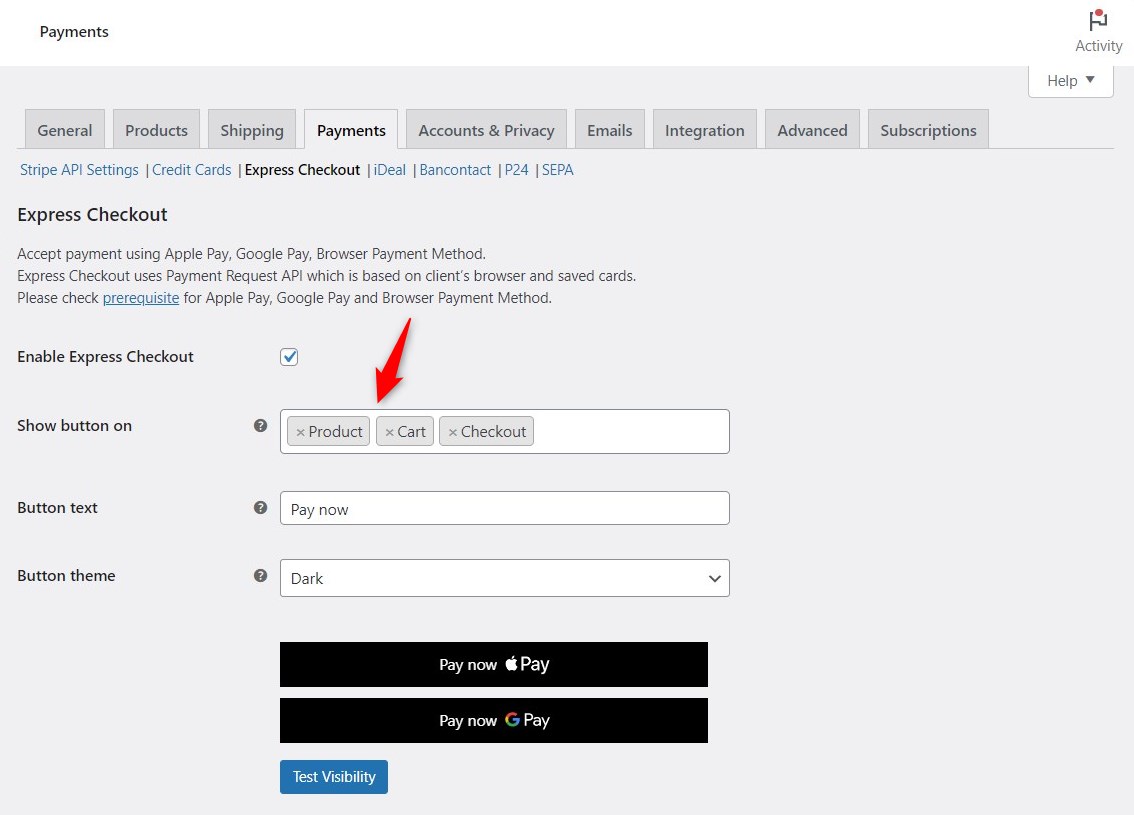
Once everything is set, go to the Express Checkout tab and enable it. You can even configure the options of Google Pay and Apple Pay express checkout button visibility here.
Upon implementing this WooCommerce checkout optimization hack, you'll get the answer to your 'How do I make WooCommerce checkout faster?' question.
👉 Read our detailed post on setting up Apple Pay and Google Pay in your WooCommerce store.
You can also check our video tutorial to set up express checkout below:
By providing a wide array of payment methods, businesses can build on different customer preferences and increase the chances of completing a purchase.
Your WooCommerce store has already got credit and debit cards as well as express checkout. It’s now time to put local payment methods into your store.
Go to WooCommerce ⇨ Settings ⇨ Payments tab. Next, click on ‘Manage’ next to Stripe Gateway - Credit Card (Stripe).
FunnelKit’s Stripe Gateway for WooCommerce offers you multiple local payment methods, such as iDEAL, P24, Bancontact, SEPA, and more.
Go to any of the payment methods you want to set up and enable it in your store.
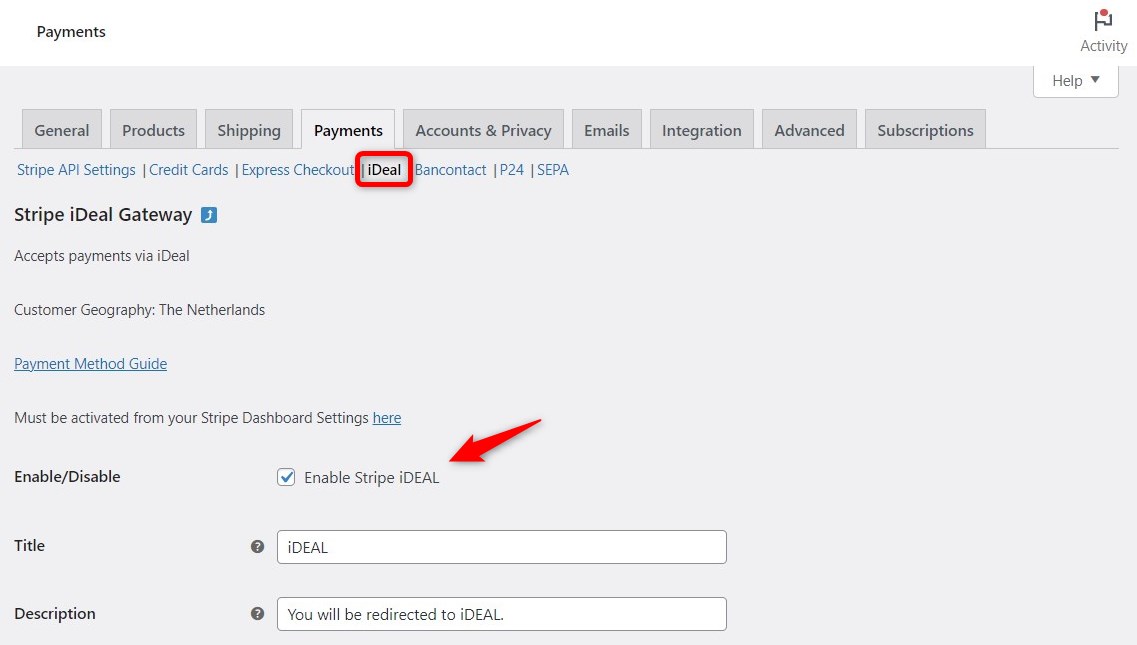
Configure the options for your payment method and hit ‘Save Changes’ to make it work.
Please note that you’ll have to enable these payment methods from Stripe in order to make it work.
👉 You can follow our documentation on setting up local payment methods in your WooCommerce store.
The progress indicator helps people know where they are in their checkout journey.
A study shared by Kissmetricss showed that respondents felt more engaged when filling out a survey with the progress indicator.
Therefore, the next WooCommerce checkout page optimization hack is to display the progress bar indicator. It shows users which step they’re on and how many steps to go to place their orders.
FunnelKit gives you customization options to style your multi-step checkout page.
Select the ‘Breadcrumb’ or ‘Tabs’ step type when customizing your checkout page.
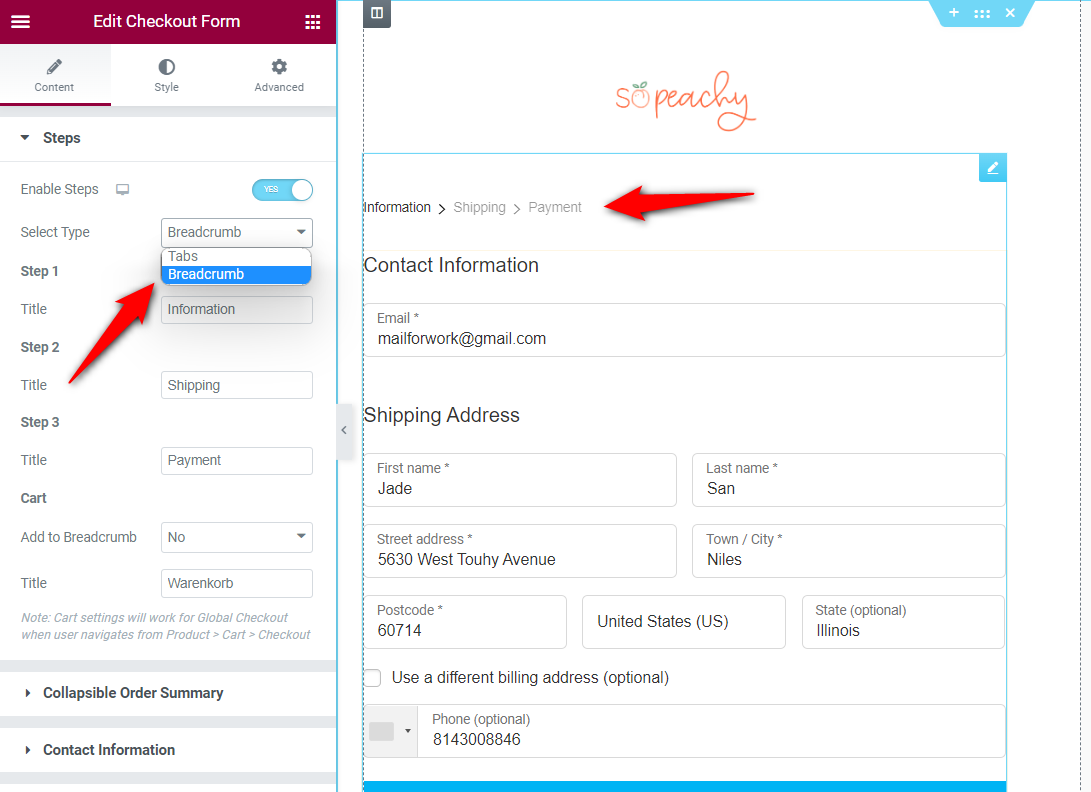
A similar option is also available in all the other page builders.
Filling out your complete address before buying sure is a frustrating process, and many customers may abandon it at the sight of the extra work.
Furthermore, incorrect addresses cause 41% of delays in order deliveries and 39% of order failures entirely.
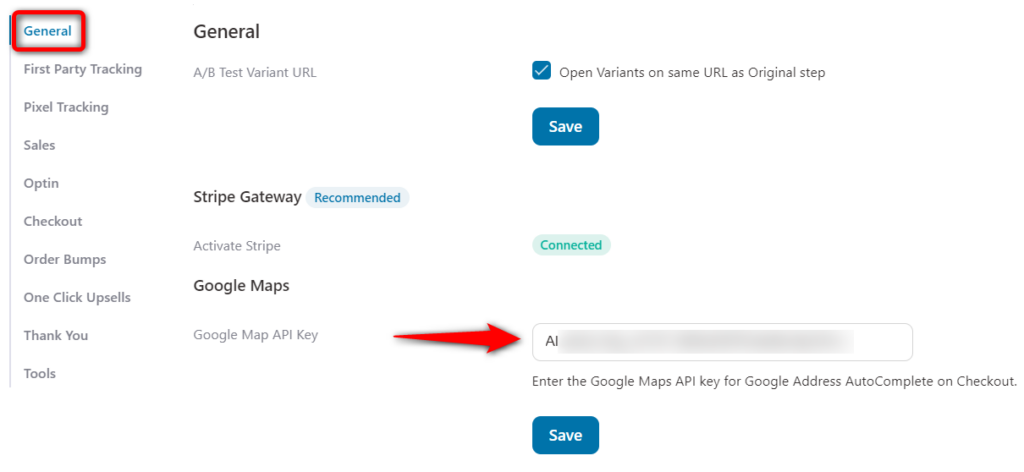
That’s why you should optimize your checkout page process with Google Address Autocomplete.
Here the user types the first few characters of their address and sees a list of potential address suggestions to pick from. This feature auto-fills the complete address, including the city and pin, once they have selected the right address.

To set it up, you need to get the Google Maps API Key first. Then go into Global General Settings and paste the key under the Address Autocomplete option:
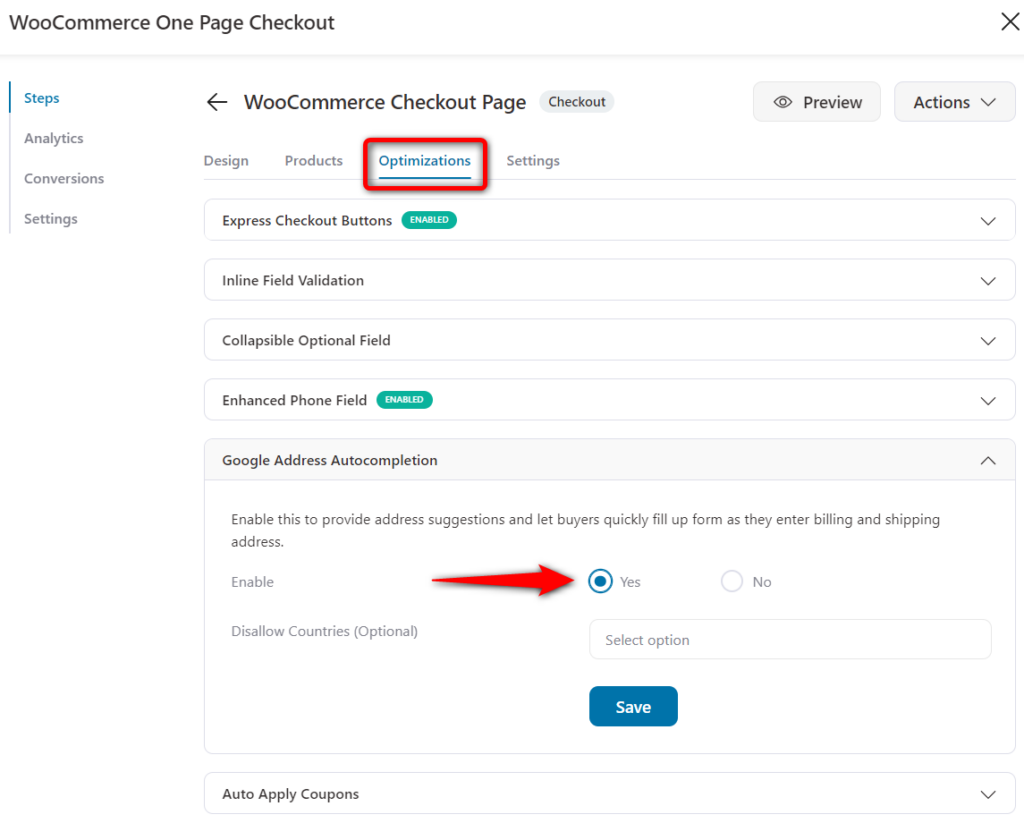
Next, go to the ‘Optimizations’ tab of your Checkout page and enable Google Address Autocompletion.
This is how you can improve your WooCommerce checkout and make an effortless shopping experience.
👉 Refer to our detailed step-by-step process for enabling Google Address Autocompletion feature in your WooCommerce store.
Make sure email and phone are your top fields on the checkout page. Let these be among the first few fields that a user fills out.
The advantage of this checkout page optimization technique is that even if the user abandons the checkout, you can reach out to them. Use a good abandoned cart recovery plugin that live-captures prospects' emails.
This way, you can capture their emails and send out cart recovery emails or SMS. SMS's have an open rate of 98%, which is way higher than emails. So it makes sense to reach out to them using both mediums.
You can set it up by going to the ‘Fields’ tab. FunnelKit gives you the ability to drag and drop to change the order of fields simply.
So you can drag and drop the email field and place it at the beginning of the checkout form.
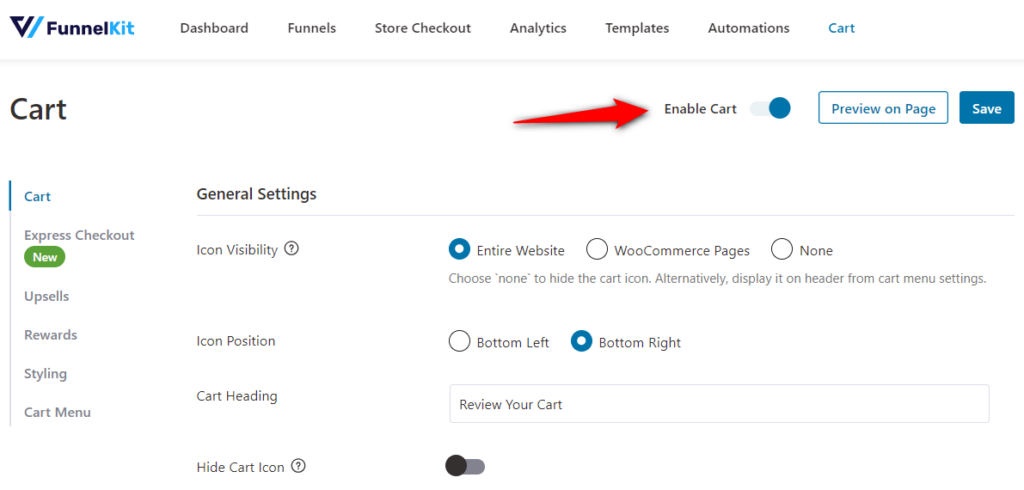
In the default WooCommerce shopping process, the users have to go to the products page, then to the cart page, and finally to the checkout.
This shopping process is long and tedious. Instead, you can add FunnelKit’s sliding cart for WooCommerce and skip that one extra step in the journey.
It offers you a modern interface that provides a seamless add-to-cart experience.
Furthermore, you can set up a smart in-cart recommendation system to offer relevant product suggestions.
Go to FunnelKit ⇨ Cart and enable the cart to set it up.
You can configure different options for your sliding shopping cart and upsell recommendations.
Plus, you also get various styling options to customize your cart and its icon to your brand.
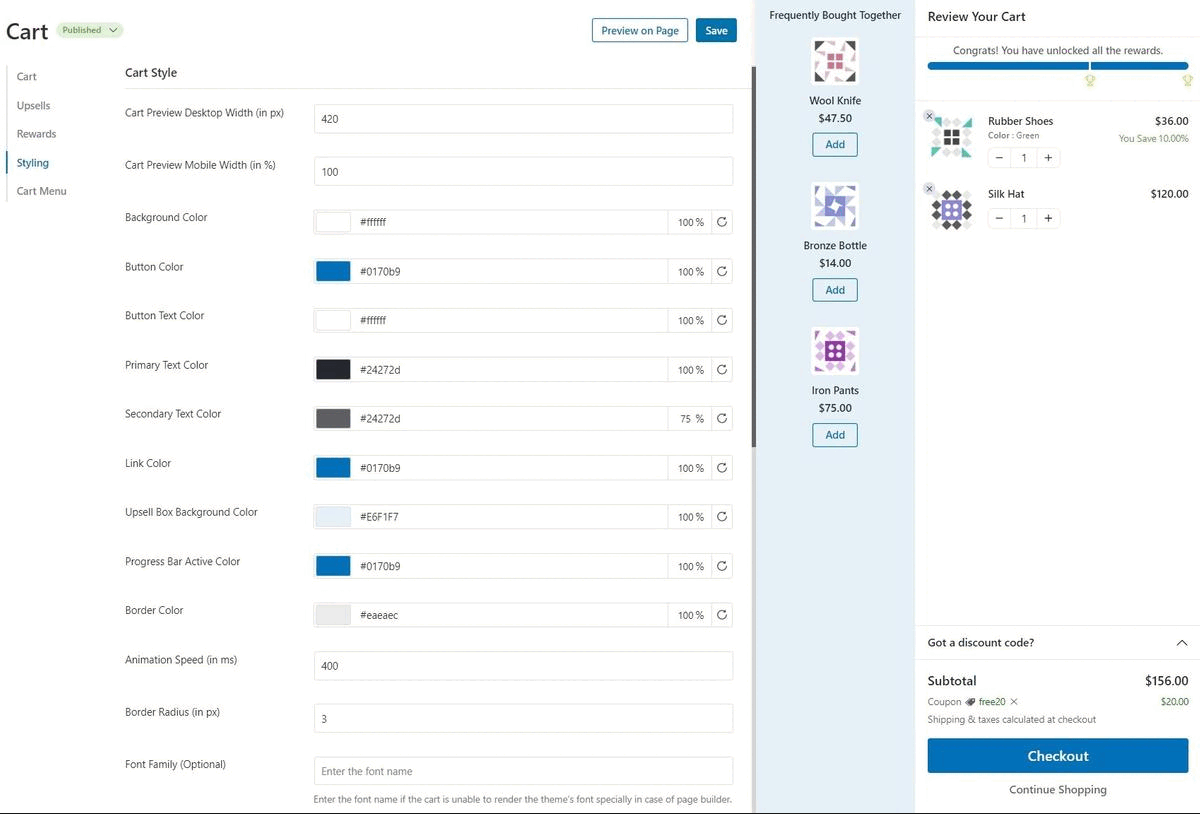
FunnelKit Cart lets you set up an intelligent rewards system that helps your users unlock a certain deal and encourages them to continue shopping.
👉 Read everything about enabling direct checkout and skipping the cart page in our post.
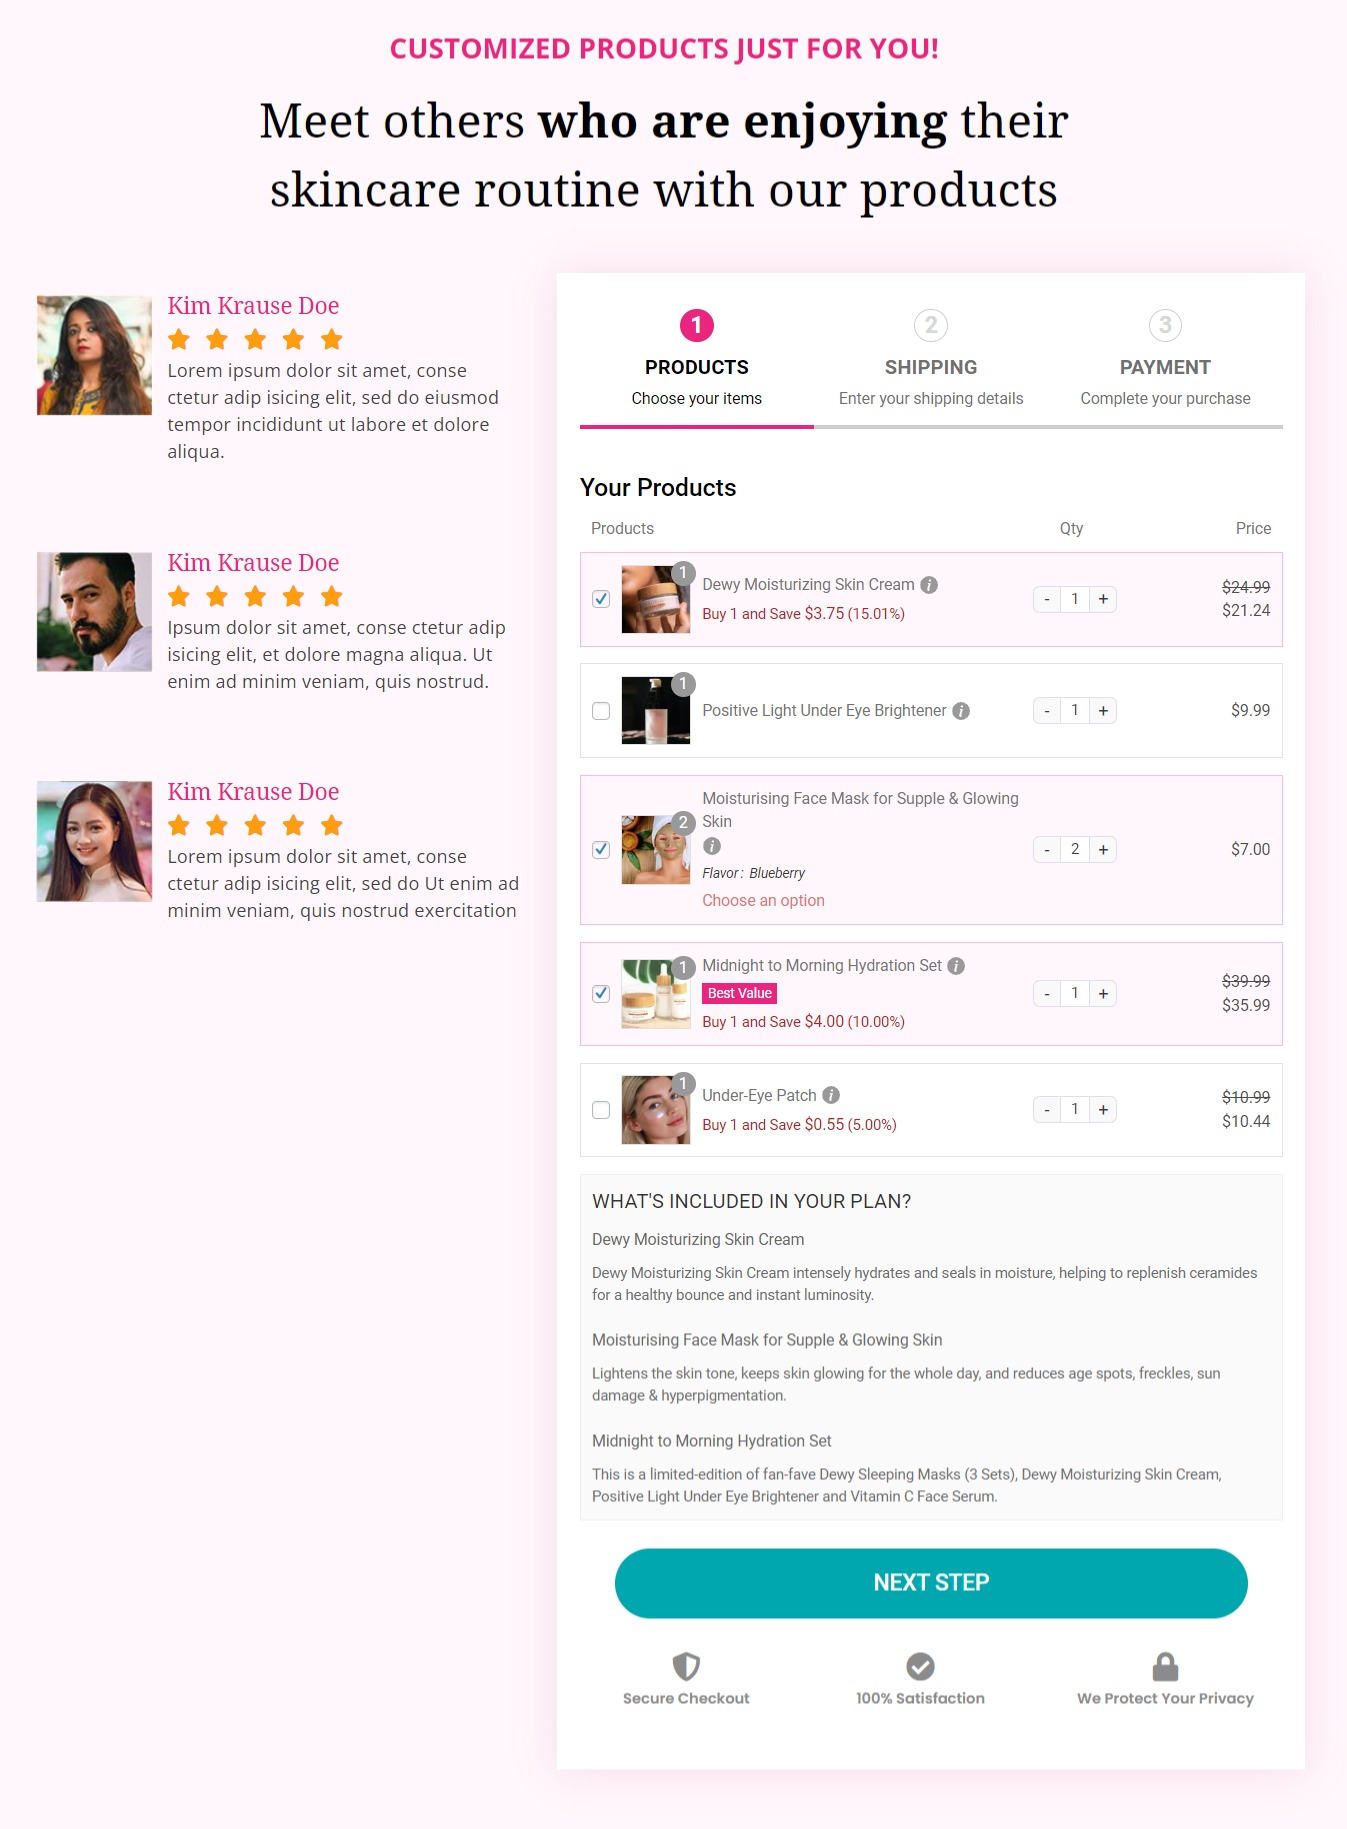
Offering complementary or relevant products based on the cart items can help boost your store’s average order value.
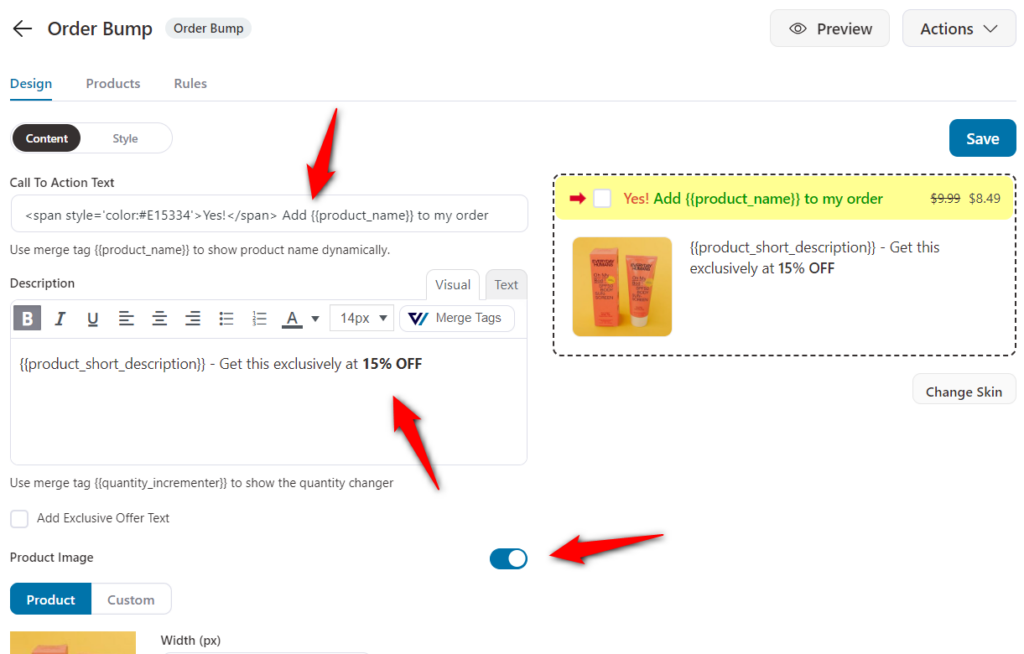
Upsells or cross-sells on the checkout page are called order bumps. These are usually low-priced items that account for an impulse purchase among customers.
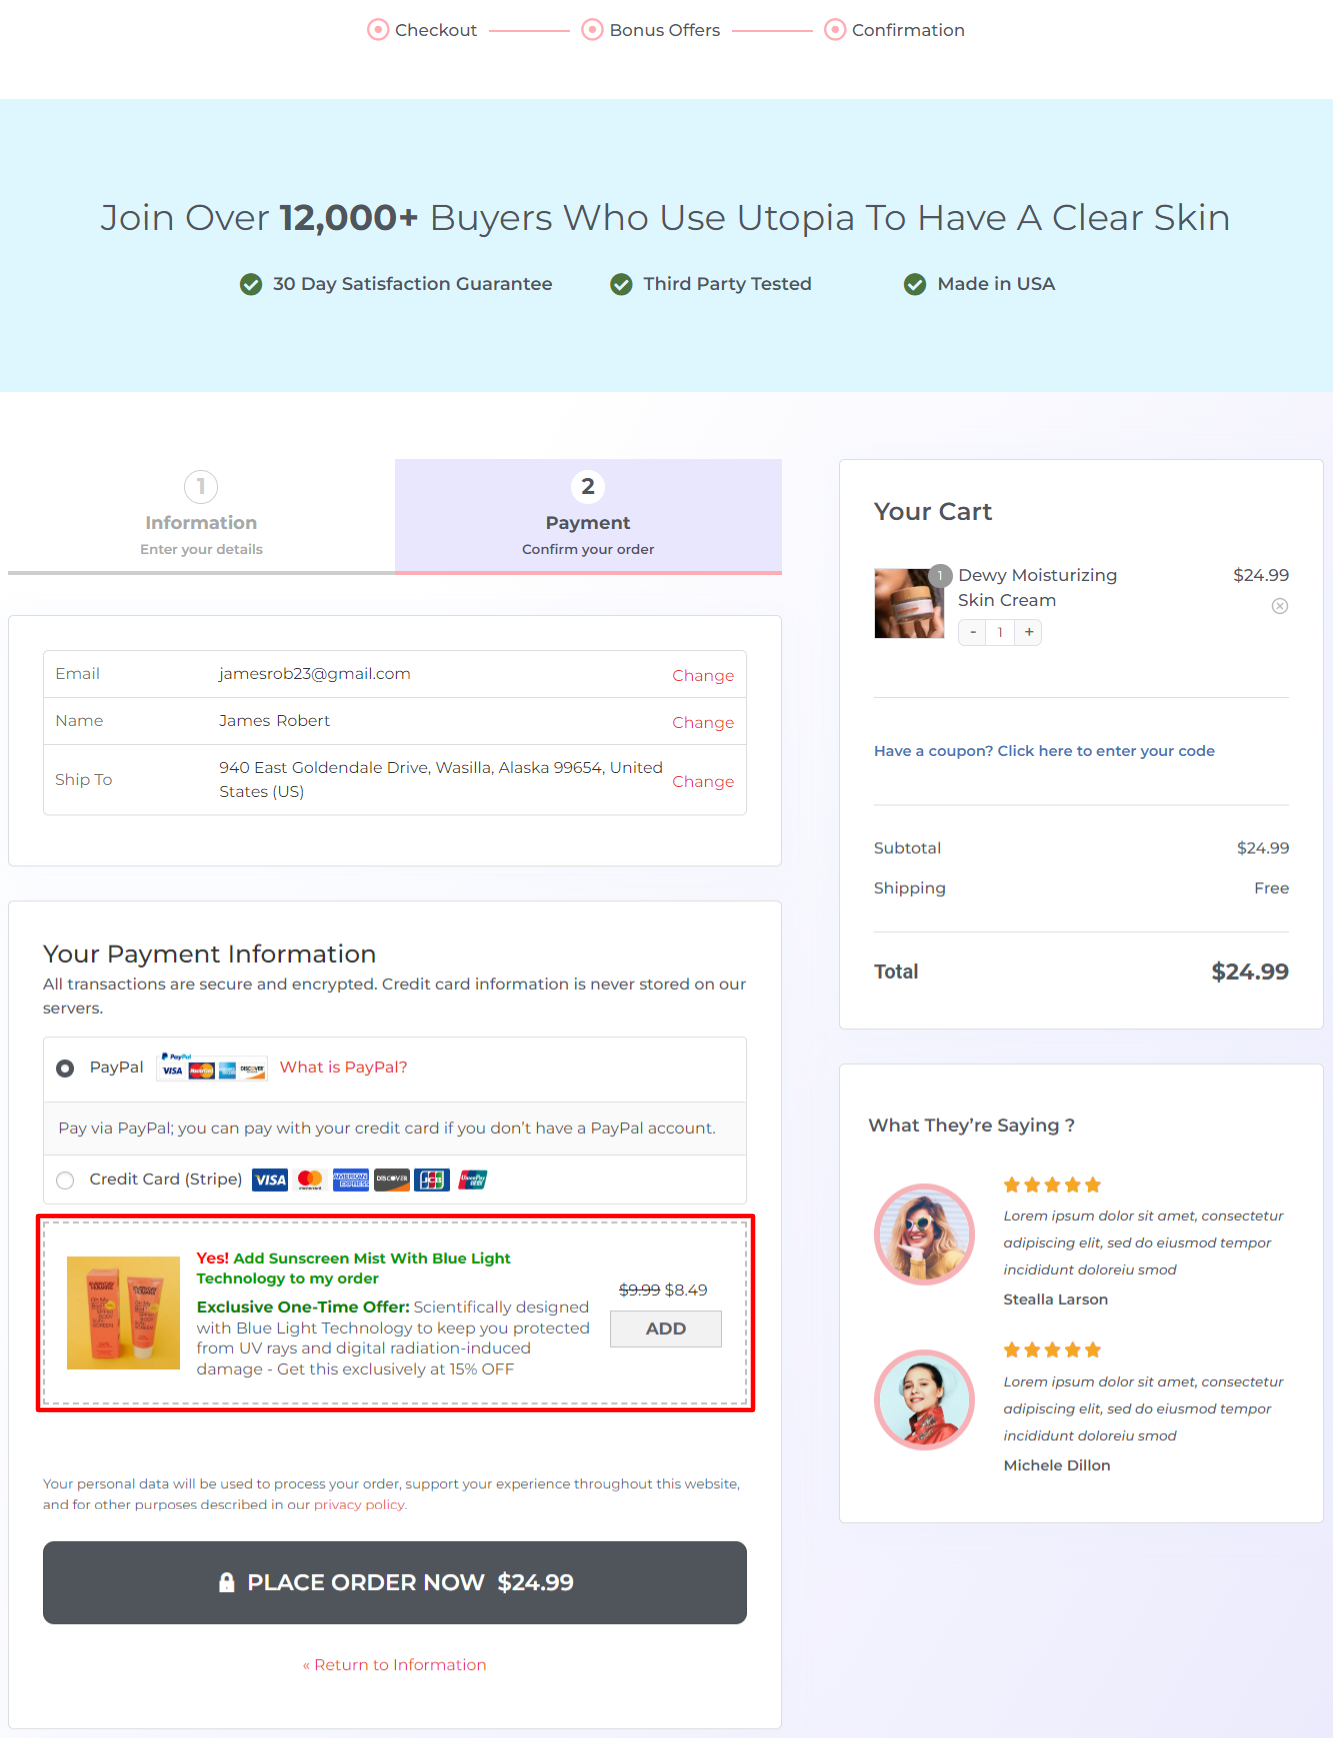
FunnelKit Funnel Builder lets you easily create compelling order bumps and offer them to your shoppers on the checkout page.
You can create order bumps based on the items in the cart, cart total, and more intuitive rules.
All you have to do is click on ‘Add Order Bump’ below the checkout on your funnel.
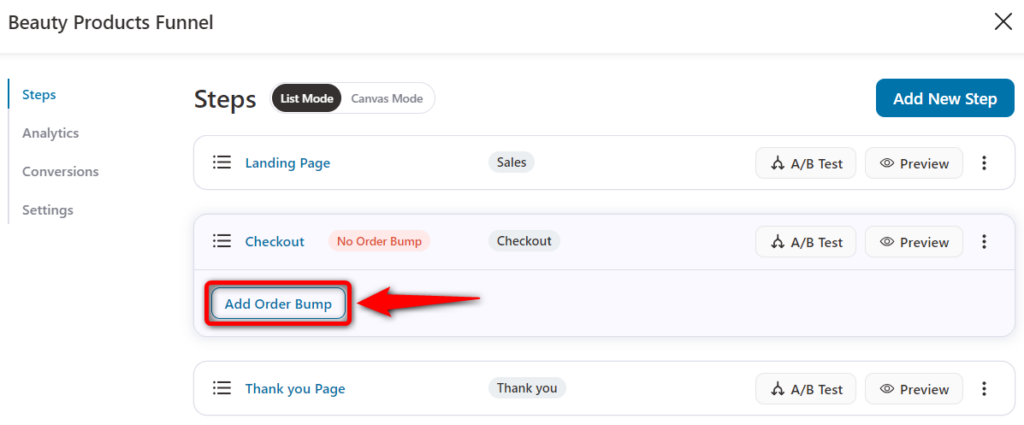
Name the order bump and import the skin you want.
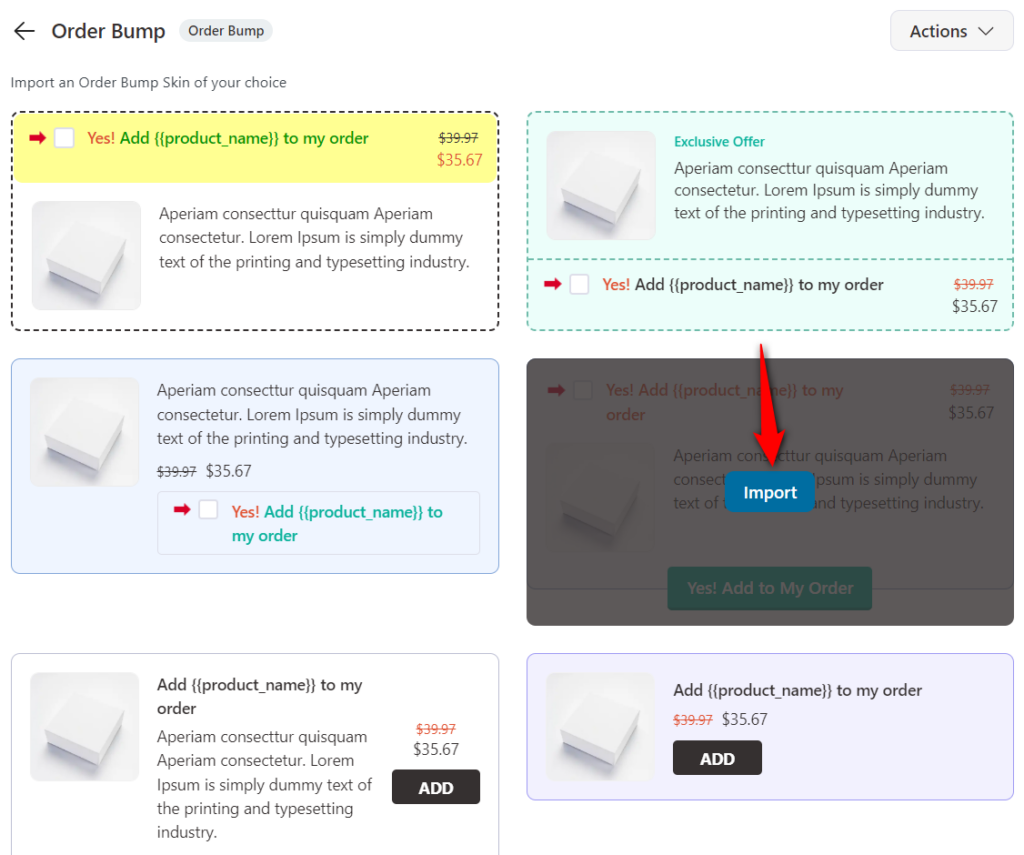
Then set the products you want to offer and give some discounts.
You can even offer variable products and configure their behavior as well as display position from the Products tab.
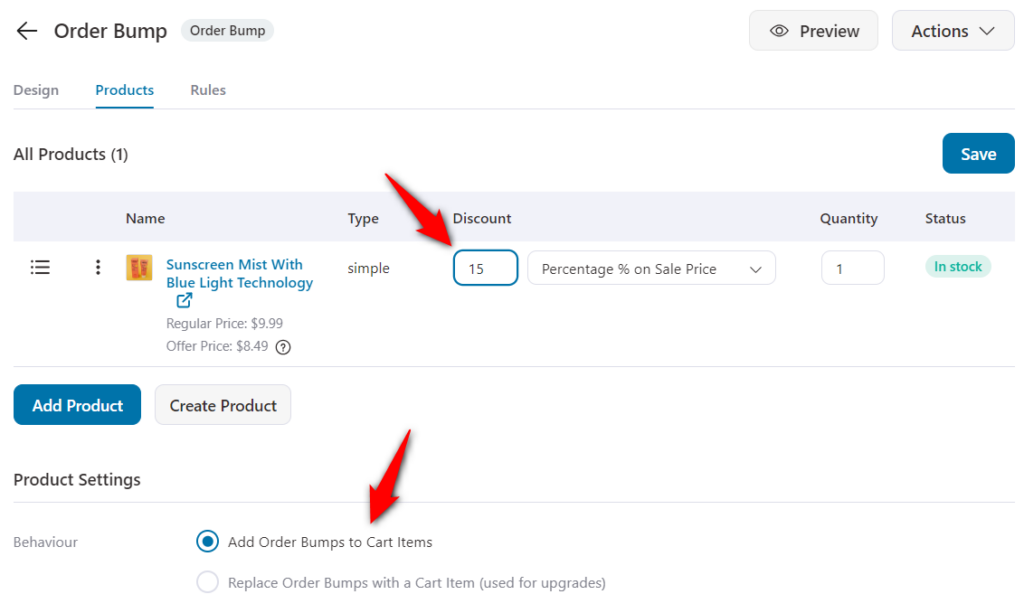
Then, design the bump section by creating an attractive copy. You also get different skins to choose from and styling options to customize it on-brand.
That's it! You're ready to display the order bump on the checkout page.
Let's move on to the next Checkout page optimization hack.
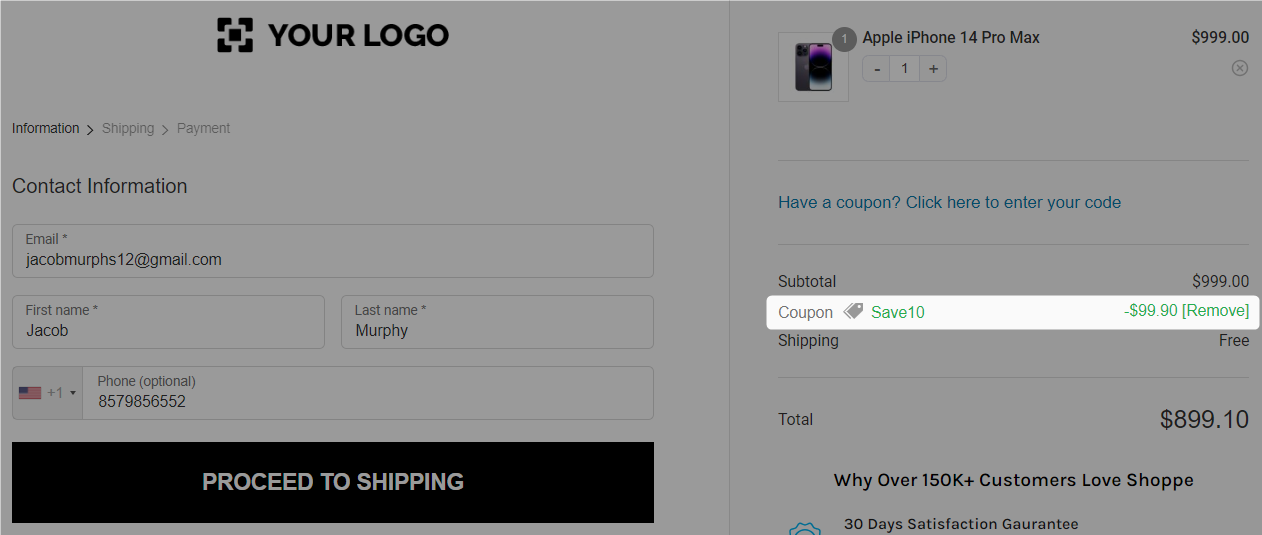
When a user sees an empty coupon field on the checkout page, it leads them to search for it everywhere on the internet.
But if you auto-apply the coupon code, you discourage people from going outside your website and show them how much they can save by completing the order.
Here’s how the coupon is automatically applied on the checkout page, and the new order total is displayed:
To set it up, you have to again go to the ‘Optimizations’ tab when editing your checkout page with FunnelKit Funnel Builder.
Next, specify the coupon code that you want to auto-apply at the checkout.
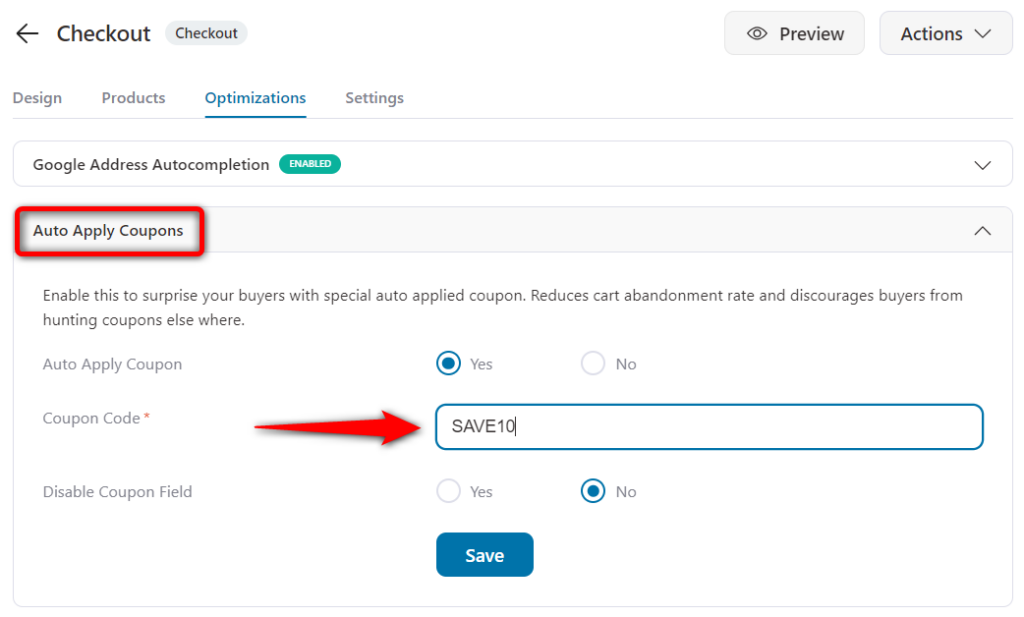
You also have the option to disable the coupon field altogether in case your store doesn’t offer coupon codes.
This WooCommerce checkout optimization hack works best for product-specific checkouts when you’re running targeted ads.
As per the study conducted by Baymard Institute, 7 out of 10 shoppers abandon the checkout process without completing the purchase.
Think of all the potential revenues you’re losing with cart abandonment.
However, you can recover these lost sales and bring your potential customers back by setting up abandoned cart emails in your WooCommerce store.
You’ll need FunnelKit Automations to set up automated checkout abandonment emails that gently remind shoppers to return to their abandoned carts and place orders.
FunnelKit Automations is a powerful marketing automation and broadcast engine for WordPress. It lets you implement personalized and targeted email campaigns that help shoppers re-engage and come back to complete their purchases.
Here are a few links to start this journey:
Building trust is crucial to instill confidence in your shoppers during the checkout process.
Therefore, displaying trust signals and security seals on the checkout helps alleviate any concerns that your customers may have regarding the security of their personal and financial information.
For that, you can make sure that your WooCommerce store has the following:
Here’s an example of security seals that make your checkout page looks authentic and secured:
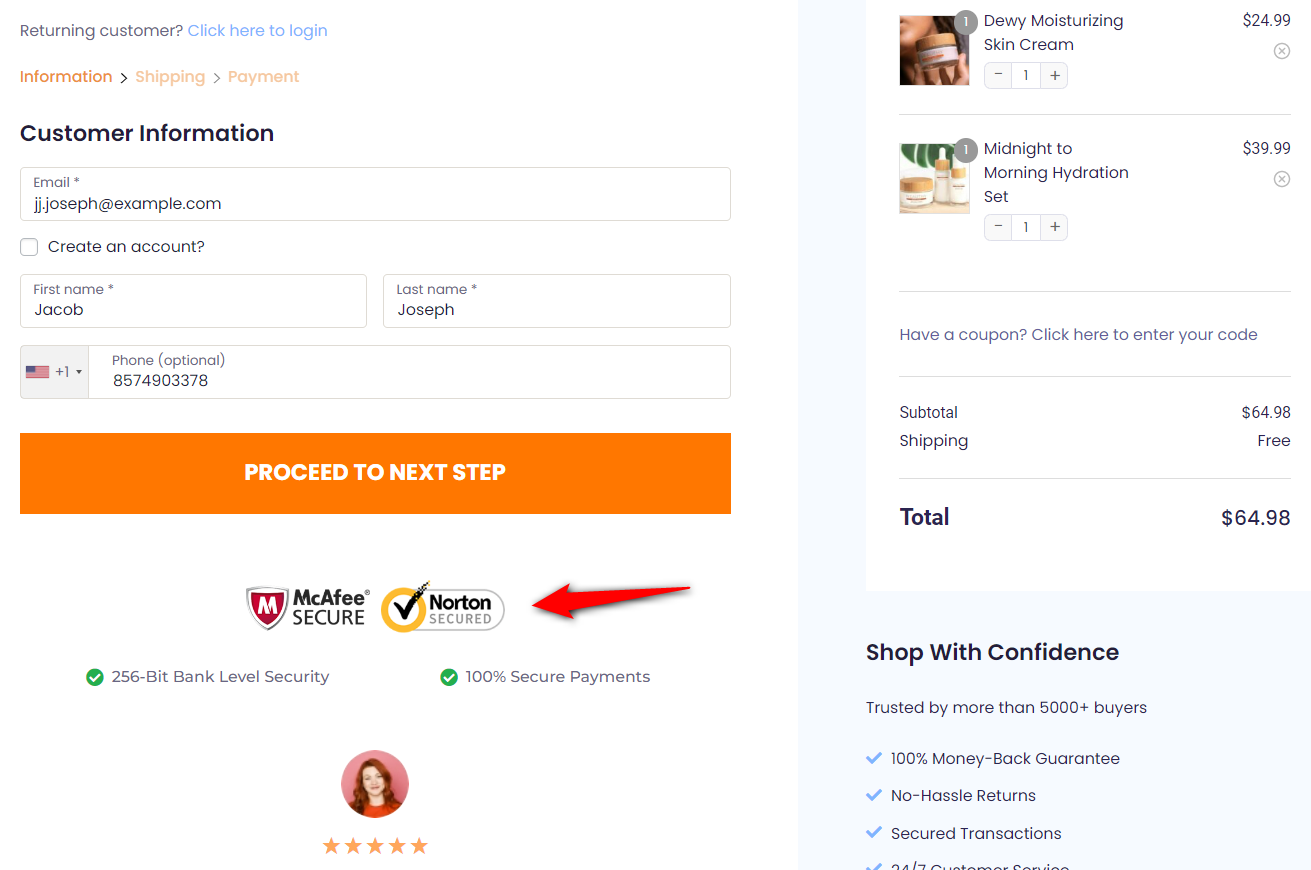
You can add the images below the payment information when customizing your checkout page in FunnelKit.
All you have to do is add an image and place it strategically:
A multi-step field preview enables users to view the information they filled out on the last step.
This way, they can cross-check the details they filled in on the previous step at the checkout form.
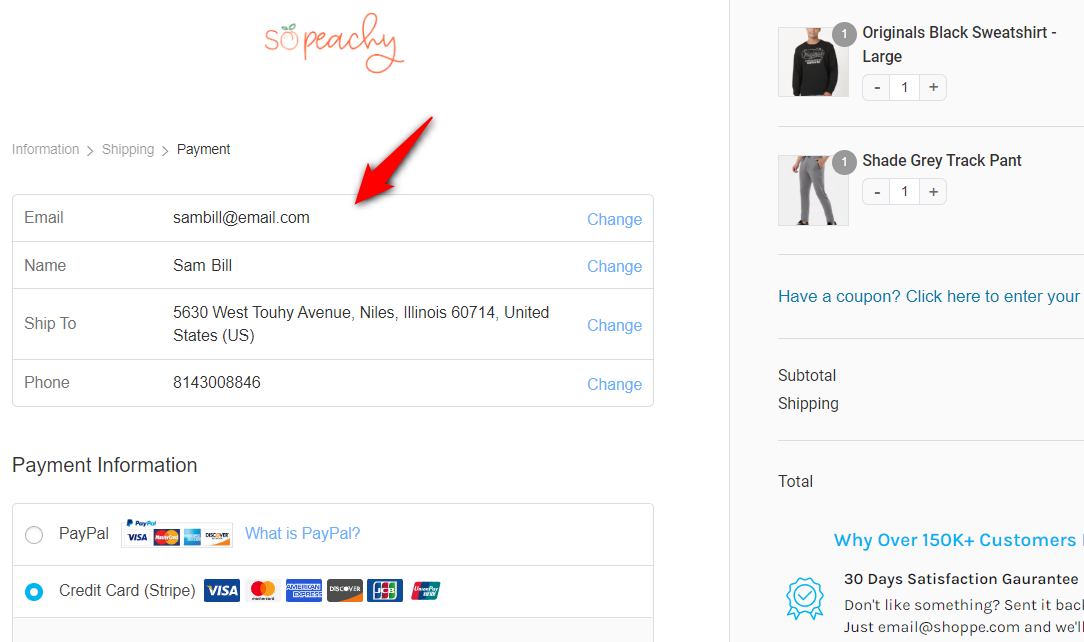
Go to the Optimizations tab and click on the ‘Multistep Field Preview’. Select the field(s) you want to show as a preview from there.

Simply check the boxes, and they'll be displayed when the user proceeds to the next steps.
Create checkout pages built to sell that one product you believe in, or it's one of your best-sellers, or maybe the item is trending.
Look at this one-page WooCommerce checkout template in FunnelKit built using Elementor:
The top section highlights the USP of the product. You can have a demo video of the product here because seeing the product in action is a great confirmation.
Plus, you can also have some bullets and reviews that are specific to that product.
You need to import a funnel template to implement this WooCommerce checkout optimization hack.
FunnelKit has a bunch of product-specific checkout page templates.
Select any of the templates and you're good to go!
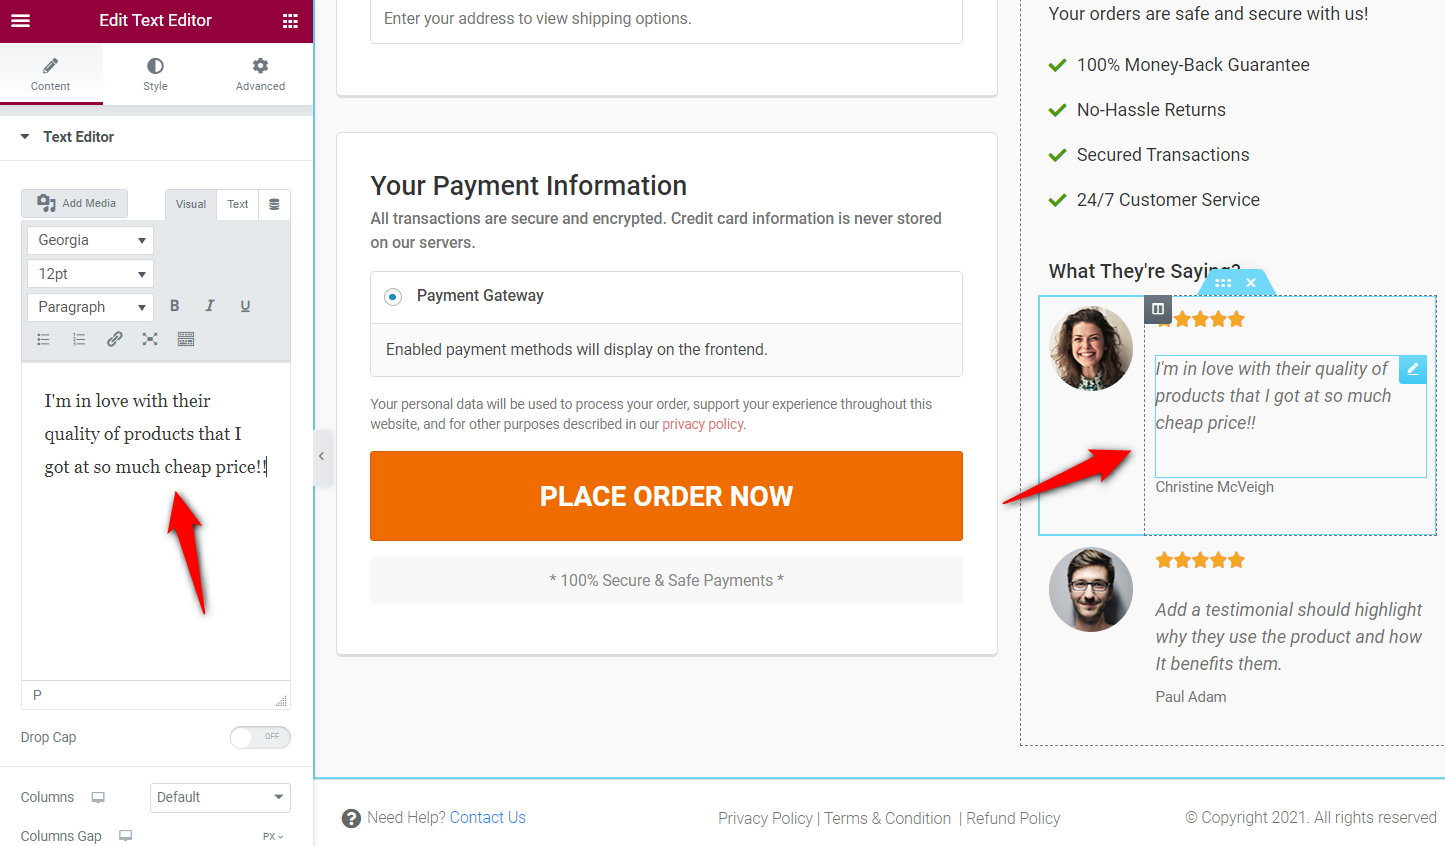
Credibility markers help build trust and encourage your shoppers to buy products from your store.
These credibility markers are sections on a checkout page like the 'Why Buy From Us' section, 'Customer Reviews/Testimonials', and more that make the page appear trustworthy.
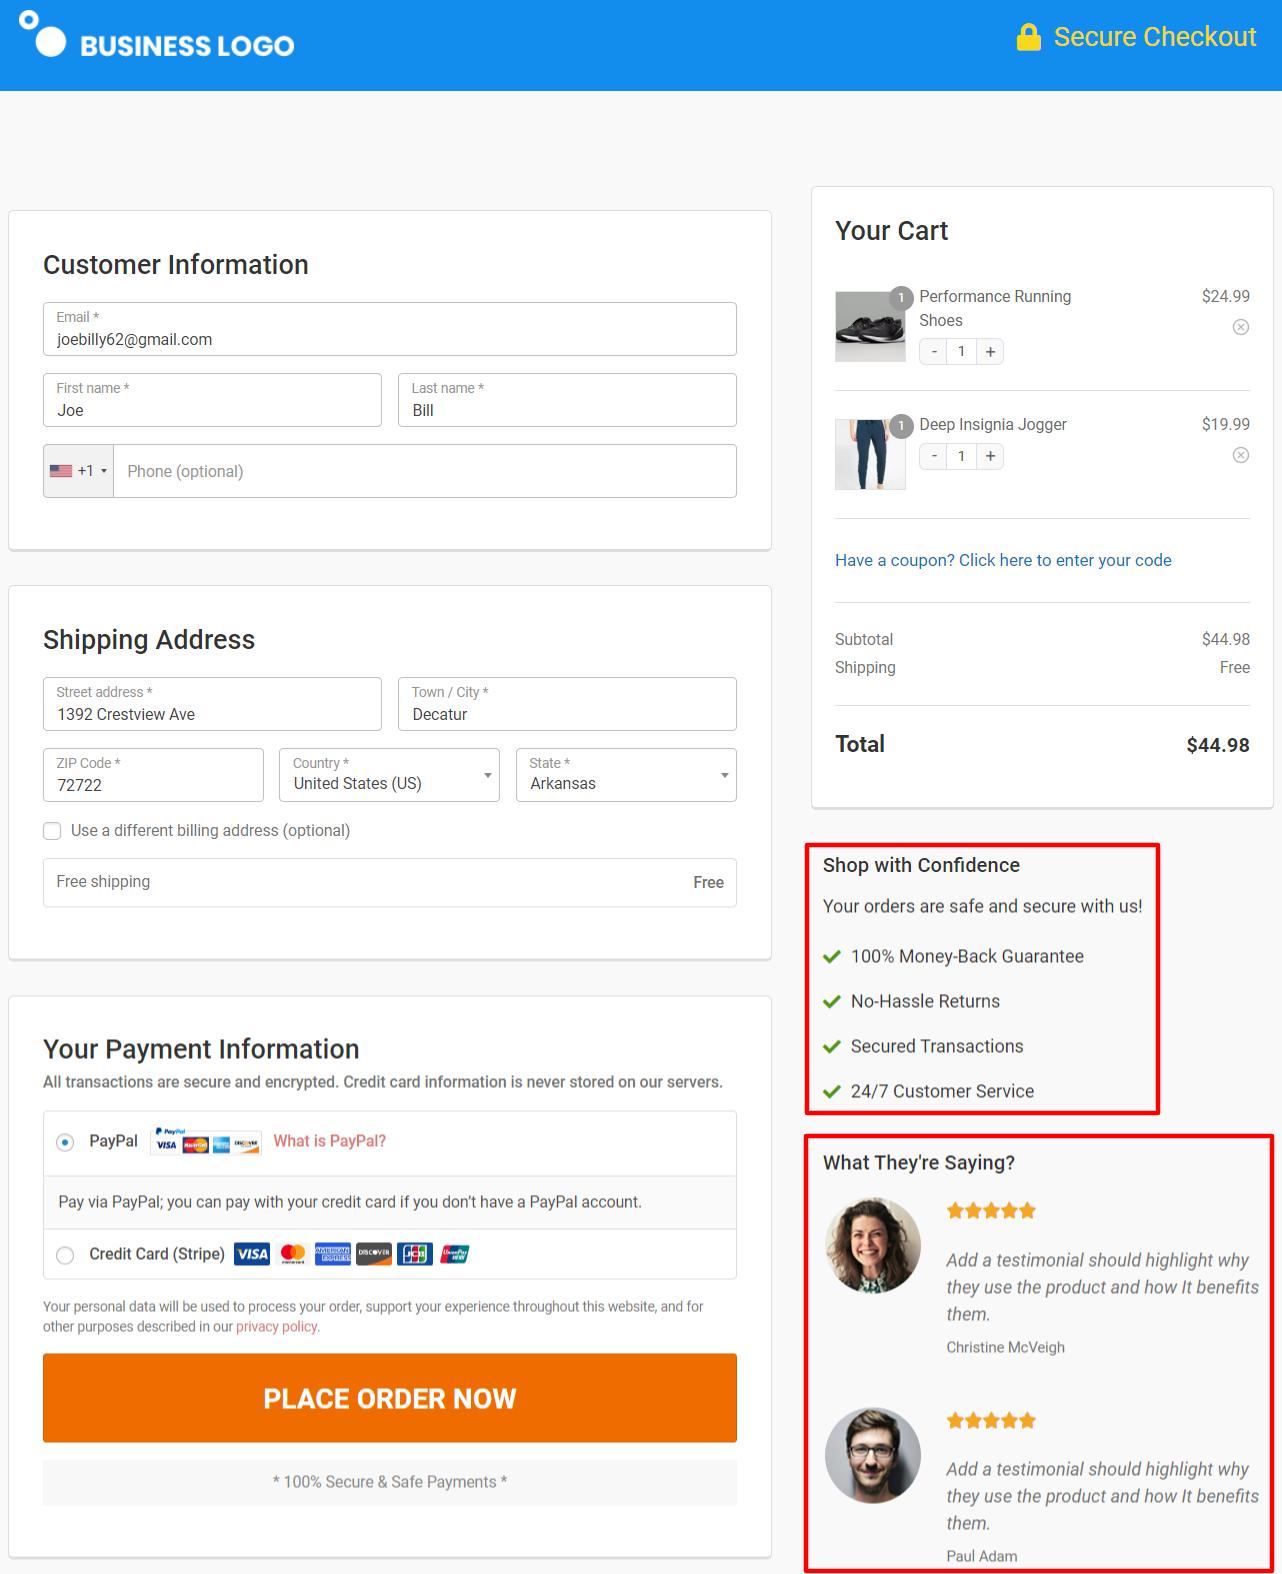
These sections put a stamp of approval on the purchase, and they confirm to the users that the decision they're making is the correct one.
The testimonials are a great Checkout page optimization hack to implement on your WooCommerce store.
The majority of templates available in FunnelKit come pre-created with benefits and testimonials sections.
You just need to edit and customize them to make them look exactly the way you want. Click on the pencil icon of the widget, and you can make the changes.
Conventionally, a user has to go back to the cart page to adjust the quantity of a product or delete an item.
But now you can provide a mini cart section on the checkout page using FunnelKit. It allows users to change the quantity of cart items and delete or even recover them.
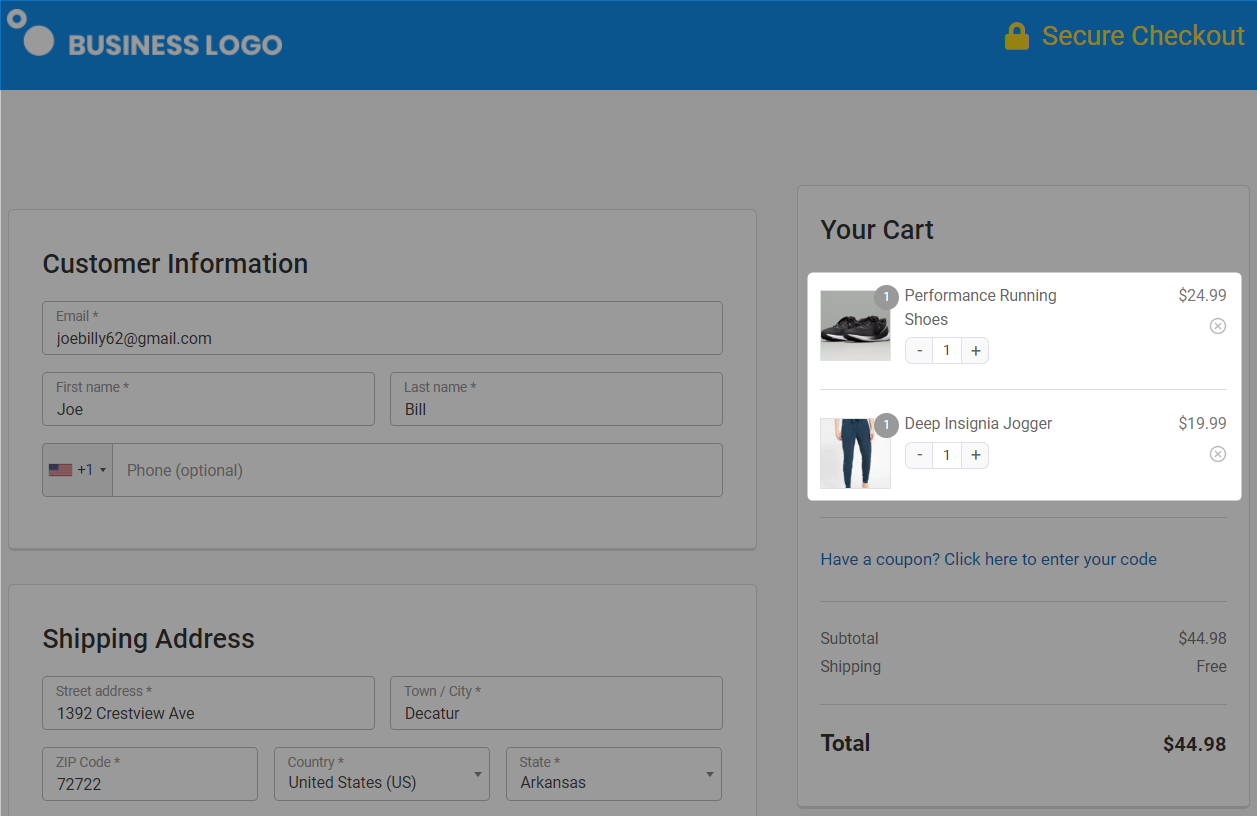
It’s easy to set it up - enable the option of quantity switcher and allow deletion when customizing the checkout page with a page builder.
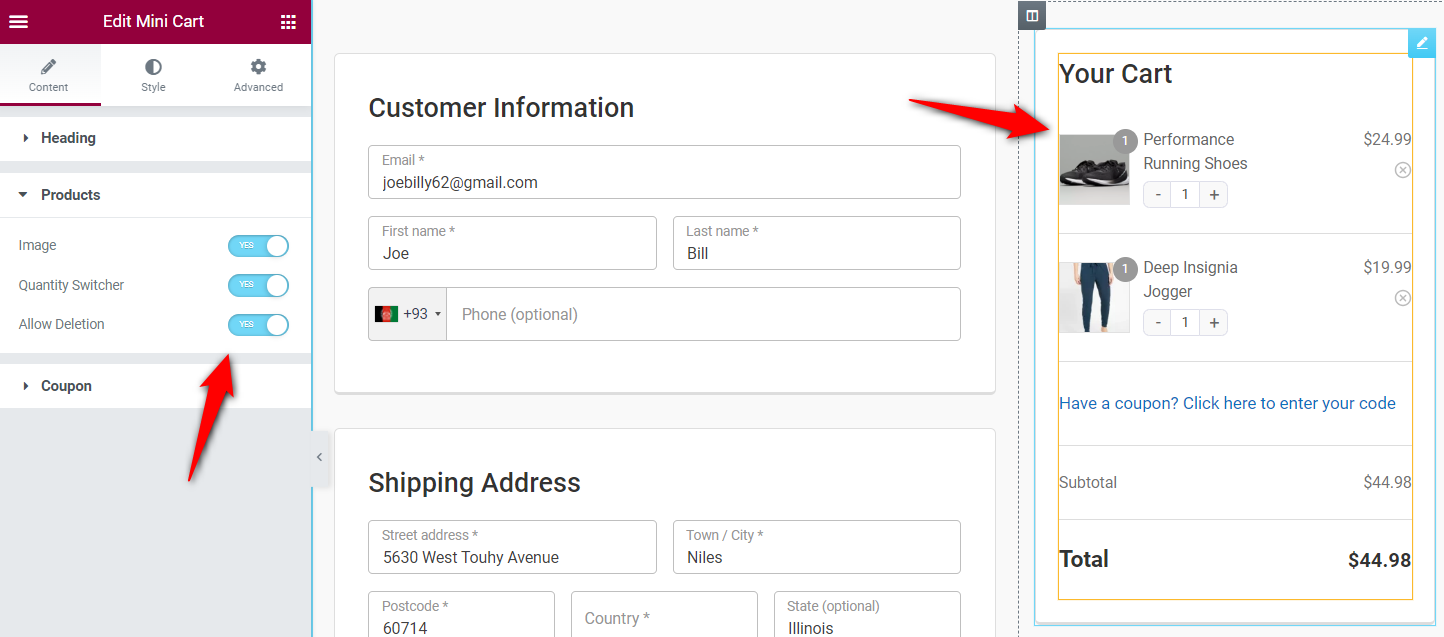
That's it! You have enabled this impressive Checkout page optimization technique!
Research by Baymard shows that websites with fewer form fields have higher conversions.
In the majority of cases, people have the same shipping and billing address. So make sure you place the shipping field before the billing field.
Once the user has filled out the shipping address, they can tick the box to enter a separate billing address:
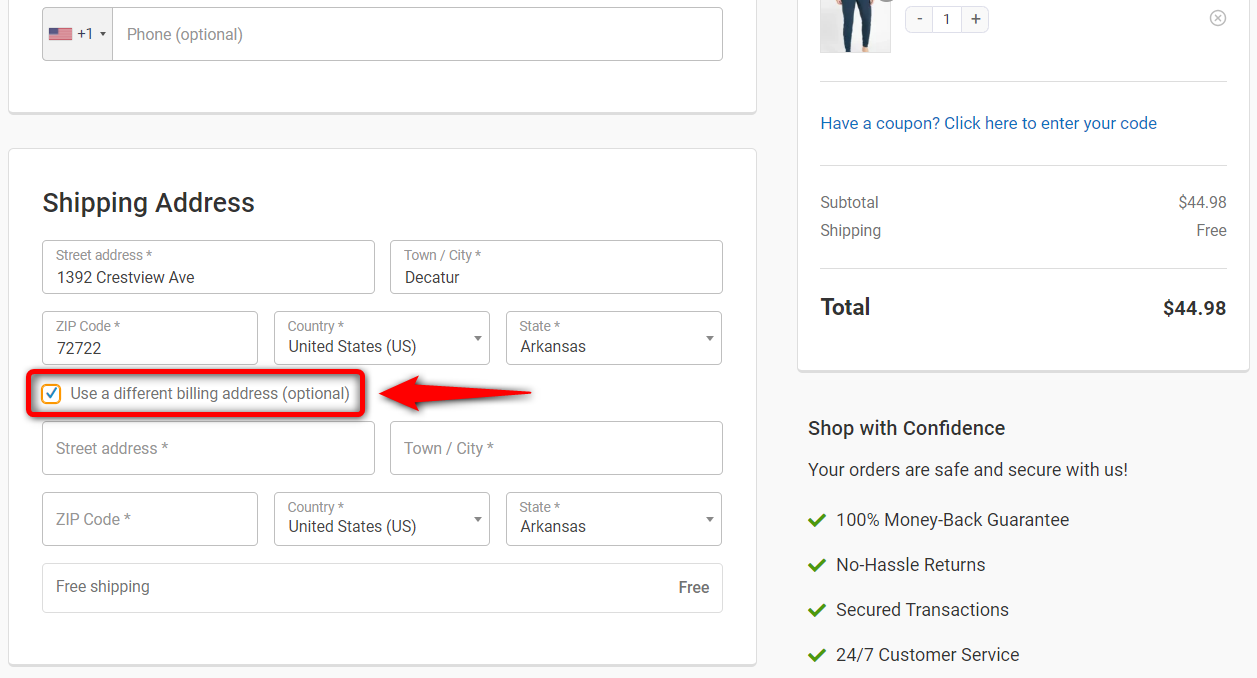
This is another checkout page optimization hack for making the process frictionless.
To set it up, go to the ‘Fields’ tab in checkout and place the ‘Shipping Address’ field next to the ‘Billing Address’ field.
Next, click on the pencil icon to edit the billing address field. And turn the visibility ON for the ‘Use a different billing address’ option.
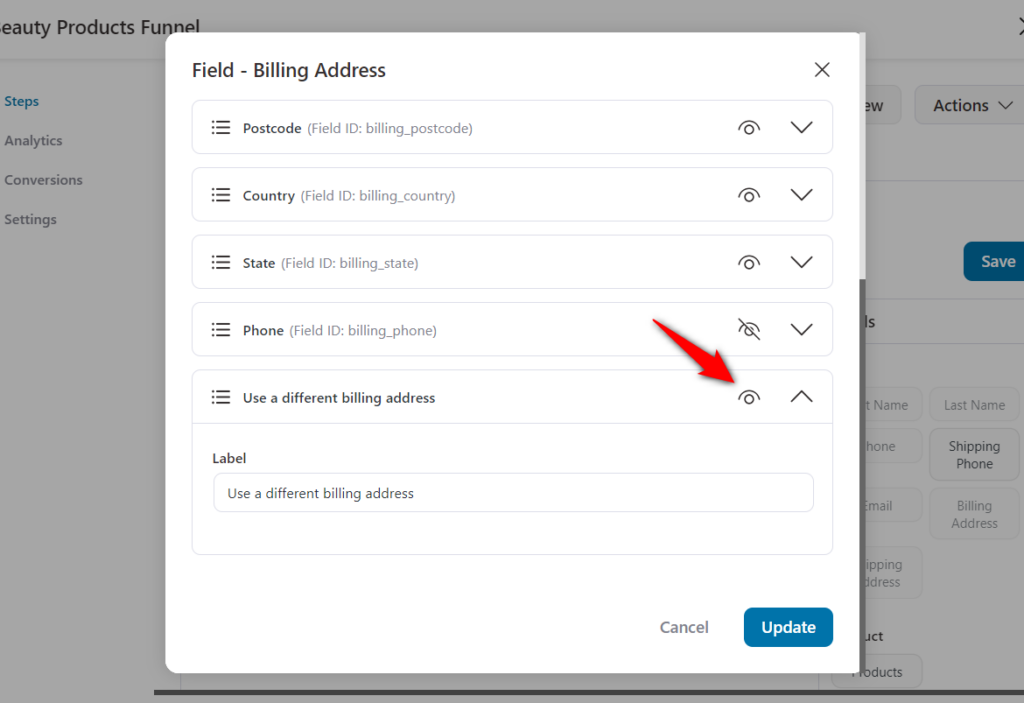
Make sure to save the changes.
Let's say you are launching some exclusive products.
And you would like them to be available for a specified period, after which the product won't be available for sale. Or maybe the discount is time-bound to create a sense of urgency.
So you can create a dedicated checkout page and set its expiry.
Once the page expires, you can direct them to a page saying, 'Sorry! Time-out' or 'You snooze, you lose!'.
This WooCommerce checkout page optimization works perfectly every time!
Go to the FunnelKit Checkout settings page and you’ll get two options:
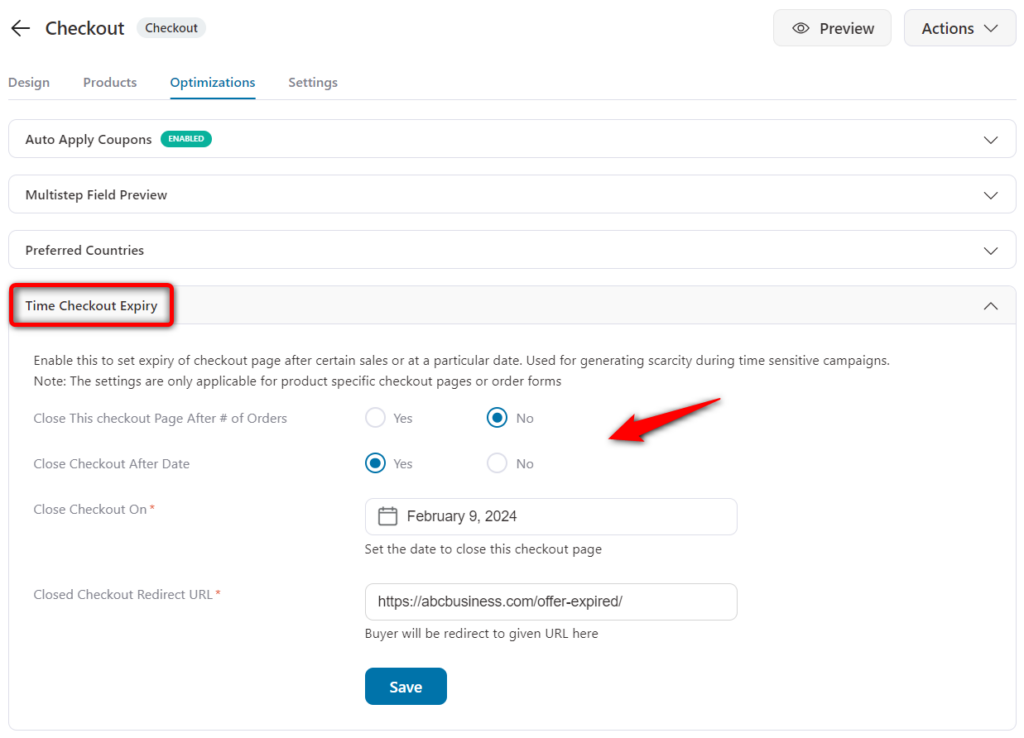
Enable one of the options by clicking on ‘Yes.’
Choose from one of the available options and provide a redirect URL. That's the URL your visitors will be sent to if they visit the checkout page after the offer has expired.
With a massive rise in the traffic of mobile shoppers, it’s important that you optimize your WooCommerce store, including the checkout page for the device.
Your main priority should be to customize the checkout page for mobile devices. For that, you can select the mobile view from the responsive mode and optimize the experience for your shoppers.
Once that’s done, here are two optimizations you can do:
Make the CTA button sticky on mobile
A sticky CTA button saves space on the mobile device. The user does not have to scroll to the bottom of the page to find the place order button.
When customizing the page, you can set it up by clicking on the ‘Checkout Form’ widget built by FunnelKit.
Here you'll find the option to make the button sticky on mobile.
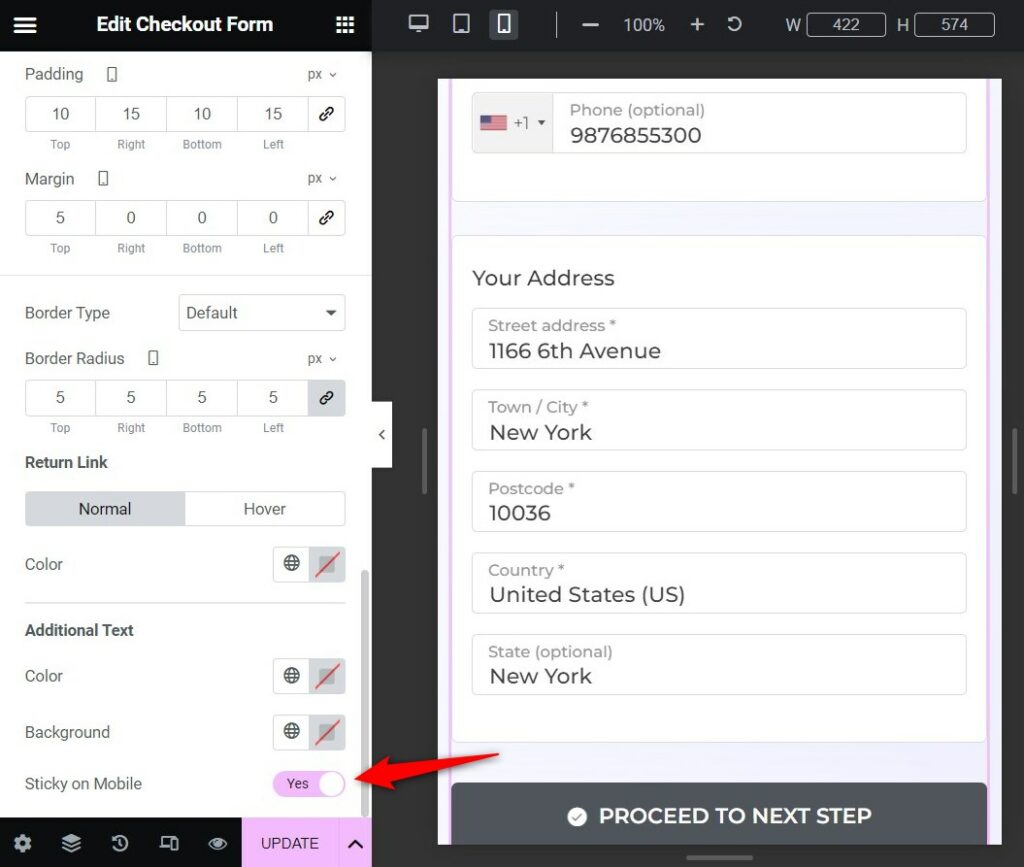
You can also set the button color, label, padding, margins, and even add a privacy statement below the button.
Make the order summary collapsible for mobile
By making the order summary collapsible on mobile, you can conserve the space well.
When the user taps on it, they'll see the full breakdown, and then they can collapse it back:
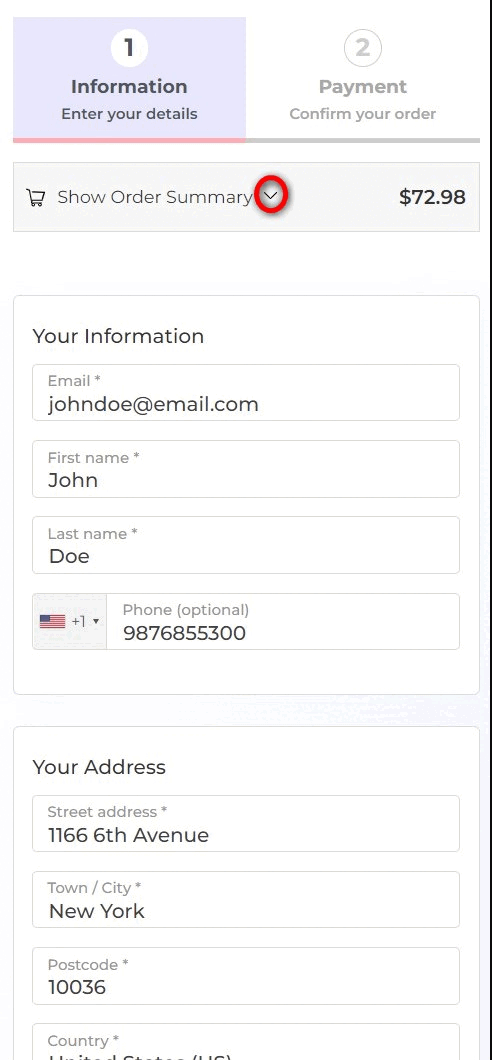
To set this Checkout page optimization hack in Elementor, go to the widget - 'Checkout Form' and edit it.
Here you’ll see the option to make the Order Summary collapsible:

Exit-intent popups aim to retain the attention of shoppers who are about to leave the checkout without completing their orders.
Your popup should attract the attention of your shoppers. Once you have their attention, the next thing you should do is give them a reason not to exit the checkout page.
You can offer some lucrative discounts, free shipping, create a sense of urgency, free gifts, etc.
To set up exit-intent popups, you can use OptinMonster.
OptinMonster is one of the most powerful conversion optimization tools that will help you retain your shoppers and boost conversions in your WooCommerce store.
You’ll be able to create exit-intent popups, floating bars, scroll boxes, gamified wheels, and more. Plus, it lets you show personalized offers to your visitors at the right time.
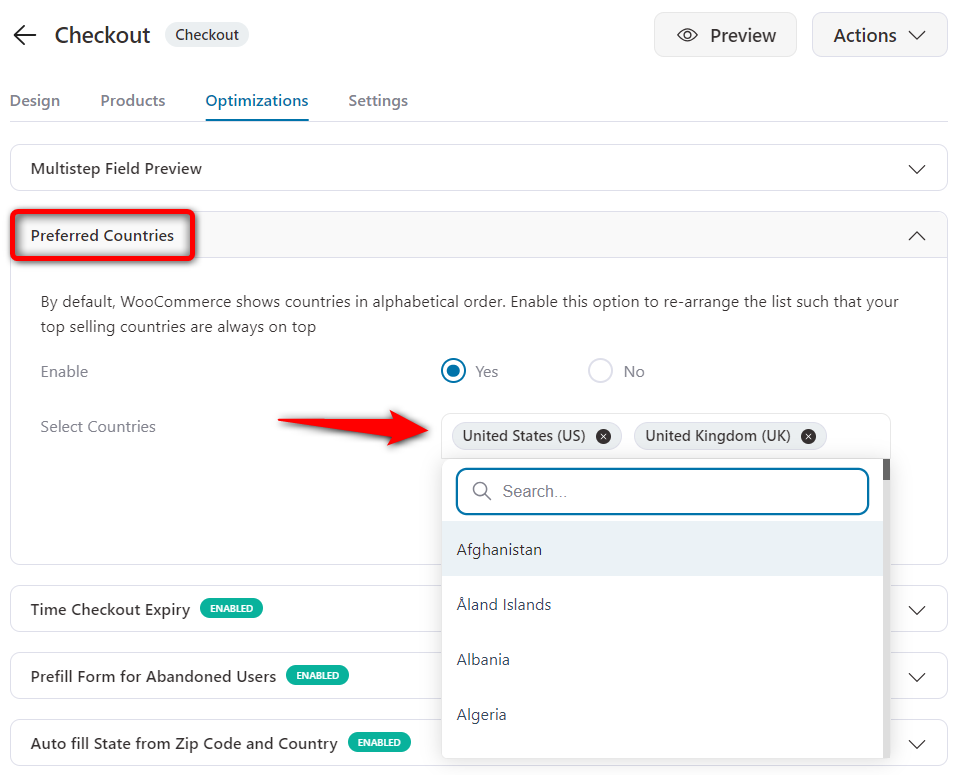
Ever had to scroll multiple times while finding your country in a drop-down? It’s time taking, isn’t it?
This great WooCommerce checkout optimization hack lets you make your top-selling countries appear at the top of the list so that most of your visitors can easily pick from it.
The user sees a mini list of countries at the top and the remaining follow in alphabetical order.
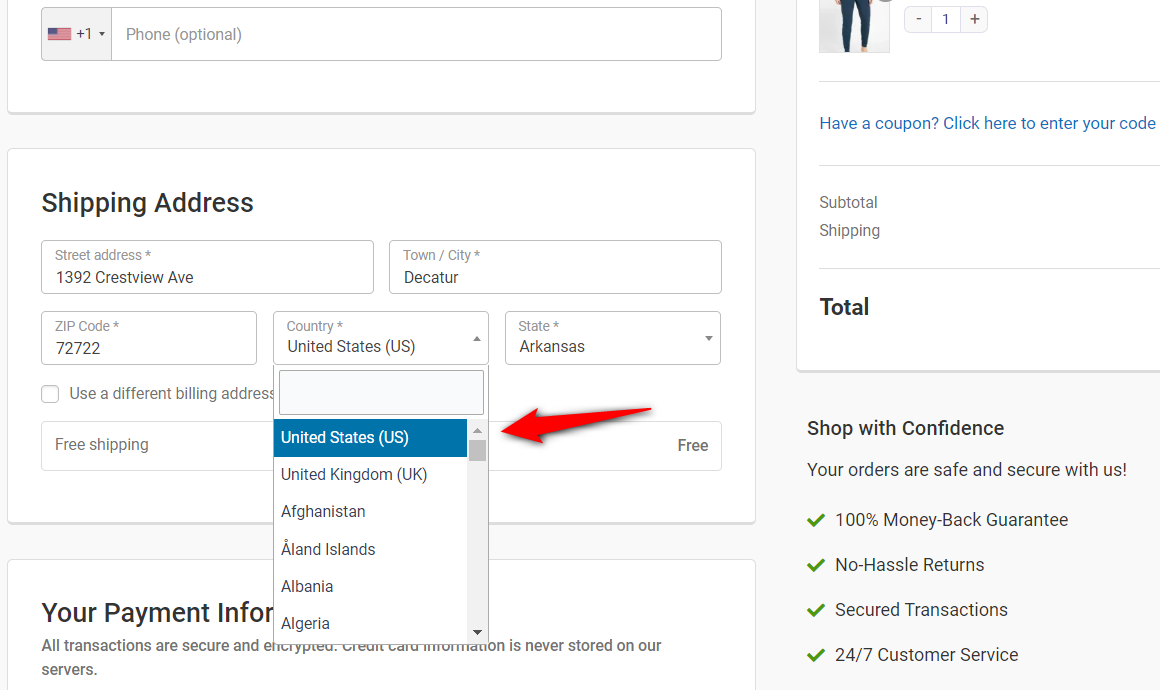
To set it up, you can enable the ‘Preferred Counties’ option under the Optimizations tab.
Then, select the list of countries that you want to show at the top.
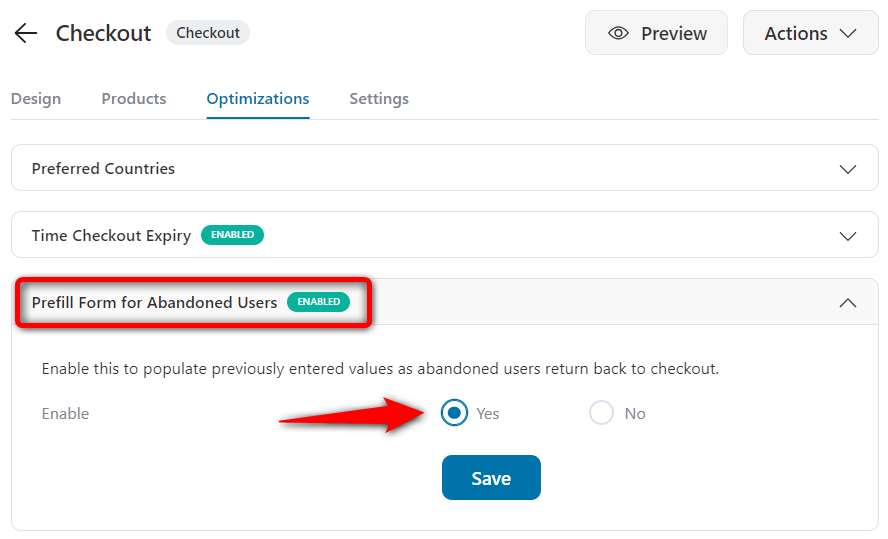
If your users return after abandoning the checkout, you can show them pre-filled fields with the information they previously entered.
This tells them there's not much they have to do on the checkout page and can fill in the remaining details to complete the process.
When a returning user lands on the checkout page again, the data they had entered is present. It’s only the case when they visit again from the same device.
You can enable this feature by going to the Optimization tab and hitting the ‘Yes’ button below the ‘Prefill Form for Abandoned Users’ option.
Your checkout page must inspire trust and confidence. It must not overwhelm users by asking for too much information.
That’s why splitting the form into multiple steps makes it look approachable and clean.
And express checkout does reduce the time spent on the checkout page hence leading to higher conversions.
Adding multiple payment options with an auto-fill address feature works like a breeze for a seamless checkout.
So go ahead and start implementing checkout page optimization hacks that you like and implement them.
We’re quite confident you'll start noticing an instant jump in conversions!